
Most software rollouts in real estate fail quietly. The vendor gets paid, the brokerage claims a win, and six months later, 90% of agents are back to using their old spreadsheets. The core failure is treating onboarding as a training issue. It is an engineering problem rooted in data integrity, access control, and faulty automation logic. If an agent cannot log in and see their active client list within 30 seconds, they will never return.
This is not a guide about welcome emails or training webinars. This is a technical breakdown of how to architect a software transition that prevents user abandonment from day one. We will focus on data migration, identity management, and post-launch validation. Get these wrong, and nothing else matters.
Phase 1: The Pre-Migration Data Audit
Legacy systems are data swamps. Before you migrate a single record, you must perform a brutal audit of the source data. The goal is not to preserve every piece of historical information. The goal is to identify and transfer only the data that is operationally critical for an agent on their first day. Anything else is noise that introduces risk.
Your audit must define a rigid data schema for the new system. Map every field from the old CRM to the new one. Identify fields that require transformation, like concatenating “First Name” and “Last Name” into a “Full Name” field. Any field without a clean one-to-one mapping should be flagged for archival, not migration. Treating legacy data migration like a simple copy-paste is like trying to connect two different plumbing systems with duct tape. You are guaranteed a leak.
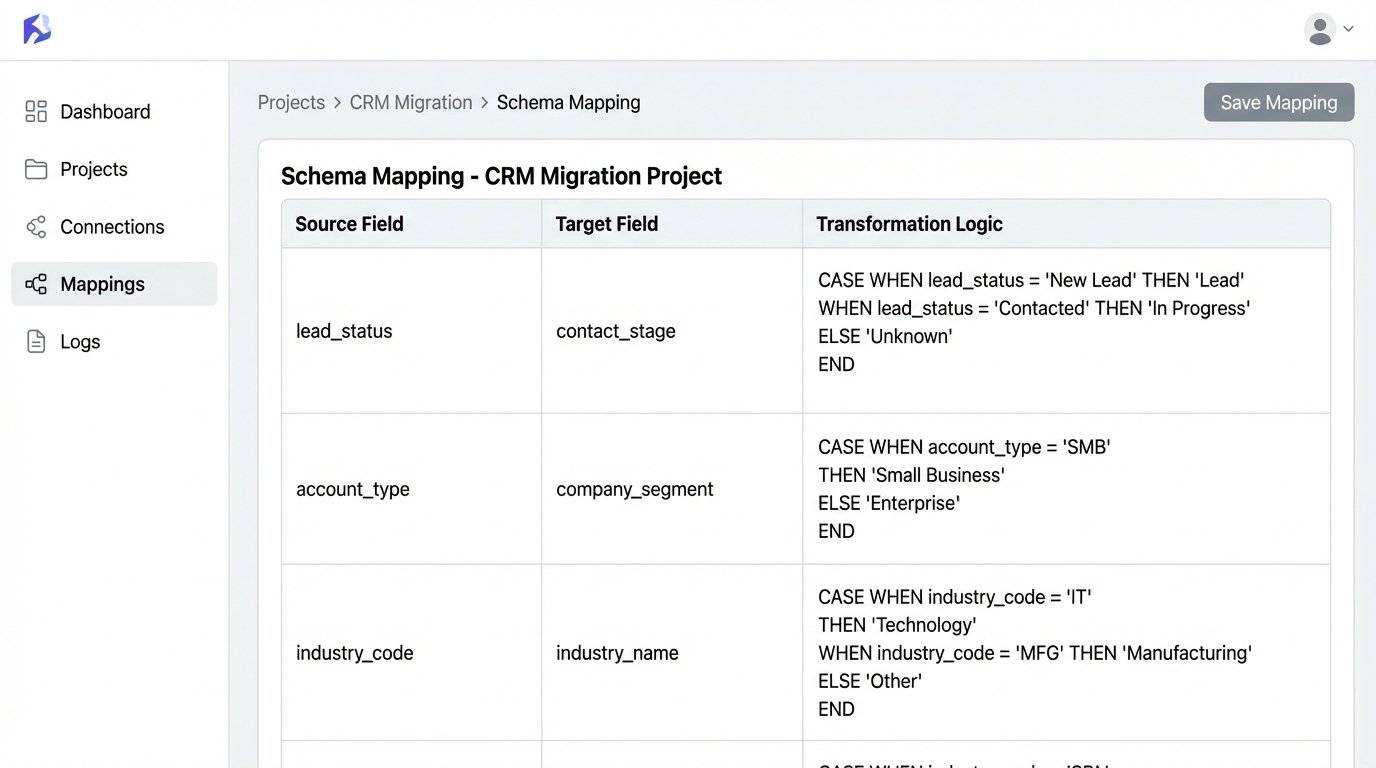
Executing The Schema Map
Start with the core objects: Contacts, Properties, and Transactions. For each object, create a mapping document. This is not a high-level flowchart. It is a granular specification that dictates data types, character limits, and validation rules. For example, a “Status” field might have ten variants in the old system but only five in the new one. Your mapping must explicitly define how to collapse those legacy statuses into the new, approved set.
- Source Field: contact_status
- Source Values: “New Lead”, “Contacted”, “Prospect”, “Nurturing”, “Client_Active”
- Target Field: contact.stage
- Target Values: “Lead”, “Opportunity”, “Client”
- Transformation Logic: CASE WHEN source IN (‘New Lead’, ‘Contacted’) THEN ‘Lead’ WHEN source IN (‘Prospect’, ‘Nurturing’) THEN ‘Opportunity’ ELSE ‘Client’ END
Failure to script these transformations guarantees data corruption. Manual cleanup post-migration is a fantasy that never works at scale.
Phase 2: Scripting The Data Transfer
Never use the built-in CSV import tool for your primary data migration. These tools are fragile, offer zero error handling, and fail silently. A production-grade migration requires direct API access. You must write scripts that pull data from the old system’s database or API, transform it according to your schema map, and then push it into the new system’s API, record by record.
This approach gives you granular control. You can log every successful and failed request. If an agent’s contact list fails to transfer, your logs should pinpoint the exact record and the API’s error response. A CSV import just tells you “failed on row 5,432” with no context, leaving you blind.
A Minimal Viable Migration Script
A simple Python script using the `requests` library can handle this. The script reads a clean CSV export from the old system, iterates through each row, formats a JSON payload, and POSTs it to the new software’s `contacts` endpoint. It checks the HTTP status code of the response to verify success.
This is a bare-bones example. A real script would include rate-limiting logic to avoid overloading the API, more sophisticated error logging, and functions to handle data transformations. But it demonstrates the core principle: programmatic control over the data flow.
import requests

import json

import csv

import time
API_KEY = 'YOUR_SECRET_API_KEY'
API_ENDPOINT = 'https://api.newrealestatesoftware.com/v1/contacts'
HEADERS = {
'Authorization': f'Bearer {API_KEY}',
'Content-Type': 'application/json'
}
def create_contact(contact_data):
payload = {
"name": contact_data['FirstName'] + ' ' + contact_data['LastName'],
"email": contact_data['Email'],
"phone": contact_data['Phone'],
"status": "active" # Example of forcing a default value
}
try:
response = requests.post(API_ENDPOINT, headers=HEADERS, data=json.dumps(payload))
if response.status_code == 201:
print(f"SUCCESS: Created contact for {payload['email']}")
return True
else:
print(f"ERROR: Failed to create contact for {payload['email']}. Status: {response.status_code}, Response: {response.text}")
return False
except requests.exceptions.RequestException as e:
print(f"FATAL: Network error for {payload['email']}: {e}")
return False
with open('legacy_contacts.csv', mode='r') as infile:
reader = csv.DictReader(infile)
for row in reader:
create_contact(row)
time.sleep(0.5) # Basic rate limiting
This script gives you something a CSV importer never will: a detailed log of exactly what worked and what broke.
Phase 3: Forcing Adoption Through Identity Management
The single biggest point of failure is the login screen. If an agent has to remember another password, they will default to what they already know. The solution is to eliminate the password entirely by implementing Single Sign-On (SSO) with your company’s existing identity provider, like Google Workspace or Microsoft 365.
Configuring SSO is not a user-facing task. It involves exchanging metadata files, configuring assertion attributes, and setting up a trust relationship between your identity provider (IdP) and the new software (the Service Provider or SP). The goal is to make the new software a one-click tile in the agent’s existing application dashboard. No login page, no “forgot password” links.
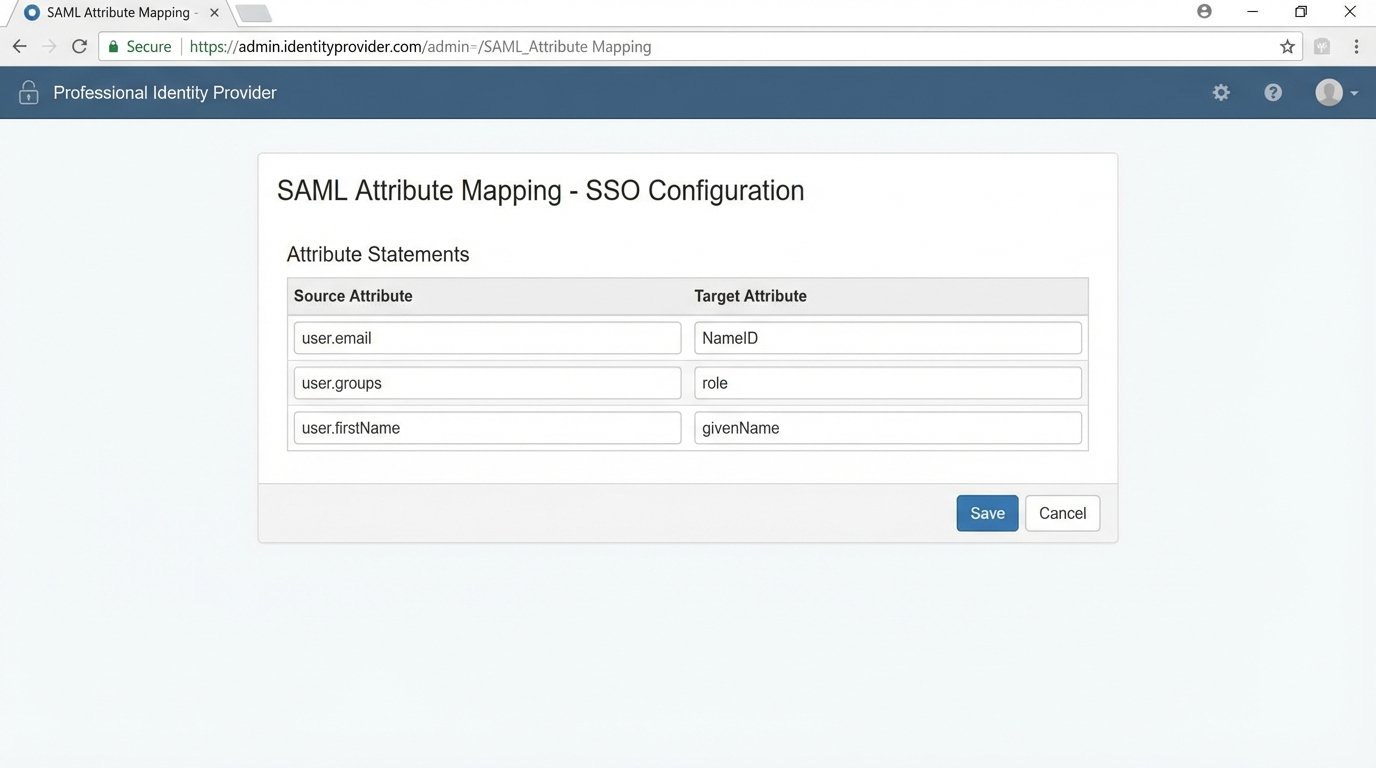
Key SSO Configuration Points
When you set up the SAML or OIDC connection, you must map user attributes correctly. The “NameID” attribute must map to a unique, immutable identifier for the agent, usually their email address. You also need to pass attributes for their first name, last name, and role. If you misconfigure the role attribute, you could accidentally provision every agent with admin permissions, which is a catastrophic security failure.
The technical lift here is moderate, but the payoff is massive. It removes the primary source of user friction and centralizes access control within your existing security infrastructure. Giving agents an 80-page PDF manual is like handing someone a dictionary and telling them to learn Spanish by Friday. It is an exercise in futility. SSO bypasses the entire problem.
Phase 4: Post-Launch Technical Validation
The moment you go live, your work begins. You need automated checks to validate that the system is functioning as designed. Hope is not a strategy. You need scripts that run on a schedule to confirm the health of the new environment.
These checks should be automated and report their status to a central dashboard or a dedicated Slack channel. The goal is to find problems before the agents do. An agent who reports a bug on day one is an agent who has already lost confidence in the platform.
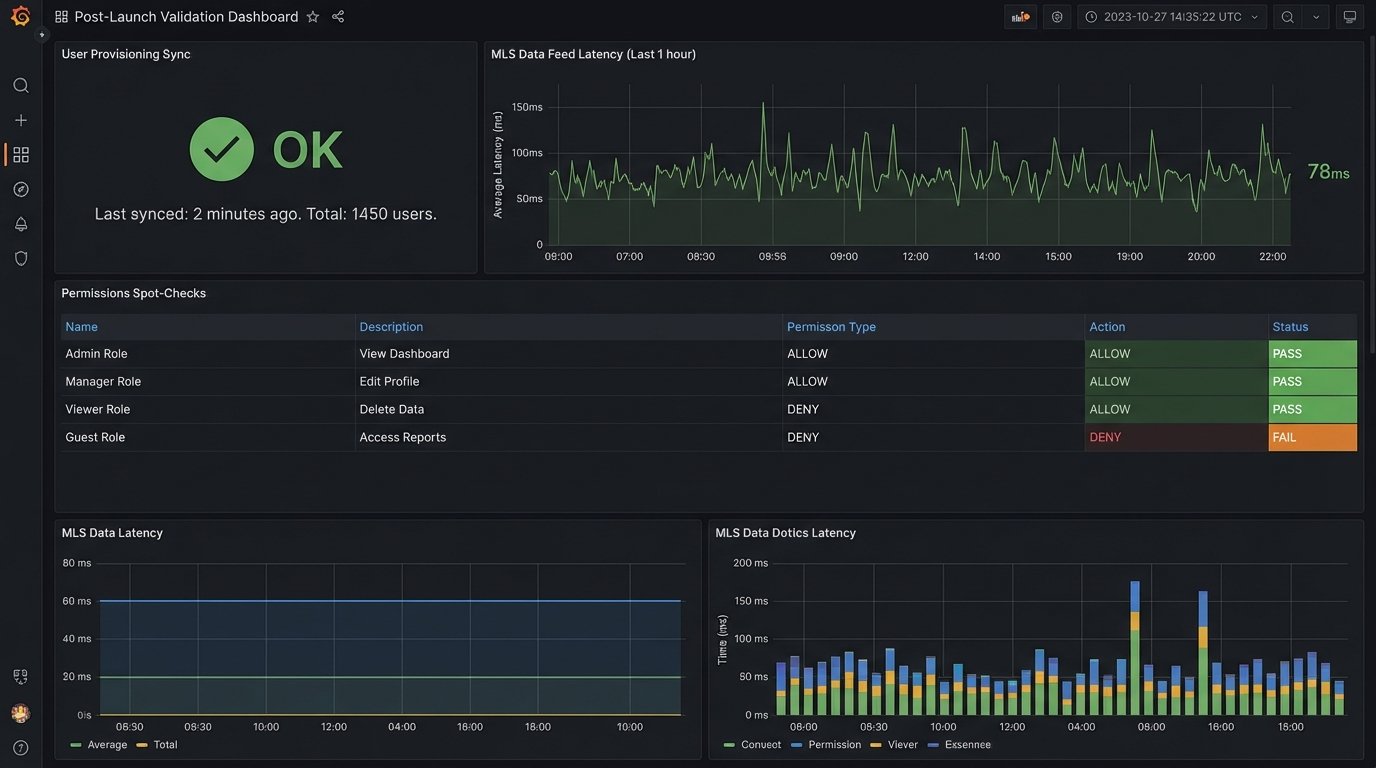
Essential Validation Checks
- Account Provisioning Check: Write a script that queries the new software’s user API and compares the list of active users against your brokerage’s official roster from your IdP or HR system. Flag any discrepancies immediately.
- Data Sync Integrity: If the software integrates with an MLS feed, you need to monitor that connection. A simple check could query the API for the timestamp of the last successful MLS sync. If that timestamp is more than an hour old, fire an alert.
- Permissions Spot-Check: Your validation scripts should programmatically attempt to access certain records using the API keys of different user roles. A standard agent account should receive a 403 Forbidden error when trying to access brokerage-level financial reports. Confirming this logic is not optional.
These are not one-time checks. They are continuous monitors that act as the immune system for your new software stack. They assume failure is inevitable and are built to detect it quickly.
Phase 5: Architecting for Long-Term Maintenance
Onboarding does not end after the first week. The system will drift out of alignment as agents join and leave the brokerage and as the software vendor pushes updates. Your job is to build an architecture that absorbs these changes with minimal manual intervention.
The key is to automate de-provisioning just as rigorously as you automate provisioning. When an agent leaves, their access must be revoked instantly and their data re-assigned or archived according to a strict policy. This is typically handled via webhooks from your IdP. When a user is suspended or deleted in Google Workspace, a webhook fires, triggering a script that deactivates their account in the real estate software and reassigns their contacts to the office manager.
Building this de-provisioning workflow prevents orphaned data and closes major security holes. An ex-agent with access to your client database is a lawsuit waiting to happen. Your job is to engineer that possibility out of the system from the start.