
Manual calendar management is a primary source of unforced operational errors in law firms. Relying on paralegals or assistants to manually transcribe appointments from emails and scheduling links into a master calendar introduces unacceptable risk. Every manual entry is a potential malpractice claim waiting to happen, born from a simple typo in a date or time. The fix is not better training. It is systematic removal of the human failure point through direct system integration.
The objective is to create a closed loop where a client-facing scheduling tool injects data directly into the firm’s authoritative calendar system, with zero human intervention. This requires bridging three distinct components: a public scheduling interface, an integration middleware layer, and the firm’s backend calendar service. Get any part of this chain wrong, and you build a system that fails silently, which is far more dangerous than one that fails loudly.
Prerequisites: The Technology Stack
Before any automation, you must have the foundational tools. First, an external scheduling tool is non-negotiable. Tools like Calendly, Acuity Scheduling, or Microsoft Bookings provide the public-facing interface. They handle the complex front-end logic of displaying availability based on rules you define. Attempting to build this yourself is a resource drain that produces an inferior product.
Second, you need programmatic access to the firm’s master calendar. For firms on Google Workspace, this is the Google Calendar API. For those on Microsoft 365, it’s the Microsoft Graph API. If your firm still runs a self-hosted Exchange server, your first step is to migrate. Gaining reliable API access to a legacy on-premise Exchange instance is a nightmare of firewall rules, authentication protocols, and questionable uptime.
Finally, a middleware solution is required to connect the scheduler to the calendar. This is where the actual logic lives. You have two primary paths: an Integration Platform as a Service (iPaaS) like Zapier or Make, or a custom-coded solution running on a serverless platform like AWS Lambda or Google Cloud Functions. The iPaaS route is faster to set up but becomes a wallet-drainer with high volume. The custom code route is cheaper to run but demands engineering resources to build and maintain.
There is no third option.
API Authentication: The First Hurdle
Gaining access to calendar APIs is not a simple login and password affair. Both Google and Microsoft use OAuth 2.0, an authorization framework that allows a third-party application to act on behalf of a user without exposing their credentials. Setting this up involves creating a project in the respective developer console, enabling the correct API, and configuring an OAuth consent screen.
You will generate a client ID and a client secret. These are not to be shared or stored in plaintext in your code. They are the keys to your entire firm’s calendaring data. For a custom solution, store them in a secure secret manager like AWS Secrets Manager or HashiCorp Vault. For an iPaaS tool, you will go through their guided connection wizard, which handles the token exchange and secure storage for you.
This process is tedious and unforgiving. A misconfigured redirect URI in your OAuth setup will block the entire authentication flow. The documentation is often dense and assumes a level of prior knowledge that many legal ops professionals do not possess.
Architecture: Webhooks as the Trigger
The core mechanism for this automation is a webhook. Instead of your middleware constantly polling the scheduling tool to ask, “Is there anything new?”, the scheduling tool actively sends a notification to your middleware the instant an event is created or canceled. This is an event-driven architecture, which is vastly more efficient and responsive than polling.
You configure your scheduling tool by providing it with a unique URL, your webhook listener. When an appointment is booked, the tool packages up all the relevant information, the invitee’s name, email, the event time, any questions they answered, into a structured data format, usually JSON. It then sends this JSON payload via an HTTP POST request to your listener URL.
Your middleware’s only job at this stage is to catch this payload and begin processing it.
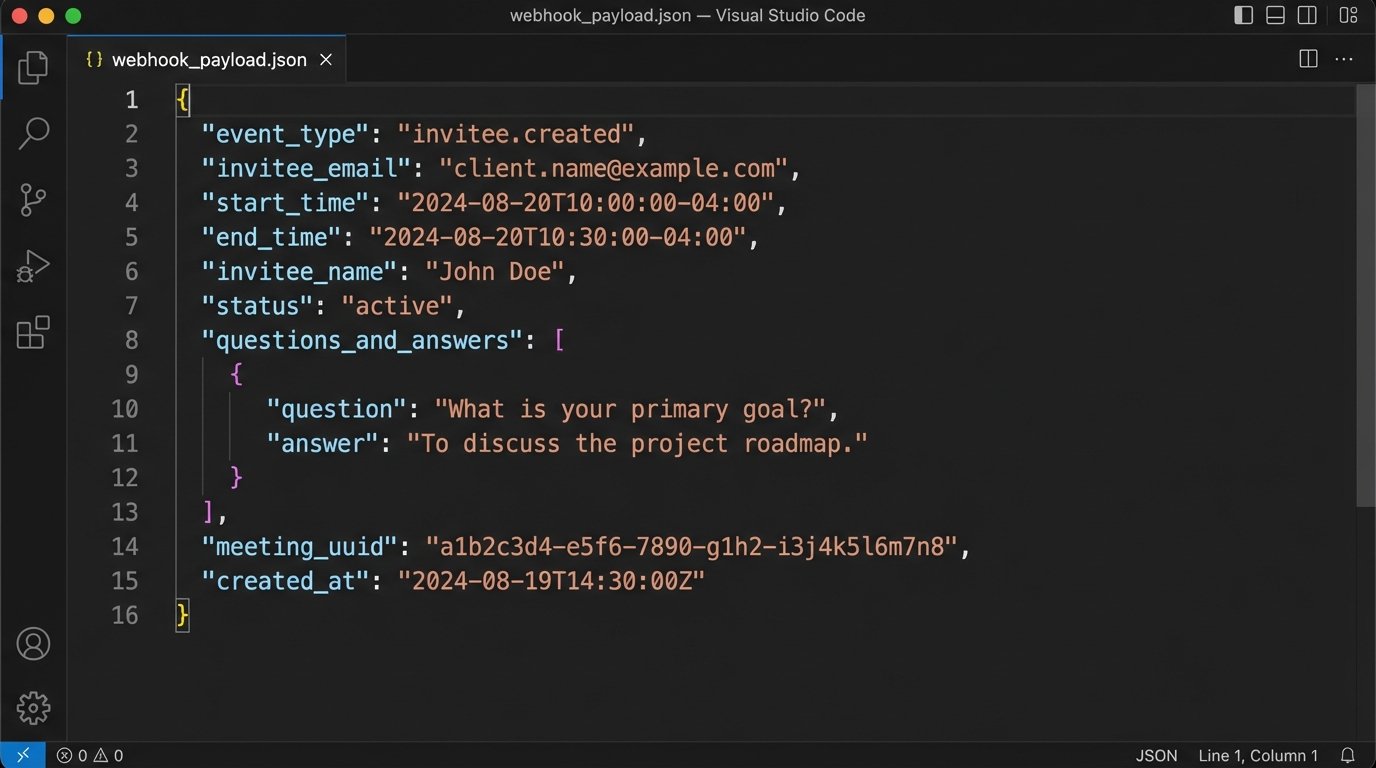
The structure of the JSON payload is dictated entirely by the scheduling tool’s API. Before writing any logic, your first step is to trigger a test event and inspect the raw JSON that arrives. You must understand its structure, the data types, and the exact naming conventions for each field. Assuming a field is named `client_email` when it is actually `invitee_email` will break your entire workflow.
Step 1: Ingesting and Parsing the Payload
Once the webhook payload arrives at your middleware endpoint, the first action is to parse it. This means converting the raw JSON text into a data structure your code or iPaaS workflow can manipulate. All modern integration platforms and programming languages have built-in functions for this. It is a trivial technical step.
The critical part is data extraction and normalization. You must pull out the specific pieces of information you need: start time, end time, event title, attendee emails, and any custom fields. Timezones are a frequent point of failure. The scheduling tool might send the time in UTC, while your calendar API expects it in Eastern Time. You must explicitly handle this conversion. Failure to do so results in appointments appearing at the wrong time, a completely unacceptable outcome.
This is also where you treat the incoming data not as a sticky note, but as a database record that must pass a rigid schema validation before it’s allowed to commit. You are shoving a firehose of potentially messy user-submitted data through the needle of your firm’s structured calendar. The validation must be ruthless.
A sample Python script running in a cloud function to receive and parse a payload might look like this. It is a skeleton, but demonstrates the basic principle of receiving the request and accessing the data.
import json

import os

from google.oauth2.credentials import Credentials

from googleapiclient.discovery import build
def create_calendar_event(request):
# Assumes request is a Flask request object with a JSON body
request_json = request.get_json(silent=True)
if not request_json:
return ('Bad Request: No JSON payload.', 400)
# --- 1. Data Extraction & Validation ---
try:
event_title = request_json['payload']['name'] # Example path
start_time_str = request_json['payload']['start_time'] # e.g., '2024-08-20T10:00:00-04:00'
end_time_str = request_json['payload']['end_time']
attendee_email = request_json['payload']['email']
attorney_email = 'attorney@yourfirm.com' # This should be determined dynamically
except KeyError as e:
print(f"Missing key in payload: {e}")
return (f'Bad Request: Missing required field {e}.', 400)
# --- 2. Logic & Formatting for Calendar API ---
event_body = {
'summary': f"Consultation: {event_title}",
'location': 'Video Conference',
'description': 'Initial consultation scheduled via automated system.',
'start': {
'dateTime': start_time_str,
'timeZone': 'America/New_York', # Be explicit
},
'end': {
'dateTime': end_time_str,
'timeZone': 'America/New_York',
},
'attendees': [
{'email': attendee_email},
{'email': attorney_email},
],
'reminders': {
'useDefault': False,
'overrides': [
{'method': 'email', 'minutes': 24 * 60},
{'method': 'popup', 'minutes': 30},
],
},
}
# --- 3. API Call to Google Calendar ---
# NOTE: Credential handling is complex and omitted for brevity.
# In a real app, you would fetch stored tokens.
# creds = Credentials.from_authorized_user_info(info=token_info, scopes=SCOPES)
# service = build('calendar', 'v3', credentials=creds)
# event = service.events().insert(calendarId='primary', body=event_body).execute()
# print(f"Event created: {event.get('htmlLink')}")
# For demonstration, we just return the formatted body
return (json.dumps(event_body), 200, {'Content-Type': 'application/json'})
The code above is a simplification. The authentication part (`creds` and `service` build) requires a secure way to store and refresh OAuth tokens, which is a significant piece of engineering in itself.
Step 2: Business Logic and Conflict Checks
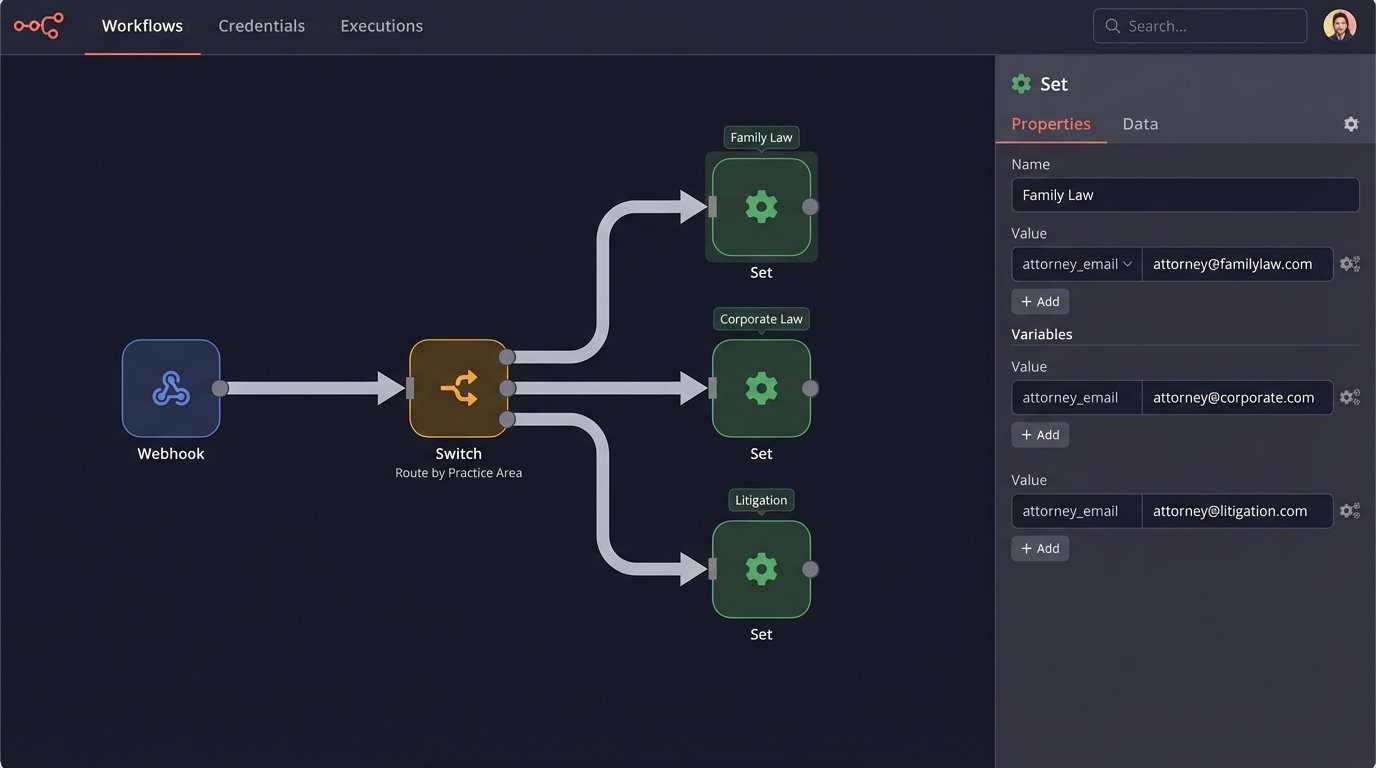
This is the step that separates a generic scheduling tool from a legal-specific automation. Once you have clean, normalized data, you must apply the firm’s business rules. This logic cannot be configured in Calendly. It must live in your middleware.
One critical rule is attorney assignment. The payload might just say “Initial Consultation.” Your logic needs to determine which attorney gets the appointment. This could be a simple round-robin assignment or a complex lookup based on practice area, which might be another field you force the client to select on the scheduling form. You inject the correct attorney’s email into the event data before sending it to the calendar API.
Another rule is conflict resolution. While the scheduling tool should prevent double-booking on an attorney’s linked calendar, it knows nothing about other firm resources. For example, a deposition might require a specific conference room or a court reporter. Your middleware can perform a secondary check against the calendars for those resources before creating the final event. If the resource is unavailable, the workflow should fail and trigger an alert for manual intervention.
This is about building a digital gatekeeper that enforces firm policy on the raw data coming from the outside world.
Step 3: Writing to the Calendar API
With the validated and enriched data, the final step is to construct the API request to create the event in Google Calendar or Microsoft 365. This involves mapping your data to the specific format the API expects. A `summary` field for the event title, a `start` and `end` object with `dateTime` and `timeZone` keys, and an array of `attendees` objects.
Do not neglect the details. You can programmatically set the event color, add a default description with a disclaimer, attach a standard “New Client Intake Form” document, and generate a unique Google Meet or Microsoft Teams link for the meeting. These small additions provide significant value and consistency.
The API call itself is a single HTTP POST request to the correct endpoint, with your OAuth token in the authorization header and the event data as the JSON body. A successful request will return a `200 OK` status code along with the complete data for the newly created event, including its unique ID. You should log this event ID. It is essential for any future updates or cancellations.
Step 4: Managing Cancellations and Updates
Creating events is only half the problem. The system must also handle cancellations and reschedules gracefully. Your scheduling tool will send different webhooks for these actions, `invitee.canceled` for example. Your middleware needs separate logic paths to handle them.
For a cancellation, the webhook payload will contain the original event’s unique identifier. Your code will use this identifier to find the event and then make a different API call, an HTTP DELETE request, to remove it from the firm’s calendar. For a reschedule, the process is an HTTP PUT or PATCH request, using the event ID to update the existing entry with the new time.
This is where logging the original event ID becomes critical. Without it, you have no reliable way to programmatically find the correct calendar event to modify or delete.
Error Handling and Monitoring
The system will fail. An API will be temporarily down, a webhook payload will be malformed, your logic will hit an unexpected edge case. A production-grade system must anticipate these failures. If your API call to create a calendar event fails, what happens? The default is that the data is lost and the appointment never appears on the calendar.
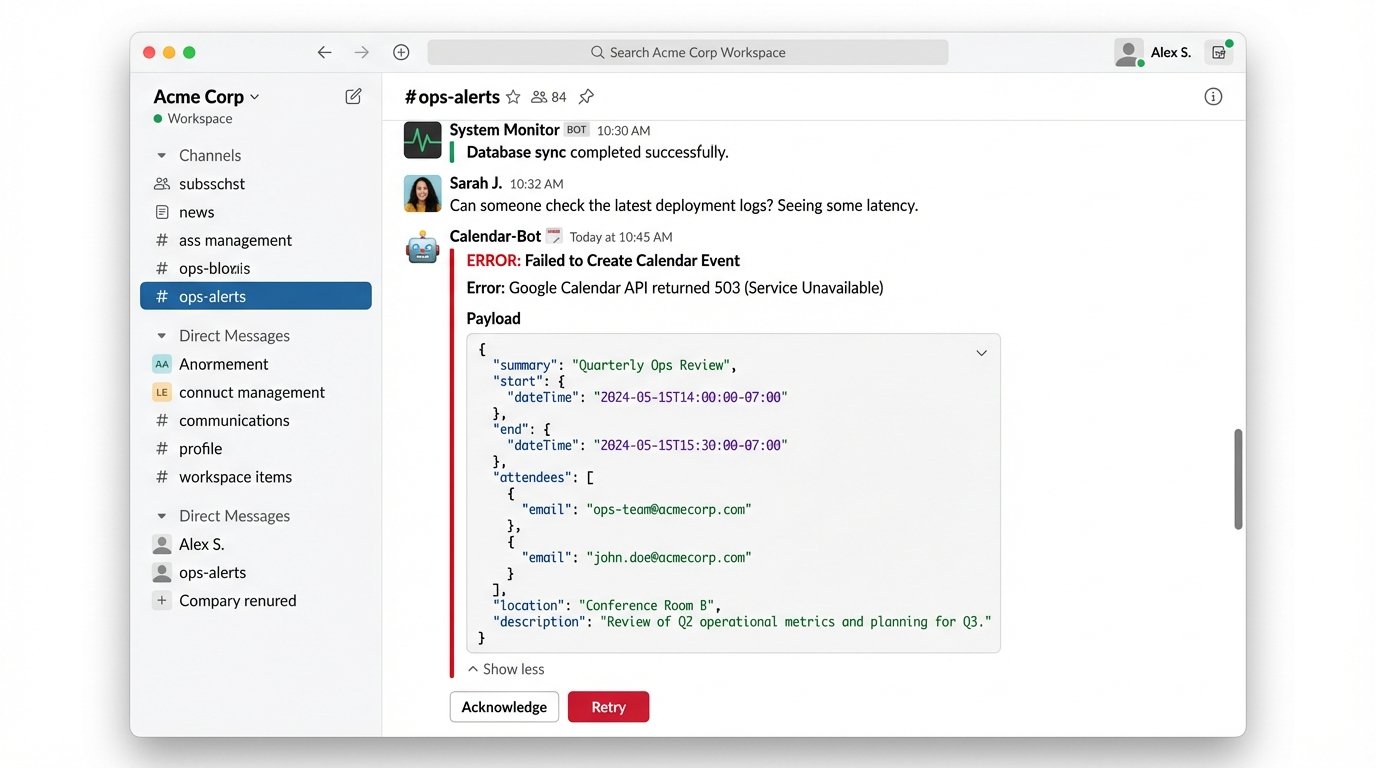
This is unacceptable. Implement a retry mechanism with exponential backoff. If the first API call fails, wait two seconds and try again. If that fails, wait four, then eight. After a certain number of failed retries, the workflow must stop and place the failed event payload into a “dead-letter queue.” This is a holding area for failed jobs. Simultaneously, it must send an alert to your operations team via email or Slack, containing the error message and the failed payload. This allows a human to inspect the problem and manually fix the calendar entry.
Without this robust error handling and monitoring, your automated system is a black box that builds a backlog of silent failures. You will only discover the problem when a client calls to ask why no one showed up for their meeting.