Forcing Order onto Closing Process Chaos
Closing processes are fundamentally broken. They operate on a brittle chain of emails, checklists buried in spreadsheets, and manual follow-ups that depend entirely on human memory. The result is a high-latency, error-prone system where a single missed task can derail a multi-million dollar transaction. The objective is not to “streamline” this mess. It’s to gut the manual dependencies and replace them with a deterministic, event-driven machine.
We are building an automation framework that listens for key events in your transaction lifecycle. When a specific trigger fires, like a document signature or a status change in your CRM, the framework executes a predefined logic set to assign tasks to the correct people in the correct systems. This isn’t about fancy AI. It’s about brute-force logic and reliable API calls to enforce a process that humans consistently fail to follow.
Prerequisites: Map the Battlefield Before You Automate
Attempting to automate a process you haven’t diagrammed is engineering malpractice. The first step is to lock the relevant stakeholders in a room and force them to agree on a single, canonical workflow. Get every trigger, every condition, and every resulting task onto a whiteboard. Expect arguments. The legal team’s idea of the process will not match the finance team’s version.
Your map must identify three critical components. First, the trigger events. These are the state changes that kick off a workflow, for example, `deal.status` changing to `Under.Contract` in Salesforce or a `document.signed` event from DocuSign. Second, the conditional logic. If the property is in California, assign Paralegal A. If it’s a commercial property, loop in the senior accounting team. Third, the target systems. You need authenticated API access to every system you plan to manipulate, which means getting credentials for your CRM, document platform, and task manager like Jira or Asana. Don’t assume the APIs are stable or well-documented.
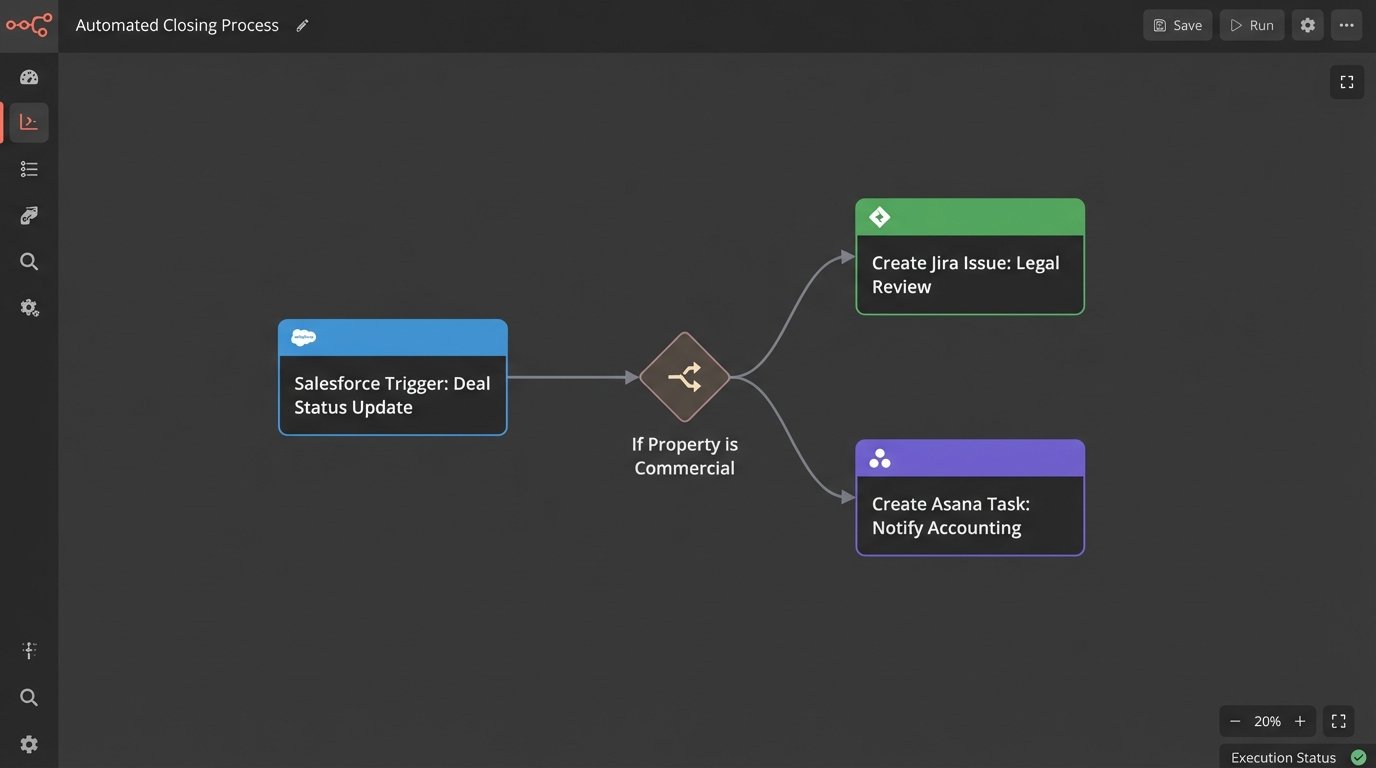
Step 1: Architecting the Trigger Listener
Your automation needs an entry point to receive event data. You have two primary options: polling or webhooks. Polling involves hammering an API on a schedule, repeatedly asking “Did anything happen yet?”. It’s simple to implement with a cron job but it’s inefficient, introduces latency, and burns through your API rate limits. It’s the technical equivalent of a child asking “Are we there yet?” every five minutes.
Webhooks are the superior architecture. The source system sends an HTTP POST request to an endpoint you control the moment an event occurs. This is real-time and efficient. The trade-off is complexity. You now have to manage a publicly accessible web service, deal with security, and handle potential failures if your service is down when the source system tries to send a payload. A missed webhook is a lost event.
A basic webhook listener can be built with a few lines of Python using a microframework like Flask. This endpoint does nothing but receive the POST request, validate that it has a valid security signature or token, and then immediately pass the payload to a more robust processing queue. Do not perform heavy logic directly in the listener. Its only job is to catch the ball.
# Basic Flask webhook listener example

from flask import Flask, request, abort

import hmac

import hashlib

import os
app = Flask(__name__)
# Get the secret from environment variables. Never hard-code it.
WEBHOOK_SECRET = os.environ.get('WEBHOOK_SECRET')
@app.route('/webhook-receiver', methods=['POST'])
def webhook_receiver():
# 1. Verify the signature to ensure the request is authentic
signature = request.headers.get('X-Signature-256')
if not signature:
abort(401)
mac = hmac.new(WEBHOOK_SECRET.encode('utf-8'), request.data, hashlib.sha256)
if not hmac.compare_digest(f"sha256={mac.hexdigest()}", signature):
abort(401) # Signature mismatch, unauthorized
# 2. Get the payload
payload = request.get_json()
# 3. IMPORTANT: Do not process here.
# Push to a queue (e.g., Redis, RabbitMQ, SQS) for background processing.
# For this example, we just print it.
print(f"Received valid payload: {payload}")
# 4. Acknowledge receipt immediately
return {'status': 'received'}, 200
if __name__ == '__main__':
app.run(port=5001)
This code is the bare minimum. It validates the payload’s origin using a shared secret and immediately acknowledges receipt. The real work should be handed off to a separate worker process to avoid timing out the HTTP request from the source system.
Step 2: The Logic Core and Rules Engine
Once you have a validated event payload, you need to decide what to do with it. Hard-coding the logic (`if event_type == ‘document.signed’ and client_tier == ‘premium’`) directly into your script is a fast path to an unmaintainable disaster. The business rules will change, and you don’t want to redeploy your entire application for every minor tweak.
A better approach is to abstract the rules into a configuration file, typically JSON or YAML. This file acts as a decision table. The processing engine reads the incoming event, iterates through the rules in the configuration, and finds the first match based on the event type and any additional conditions. This decouples the “what to do” from the “how to do it.”
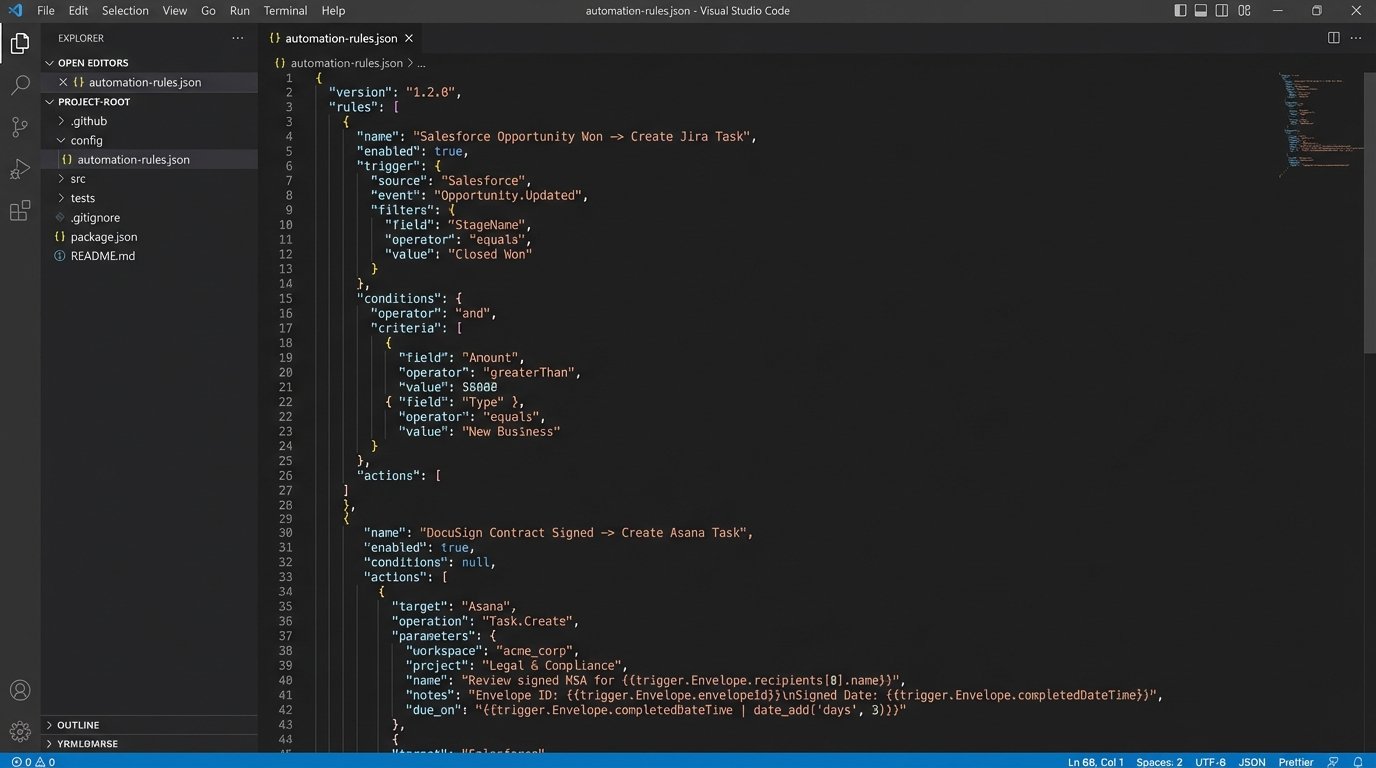
Your rules configuration defines the mapping between a trigger and one or more actions. This structure isolates the business logic, making it reviewable by non-engineers and modifiable without a full code change. You can build a simple engine that just parses this file and executes the defined API calls.
{

  "rules": [

    {

      "ruleName": "AssignLegalReviewForCommercialProperty",

      "trigger": {

        "source": "Salesforce",

        "eventType": "deal.status.changed",

        "conditions": [

          {"field": "newStatus", "operator": "equals", "value": "Under Contract"},

          {"field": "propertyType", "operator": "equals", "value": "Commercial"}

        ]

      },

      "actions": [

        {

          "targetSystem": "Jira",

          "actionType": "createIssue",

          "details": {

            "project": "LEG",

            "issueType": "Task",

            "summary": "Legal Review: {{dealName}}",

            "assignee": "senior.paralegal",

            "description": "Please initiate legal review for commercial property at {{propertyAddress}}."

          }

        }

      ]

    },

    {

      "ruleName": "NotifyAccountingOnFundingApproval",

      "trigger": {

        "source": "DocuSign",

        "eventType": "document.signed",

        "conditions": [

          {"field": "documentName", "operator": "contains", "value": "Funding Approval Form"}

        ]

      },

      "actions": [

        {

          "targetSystem": "Asana",

          "actionType": "createTask",

          "details": {

            "project_gid": "12025...",

            "name": "Prepare wire for {{dealName}}",

            "assignee_gid": "1199..."

          }

        }

      ]

    }

  ]

}
This JSON structure is explicit. It dictates that a status change for a commercial property in Salesforce creates a Jira ticket, while a specific document signature in DocuSign creates an Asana task. The `{{variable}}` syntax indicates data injected from the trigger payload.
Step 3: Idempotent Actions and Error Handling
Making the outbound API call to Jira or Asana is the final step, but it’s loaded with potential failures. APIs go down. Networks become unstable. Your webhook might get delivered twice by a misbehaving source system. Your action logic must be idempotent, meaning running it multiple times with the same input produces the same result. You cannot create five duplicate tasks because your trigger fired five times.
Achieve idempotency by using a unique identifier from the source event, like a `transaction_id` or `envelope_id`. Before creating a task, query the target system to see if a task with that unique identifier already exists. If it does, you log a “duplicate event ignored” message and exit cleanly. If it doesn’t, you create the task and store a reference to it, linking it back to the source transaction ID.
Handling API failures requires a retry strategy. A simple, immediate retry is naive and can make problems worse during a system outage. Implement an exponential backoff with jitter. If the first API call fails, wait 1 second before retrying. If that fails, wait 2 seconds, then 4, and so on, adding a small random delay to prevent multiple instances from retrying in perfect sync. After a set number of failures, move the job to a dead-letter queue for manual inspection.
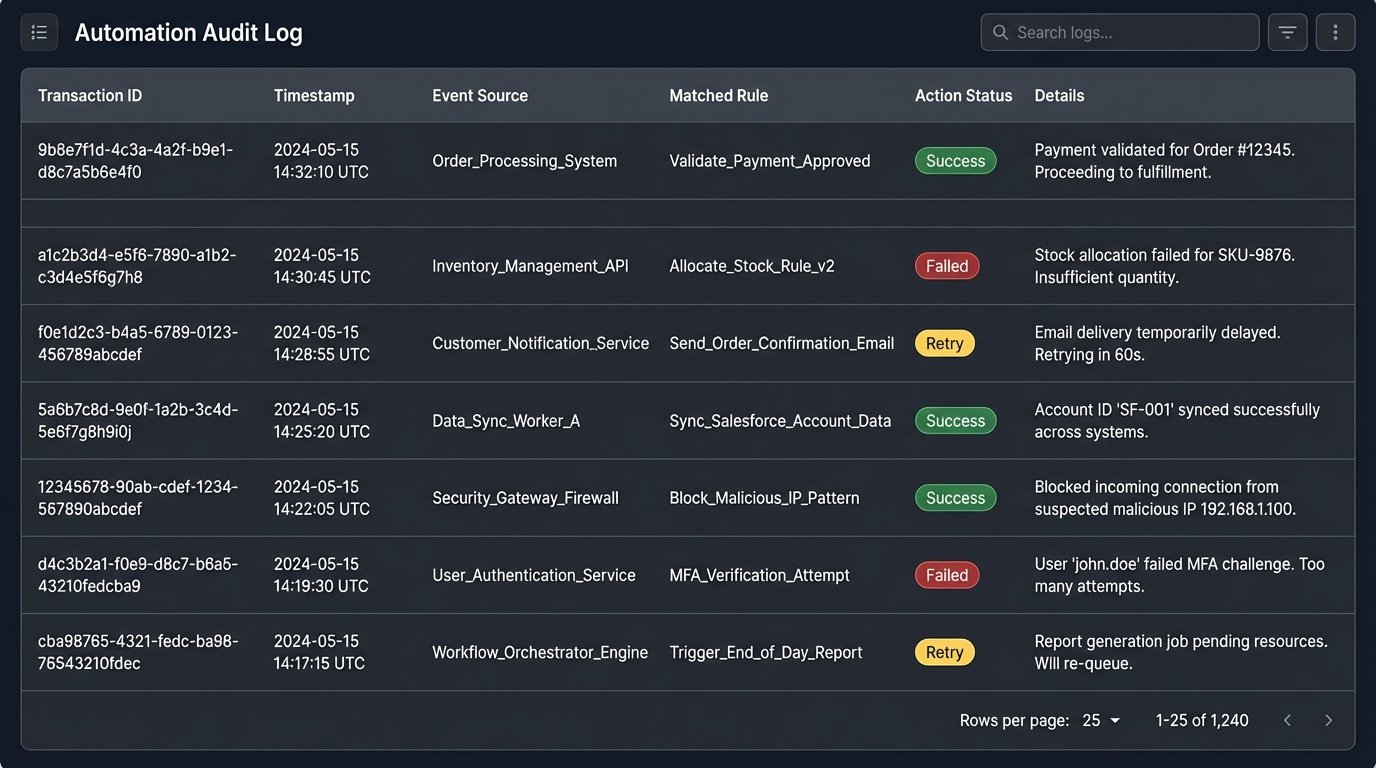
Step 4: Audit Trails and State Management
When an automation fails, the business user’s first claim is always “the system is broken.” Without a detailed audit trail, you have no way to prove what actually happened. Every event your system ingests and every action it takes must be logged to a persistent, queryable data store, not just to standard output.
For each transaction, you must log the incoming payload, which rule it matched, what actions were attempted, the API requests sent, the responses received, and the final status. This isn’t just for debugging. It’s a non-repudiable record of the system’s behavior that is critical for compliance and for settling disputes. Trying to manage this without logs is like trying to debug a memory leak by staring at the server rack. You see symptoms, but you have no idea about the cause.
A simple database table with columns for `transactionId`, `receivedTimestamp`, `eventPayload`, `matchedRule`, `actionStatus`, and `logs` is a sufficient starting point. This state database becomes your single source of truth for the automation’s execution history.
Step 5: Monitoring the Machine
Deployment is not the end of the project. A running automation with no monitoring is a liability waiting to happen. You need a dashboard that gives you an at-a-glance view of the system’s health. Key metrics to monitor include event throughput (events processed per minute), action latency (time from event receipt to task creation), and error rate (percentage of failed actions).
Set up alerts for anomalous conditions. An error rate spiking above 2% requires an immediate notification to the on-call engineer. If the processing latency for a P1 task type exceeds 60 seconds, that’s another alert. These alerts shouldn’t be emails that get ignored; they should trigger a real incident in a system like PagerDuty or Opsgenie. The automation is now a core piece of business infrastructure and must be treated as such.
This entire structure isn’t a one-time build. It’s a foundation. As the business process evolves, you will add more rules, integrate with new systems, and refine your error handling. The goal is not a magical, hands-off system. The goal is a resilient, auditable framework that systematically absorbs repetitive work, reduces manual error, and provides hard data when things go wrong.