Most guides on automated drip campaigns start with a drag-and-drop interface in some marketing platform. That approach works until it doesn’t. The moment you need to inject custom logic, handle a failing API, or guarantee data integrity between systems, the pretty UI becomes a cage. We are not building a toy. We are building a resilient system for converting leads, which means owning the logic, the state, and the failure modes.
The core failure of pre-packaged solutions is their assumption that the world is a series of clean, instantaneous events. It isn’t. A lead submission is a webhook that can fail. The CRM API can be down. The email provider can start rate-limiting your account during a high-volume spike. Our job is to build a system that anticipates this chaos, not one that pretends it doesn’t exist.
Prerequisites: The Non-Negotiable Foundation
Before writing a single line of logic, you need three components locked down. Skimping here guarantees a 3 AM page about lost leads.
- A Decoupled Ingestion Point: Your lead source (web form, CRM, etc.) must not directly trigger your email logic. It should drop a payload into a message queue like AWS SQS, Google Pub/Sub, or RabbitMQ. This decouples the systems. If your email logic processor goes down, the leads stack up safely in the queue instead of vanishing into the ether.
- A State Database: You need a place to track where each lead is in the sequence. This cannot be the email platform itself. Use a key-value store like Redis for speed or a document database like DynamoDB for more complex state objects. Storing state externally gives you control to pause, restart, or manually move a lead in the sequence.
- A Transactional Email Service Provider (ESP) with an API: This is for sending the actual emails. Think Mailgun, SendGrid, or Postmark. We need them for their core competency, which is deliverability and bounce handling, not for their half-baked automation builders. Access to a solid API is mandatory.
Step 1: Architecting the Ingestion Webhook and Queue
Your public-facing endpoint is the front door. Its only jobs are to validate the incoming data shape and immediately push it to a queue. It should perform zero business logic. Any processing makes it brittle and slow. This endpoint needs to be fast and stupid.
We set up a simple serverless function or a minimal containerized service. Its entire purpose is to catch the lead data, run a quick schema check, and then serialize it into a message queue. This architecture insulates our core logic from the public internet and provides a buffer to absorb traffic spikes.

A barebones Node.js example using AWS SQS looks something like this. It receives a POST request, does a rudimentary check for an email field, and pushes to the queue. Anything more complex belongs in a downstream worker.
Example: A Minimalist AWS Lambda Ingestion Function (Node.js)
const { SQSClient, SendMessageCommand } = require("@aws-sdk/client-sqs");

const sqsClient = new SQSClient({ region: "us-east-1" });
exports.handler = async (event) => {
const requestBody = JSON.parse(event.body);
// Minimal validation. More complex validation happens later.
if (!requestBody || !requestBody.email) {
return {
statusCode: 400,
body: JSON.stringify({ message: "Invalid payload. Email is required." }),
};
}
const params = {
QueueUrl: process.env.QUEUE_URL, // Injected from environment variables
MessageBody: JSON.stringify(requestBody),
MessageGroupId: "new-leads" // For FIFO queues
};
try {
const command = new SendMessageCommand(params);
await sqsClient.send(command);
return {
statusCode: 202, // Accepted
body: JSON.stringify({ message: "Lead accepted for processing." }),
};
} catch (error) {
console.error("Failed to queue lead:", error);
// This failure needs to trigger an alert.
return {
statusCode: 500,
body: JSON.stringify({ message: "Internal server error." }),
};
}
};
Notice the response code is 202 (Accepted), not 200 (OK). We are acknowledging receipt of the request, not confirming its completion. That’s a critical distinction for an asynchronous system.
Step 2: The Worker, Data Sanitation, and State Initialization
A separate process, the “worker,” pulls messages from the queue. This is where the real work begins. The first task is to clean the data. Never trust incoming data. Ever.
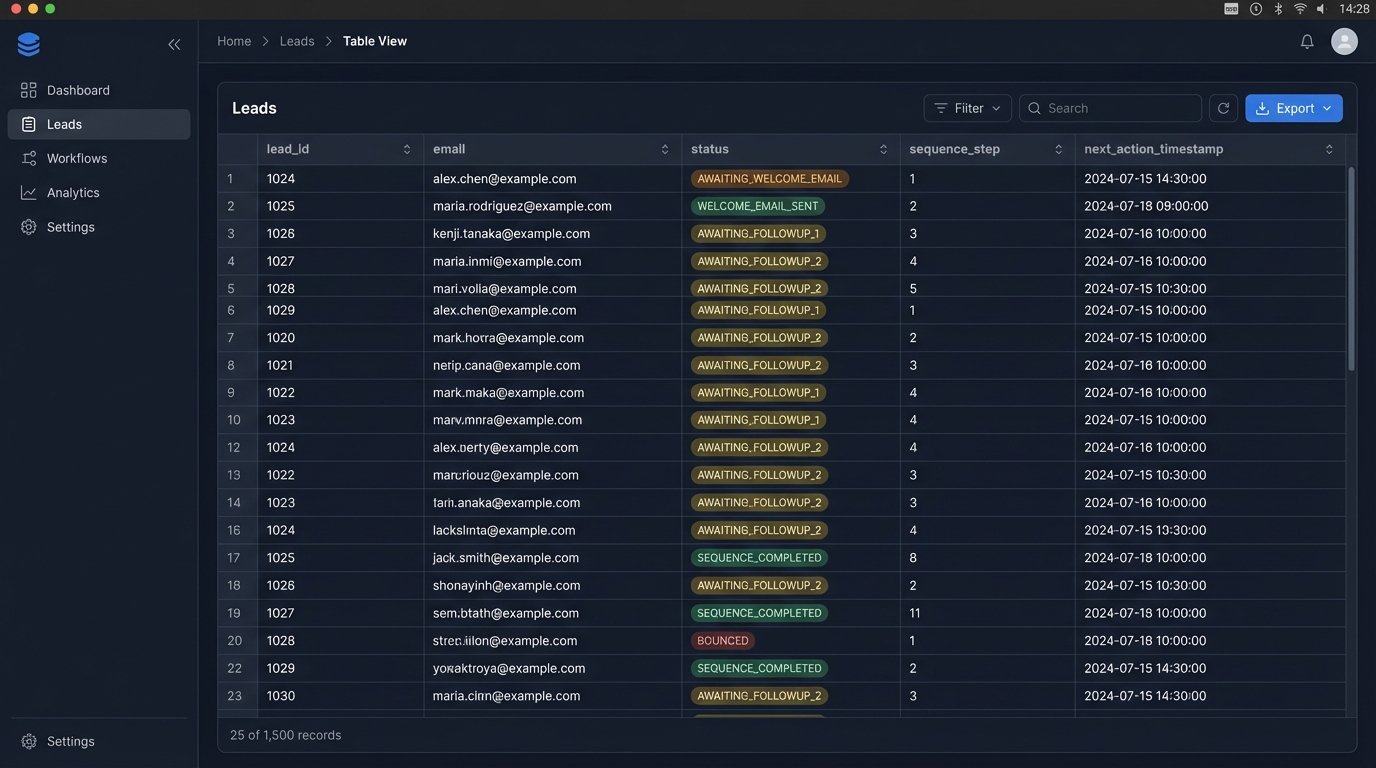
Data sanitation involves stripping whitespace, lowercasing emails, standardizing phone numbers, and validating fields against expected formats. Once the lead object is clean, we initialize its state in our database (e.g., Redis). The lead enters the system with a status like `NEW` and a timestamp for the next action, which is sending the first email.
Example: Initial Lead State in Redis
We can store the lead’s state as a JSON string or a hash in Redis. The key would be something like `lead:contact@example.com`.
{

  "leadId": "xyz-123",

  "email": "contact@example.com",

  "firstName": "Jane",

  "status": "AWAITING_WELCOME_EMAIL",

  "sequence": "new_lead_nurture_v1",

  "step": 0,

  "nextActionTimestamp": 1678886400, // Unix timestamp for immediate processing

  "createdAt": 1678886395,

  "history": [] // Array to log actions

}
Storing the sequence name allows us to run multiple drip campaigns simultaneously. The `step` indicates which email in the sequence is next.
Step 3: The Scheduler and Logic Engine
This is the heart of the operation. A scheduler, typically a cron job running every minute, triggers our main logic engine. This engine is not a listener; it’s a hunter. It actively queries the state database for leads that are due for an action.
The query logic is simple: “Select all leads where `nextActionTimestamp` is less than or equal to the current time.”
For each lead returned, the engine performs these steps:
- Read the State: Get the lead’s current `status`, `sequence`, and `step`.
- Map to Action: Use a mapping object or configuration file to determine what action corresponds to the current state. For `sequence: ‘new_lead_nurture_v1’` and `step: 0`, the action is “send welcome email.”
- Execute Action: Call the ESP’s API to send the email. This must be wrapped in a try-catch block to handle API failures.
- Update State: Upon successful execution, update the lead’s state in the database. Increment the `step`, change the `status` to `WELCOME_EMAIL_SENT`, and calculate the `nextActionTimestamp` for the next email (e.g., current time + 2 days). Log this action to the `history` array.
This state-driven loop is predictable and easy to debug. You can look at any lead in the database and know exactly what happened and what will happen next.
Relying on the ESP’s internal logic for complex sequences is like trying to build a distributed system using only carrier pigeons. The messages might get there, but you have zero visibility into transit failures, retries, or sequencing.
Step 4: Handling Bounces and Unsubscribes
Deliverability is not optional. Your ESP will provide webhooks that fire on events like hard bounces, spam complaints, and unsubscribes. You must configure another endpoint in your system to listen for these events. This is a reverse flow of data, from the ESP back to you.
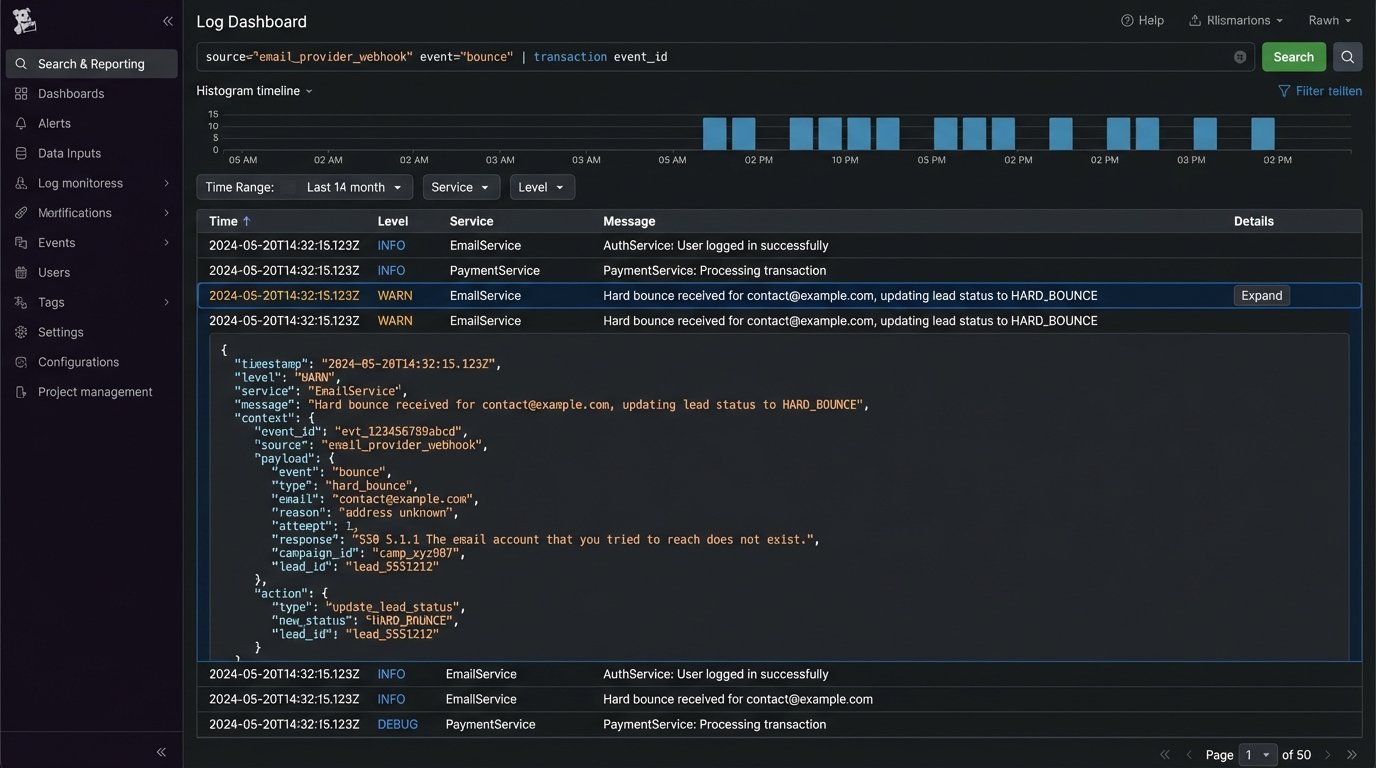
When your webhook receives a hard bounce event for `contact@example.com`, your system’s immediate responsibility is to find that lead in your state database and update its status to `HARD_BOUNCE` or `UNSUBSCRIBED`. This acts as a circuit breaker, preventing the scheduler from ever attempting to send to that address again. Failure to do this will destroy your sender reputation.
Example: Unsubscribe Webhook Logic
// Pseudocode for an unsubscribe webhook handler

function handleUnsubscribe(request) {

  const eventData = parseEvent(request.body); // e.g., from SendGrid

  const email = eventData.email;

  const reason = eventData.reason; // 'unsubscribed'
// Find the lead in our state database
const lead = database.findByEmail(email);
if (lead) {
// Update the state to a terminal status
lead.status = "UNSUBSCRIBED";
lead.nextActionTimestamp = null; // Nullify next action
lead.history.push({ event: "unsubscribe", timestamp: now() });
database.save(lead);
console.log(`Marked ${email} as unsubscribed.`);
} else {
// This could happen if the lead is not in our system. Log it.
console.warn(`Received unsubscribe for unknown email: ${email}`);
}
return response.status(200).send("OK");
}
This feedback loop is what separates a professional setup from an amateur one.
Step 5: Monitoring and Logging
An automated system without monitoring is a liability. You need structured logs for every major event: lead ingestion, state transition, API call to the ESP, and error handling. For each log entry, include the `leadId` or `email` as a correlation ID. This allows you to trace a single lead’s journey through the entire system.
Set up dashboards to monitor key metrics:
- Queue Depth: A rising SQS queue depth indicates your workers can’t keep up with lead volume. This is an early warning of a bottleneck.
- API Error Rate: Track the percentage of failed API calls to your ESP. A sudden spike could mean they are having an outage or you’re being rate-limited.
- Scheduler Lag: Monitor the time difference between a lead’s `nextActionTimestamp` and the actual time the action was processed. High lag means your scheduler isn’t running frequently enough or your database queries are too slow.
Finally, create a “canary.” This is a fake lead with your own email address that you inject into the system every hour. Set up an automated check to verify that you received the expected sequence of emails. If the canary fails to arrive, an alert should fire. This is the only way to be certain the entire pipeline is working.
Building this architecture requires more upfront work than using an off-the-shelf tool. The payoff is a system that is transparent, resilient, and can be extended to handle any custom logic you can imagine. You own the code, you own the data, and you own the failures.