
Manual client intake is a data integrity black hole. Every time a paralegal re-types a client’s name from an email into your case management system, you introduce a point of failure. The process is slow, expensive, and a fantastic way to lose a potential client to a firm that can send an engagement letter in three minutes, not three days. Fixing this isn’t about buying a single piece of software. It’s about plumbing together a series of APIs that respect your firm’s specific workflow.
This is not a theoretical exercise. It’s a field guide to building a resilient, automated intake system that survives contact with actual clients and stressed-out attorneys. We will bypass the marketing fluff and focus on the architecture, the code, and the inevitable failure points you must plan for.
Prerequisites: The Stack Audit
Before you build anything, you must map your existing infrastructure. Writing code without a clear inventory of your endpoints and authentication methods is malpractice. You need to answer these questions with absolute clarity, and “I think we use…” is not an answer. Get the API keys, read the developer documentation, and run test calls with Postman or Insomnia.
Case Management System (CMS) API
Your CMS is the final destination for all intake data. Its API is your single most important dependency. Does your system, be it Clio, Filevine, MyCase, or some other platform, have a REST API? If it’s a legacy SOAP API, budget more time and find a developer who enjoys XML-induced pain. Find the specific endpoints for creating contacts, opening matters, and running conflict checks. Check the rate limits. A cheap intake form that bombards the API with requests can get your access token suspended.
Legacy desktop software without a web API is a dead end. You’ll be stuck exporting CSV files, which isn’t automation, it’s just a different kind of manual labor.
E-Signature Provider
Firms typically use DocuSign, Dropbox Sign (formerly HelloSign), or Adobe Sign. All have mature APIs for sending documents, tracking their status, and retrieving the signed PDF. The critical feature you need is support for webhooks. A webhook is a reverse API call. Instead of you polling DocuSign every five minutes to ask “Is it signed yet?”, their server sends a notification directly to your system the moment the client signs. This event-driven architecture is mandatory for a responsive workflow.
Your job is to find the documentation for creating an “envelope” or “signature request” and how to configure the webhook callback URL.
Scheduling and Calendar System
The goal is to eliminate the email chain for finding a meeting time. You can use a dedicated scheduling tool like Calendly or Acuity, which simplifies finding open slots. Their APIs let you generate single-use scheduling links. The more direct route involves integrating with the Microsoft Graph API (for Office 365) or the Google Calendar API. This gives you more control but requires you to handle the logic for finding free/busy times across multiple attorney calendars, which is not a trivial task.
Pulling calendar availability is one thing. Writing an appointment back to an attorney’s calendar requires write permissions. This means dealing with OAuth 2.0 consent screens and securely storing refresh tokens. Plan for it.
Step 1: Architecting the Intake Questionnaire
The public-facing questionnaire is the top of the funnel. A poorly designed form will kill your conversion rate. A form that lacks proper validation will poison your backend systems with garbage data. Its job is to capture clean, structured information and qualify the lead.
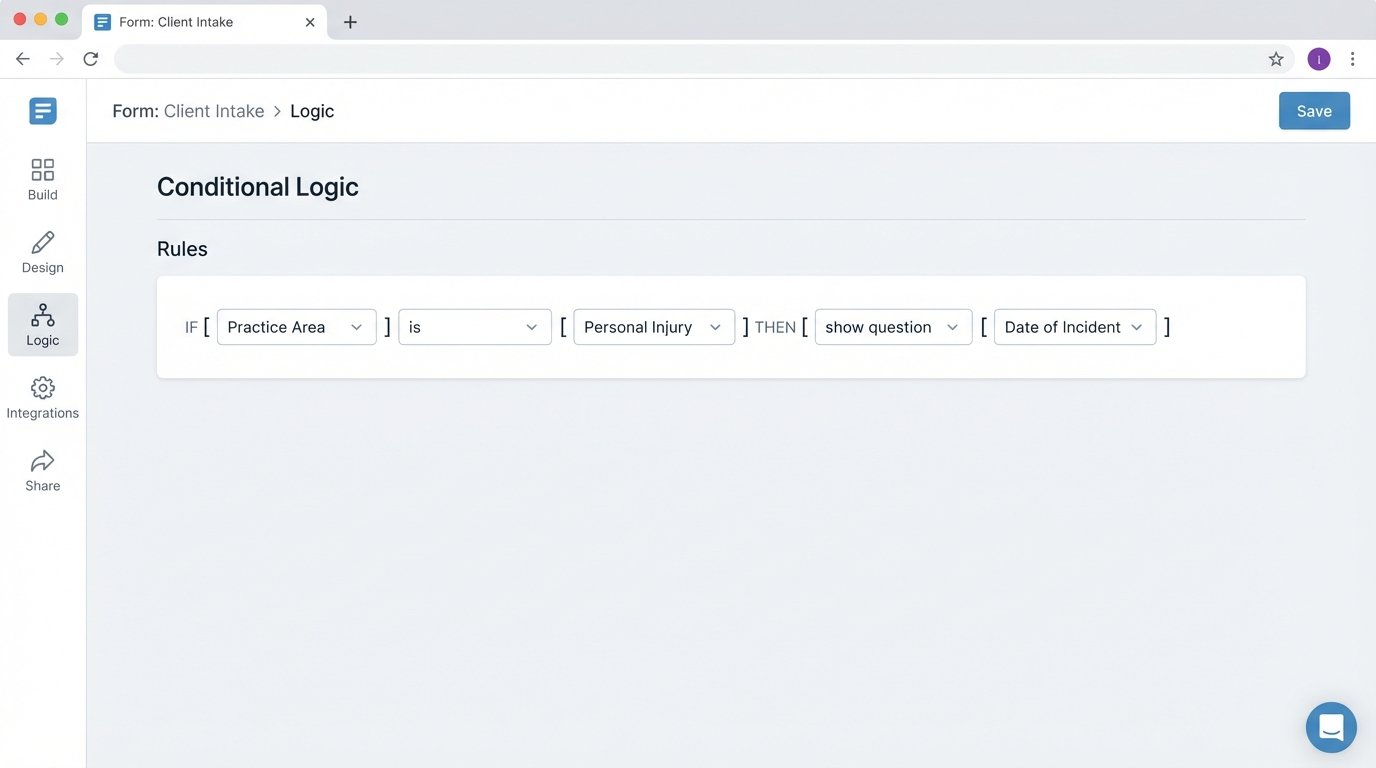
Conditional Logic is Non-Negotiable
A static, one-size-fits-all form is lazy. Your form must adapt to the user’s input in real time. If a user selects “Family Law” as the practice area, the form should then ask about dependents. If they select “Personal Injury,” it should ask for the date and location of the incident. This logic guides the user, reduces friction, and ensures you get the specific data needed for that case type.
Tools like Typeform, Jotform, or Gravity Forms offer user-friendly interfaces for building these conditional rules. The real challenge is extracting this data cleanly. Check if their API provides a flat, predictable JSON object or a nested nightmare you’ll have to parse. Sometimes, building a simple front-end application with a framework like React or Vue gives you total control over the data structure from the start.
Server-Side Validation is Your Only Defense
Client-side validation using JavaScript is a user experience feature, not a security measure. It provides immediate feedback to the user if they type an invalid email address. But it can be bypassed trivially. All critical validation must happen on your server before the data ever touches your CMS.
Your backend logic must strip any potential script tags, enforce character limits, and validate data formats using regular expressions for phone numbers, postal codes, and case numbers. Never trust incoming data. This is the firewall between a typo and a corrupted contact record in your database.
Step 2: The Middleware Bridge
Never connect your public form directly to your core systems. A direct connection is brittle and insecure. You need a middle layer of logic, a service that acts as a translator and a gatekeeper. This middleware can be a set of serverless functions (like AWS Lambda or Google Cloud Functions) or a small, dedicated web server running Node.js, Python, or another language.
Mapping, Transforming, and Cleaning Data
The middleware’s first job is to catch the data submitted from the form. It then transforms that raw data into the precise format your CMS API expects. Your form might have a single field called `full_name`, but your CMS API requires `firstName` and `lastName`. The middleware handles this split. It might convert date formats, capitalize names consistently, or append a default status to a new matter.
This is also where you run the conflict check. The middleware takes the names of the client and opposing parties from the intake form and queries your CMS API’s contact database. If a potential conflict is found, the automation stops. It flags the submission for manual review by a paralegal and sends a polite, generic message to the client. Automating a conflict bypasses firm policy and is a serious ethical breach.
Here is a simplified JavaScript example using `axios` to post data to a hypothetical CMS endpoint. This code would live inside your middleware function.
const axios = require('axios');
// This function is triggered by the form submission
async function createNewMatter(formData) {
const CMS_API_ENDPOINT = 'https://api.yourcms.com/v2/matters';
const API_KEY = process.env.CMS_API_KEY;
// 1. Run conflict check first (logic not shown)
const isConflict = await runConflictCheck(formData.opposingParty);
if (isConflict) {
console.error('Conflict detected. Halting process.');
// Flag for manual review
return { status: 'conflict_detected' };
}
// 2. Map form data to the CMS API's required structure
const matterPayload = {
client: {
firstName: formData.client_first_name,
lastName: formData.client_last_name,
email: formData.client_email
},
matterDetails: {
displayName: `Matter for ${formData.client_first_name} ${formData.client_last_name}`,
practiceArea: 'Personal Injury', // This could be dynamic
status: 'Pending Engagement'
}
};
// 3. Send the data to the CMS
try {
const response = await axios.post(CMS_API_ENDPOINT, matterPayload, {
headers: {
'Authorization': `Bearer ${API_KEY}`,
'Content-Type': 'application/json'
}
});
console.log('Successfully created matter:', response.data.id);
return { status: 'success', matterId: response.data.id };
} catch (error) {
console.error('Failed to create matter in CMS:', error.response.data);
// Trigger an alert and queue for retry
return { status: 'error', details: error.message };
}
}
This code performs a critical function. It separates the concerns of the form, the conflict check, and the data creation. It’s clean and, more importantly, it’s testable.
Step 3: Triggering the Engagement Letter
Once the contact and matter are created in your CMS, the next step is to get the engagement letter signed. This process is triggered by the successful response from the CMS API call in the previous step.
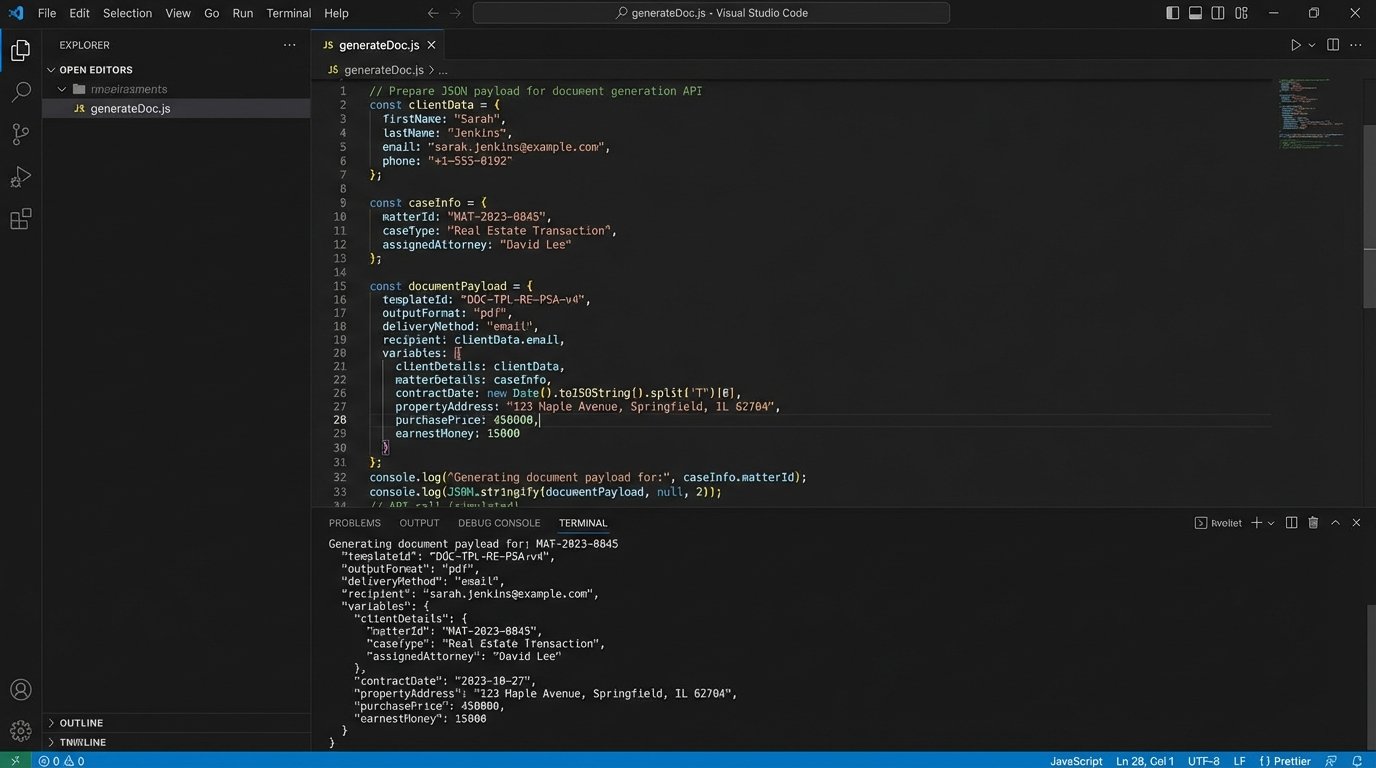
Dynamic Document Generation
Your middleware takes the validated client data and the new matter ID and uses them to populate a document template. You are not building a PDF generator from scratch. You use a service like PandaDoc, Documate, or Nintex. Your middleware calls their API, passing the data as a JSON payload. The service merges the data into a predefined template (your standard engagement letter) and generates the document.
Dispatching via E-Signature API
The document generation service then hands the document off to your e-signature provider’s API. Your code constructs a request that specifies the signers (the client and the responsible attorney), their email addresses, and the webhook URL where you want to be notified of status changes. This API call returns a unique ID for the signature request, which you must log against the matter record in your CMS. This ID is your link to track the document’s journey.
Processing the Webhook
When the client signs, DocuSign sends a POST request to your specified webhook URL. This payload contains the signature request ID and the final status, typically `completed`. Your middleware needs a public endpoint to listen for this traffic. This endpoint must be robust. It might receive duplicate events or events out of order. Your code should be idempotent, meaning if it receives the same “completed” notification twice, it doesn’t trigger the next step twice.
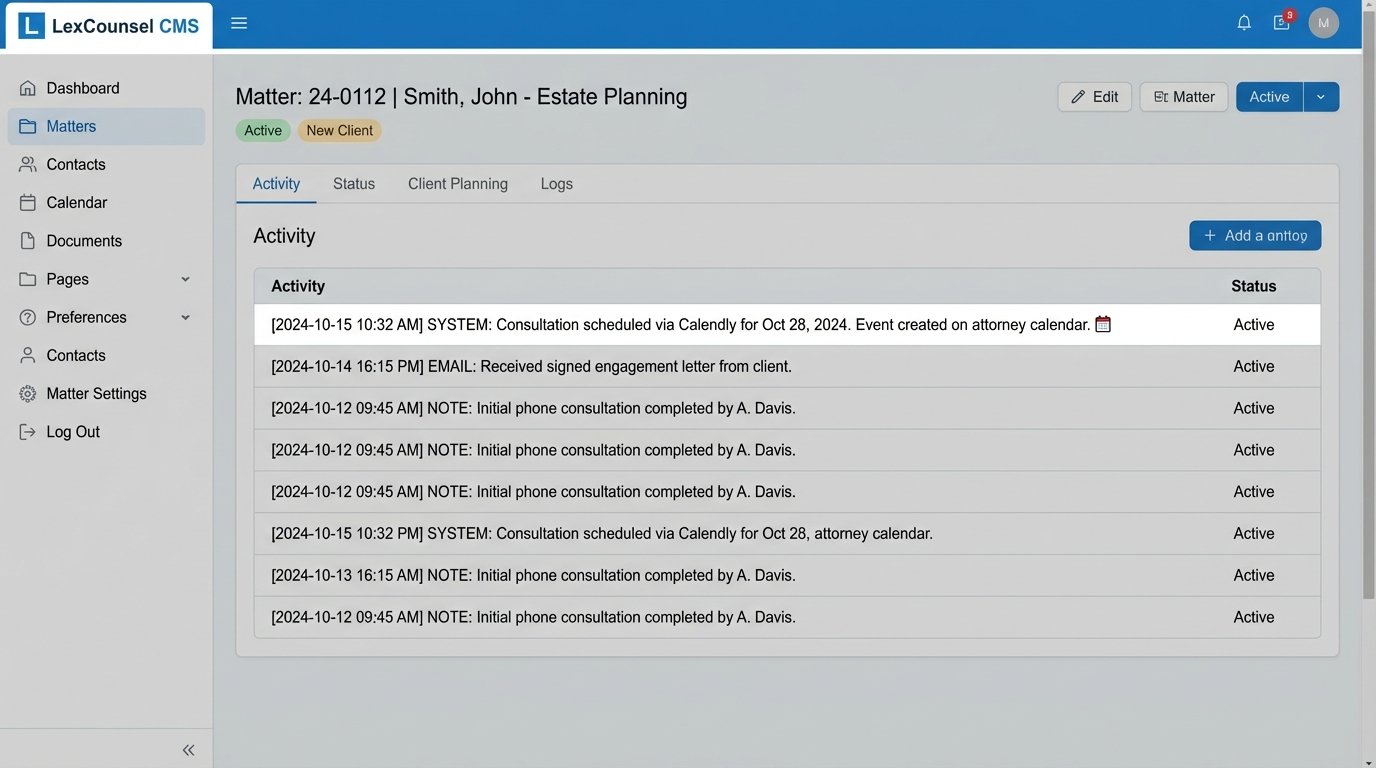
Upon receiving the `completed` webhook, your middleware should download the signed PDF from the e-signature provider’s API and upload it directly into the corresponding matter’s document folder in your CMS. The status of the matter should also be updated from “Pending Engagement” to “Active.” This is how you close the loop.
Step 4: Automating the Consultation Scheduling
With a signed engagement letter in hand, the client is officially active. The final step of intake is to schedule the initial consultation. This is triggered by the same `completed` webhook from the e-signature provider.
Generating a Unique Scheduling Link
Your middleware calls the Calendly (or similar) API. You pass context about the meeting, like the matter ID and the assigned attorney. The API returns a single-use scheduling link. You then send this link to the client via an automated email. This prevents them from using the same link to book multiple appointments or sharing it.
Alternatively, if integrating directly with Google or Microsoft, your middleware queries the attorney’s calendar for open slots within certain parameters (e.g., next 5 business days, between 9 AM and 5 PM). It then presents these options to the client. This is like trying to shove a firehose through a needle. It offers incredible control but the logic for handling time zones, existing appointments, and buffer times is complex. For most firms, a dedicated scheduling tool is the more pragmatic choice.
Closing the Final Loop
When the client books a time, the scheduling tool sends its own webhook back to your middleware. Your system catches this notification. It then writes the appointment details back to the matter’s activity log or notes section in the CMS. It can also create the calendar event on the attorney’s calendar and automatically generate a video conferencing link (Zoom, Teams). The intake process is now complete, with zero manual data entry.
Error Handling: Planning for Reality
This entire workflow is a chain of dependent API calls. It will fail. The DocuSign API will have downtime. Your CMS will return a 500 error during maintenance. A client’s email server will reject your automated email. Your automation is only as good as its ability to handle, log, and recover from these failures.
Implement a Dead Letter Queue
When an API call fails after a couple of automated retries, don’t just drop the data. The failed request payload should be sent to a “dead letter queue” (DLQ). This is a simple message queue, like Amazon SQS or Google Pub/Sub. Another process, or a human, can then inspect the messages in this queue to diagnose the problem and re-process them manually. Losing a new client’s intake data because an API temporarily failed is unacceptable.
Structured Logging and Alerting
Log every step. Log the incoming form data, the API request you sent, the response you received, and any transformations you performed. Use a structured logging format like JSON, which makes the logs searchable. Feed these logs into a system like Datadog, Sentry, or AWS CloudWatch.
Set up automated alerts. If your middleware logs more than five failed CMS API calls in a minute, it should trigger an alert to a Slack channel or PagerDuty. The operations team needs to know the system is broken before clients start calling to ask why they never received their engagement letter.
Building this system isn’t a one-time project. It’s a living product that must be maintained. API versions will be deprecated, authentication keys will expire, and your firm’s business logic will change. Treat it as a core piece of firm infrastructure, because that’s exactly what it is.