
Most real estate newsletters are digital garbage. They get sent to bloated, unsegmented lists with subject lines so generic they trigger automatic filtering straight into the trash folder. Your open rate isn’t low because your market updates are bad. It’s low because your delivery mechanism is lazy and lacks any semblance of intelligent targeting. The fix isn’t better stock photos of houses; it’s a series of cold, logical automations that force relevance on a per-contact basis.
These aren’t push-button solutions. They require API access, data hygiene, and a willingness to accept that a good chunk of your contact list is probably dead weight. Here are six automation frameworks that actually work.
1. Dynamic Subject Lines Based on Lead Behavior
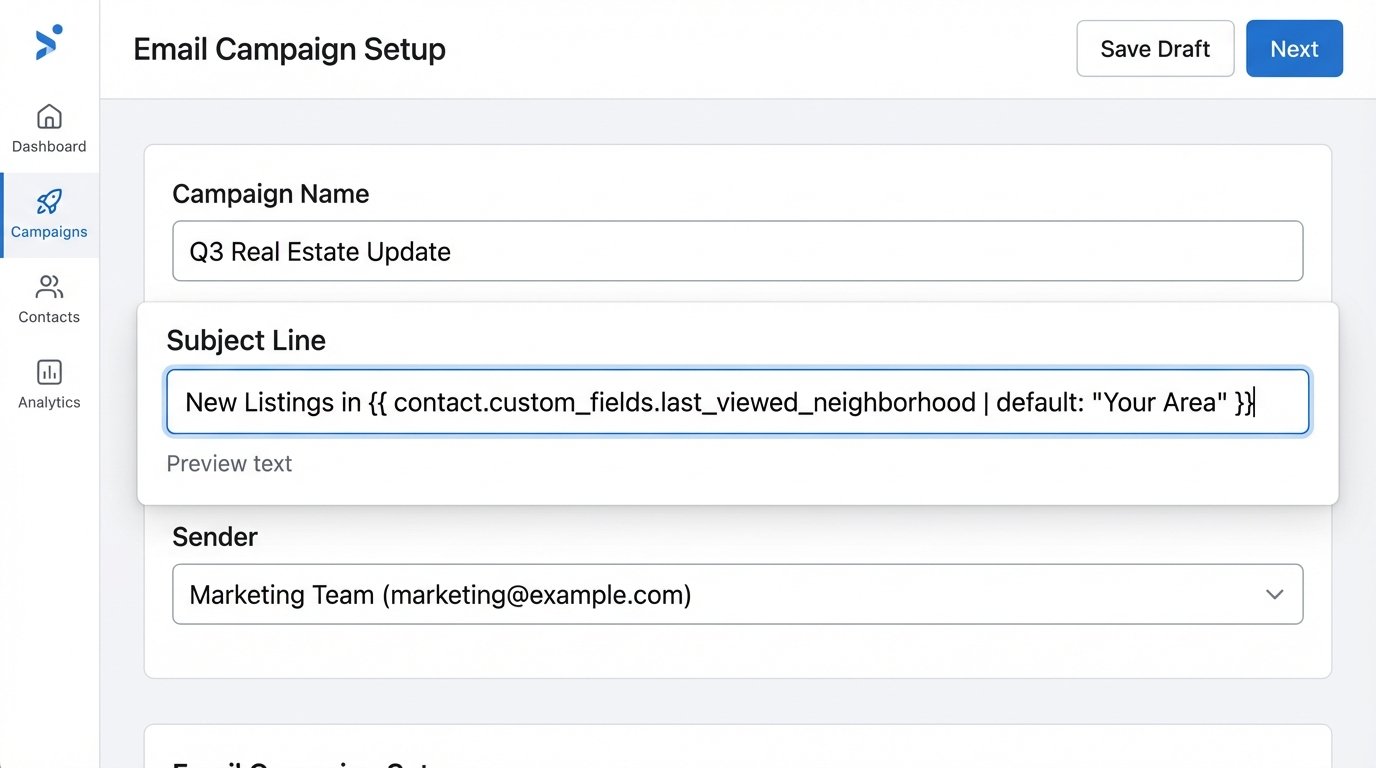
A static subject line like “Your Weekly Market Report” is an invitation to be ignored. It signals zero personalization and screams that the same content was blasted to thousands of other people. The goal is to build a subject line that reflects a contact’s most recent interaction with your digital assets, making it impossible to ignore because it directly references their own actions.
The core mechanism involves capturing specific user behavior, storing it as a custom attribute against their contact record, and then injecting that attribute into the subject line at send time. This requires a tight data pipeline between your website, your CRM, and your email service provider (ESP). For example, a lead views three properties in the “Greenwood” neighborhood. That data point, “Greenwood,” needs to be written to a `last_viewed_neighborhood` field in your marketing automation platform.
Technical Implementation
First, you capture the relevant data point on the front end. Using JavaScript, you can grab the neighborhood name from the page’s `h1` tag or a data attribute when a user views a listing. This data is then passed to your backend or a service like Segment, which then updates the contact record in your ESP via an API call. Most platforms support updating a contact with custom fields.
Your email template’s subject line then uses a personalization token. If you’re using a platform that supports a templating language like Liquid, it would look something like this:
New Listings in {{ contact.custom_fields.last_viewed_neighborhood | default: "Your Area" }}
The `default` filter is your safety net. If the `last_viewed_neighborhood` field is null for a contact who hasn’t browsed yet, the automation doesn’t break. It gracefully falls back to a generic, but still functional, subject line. The entire process hinges on the speed and reliability of this data sync. If the data is stale, the personalization feels creepy and out of touch.
You can apply the same logic to price reductions. A user views a property at $750,000. Your system flags this property ID. When the price drops, an automation is triggered, checks which contacts have viewed that ID, and sends a targeted email with the subject: “Price Drop on the Property You Viewed.” This is far more effective than a generic newsletter.
2. Send Time Optimization (STO) Based on Historical Engagement
The concept of a single “best time to send” is a complete myth. A contractor checking email at 6 AM has a different digital schedule than an office worker who clears their inbox after lunch. Sending your newsletter to everyone at 9:00 AM on Tuesday guarantees you will miss the engagement window for a significant portion of your audience. Send Time Optimization (STO) is the process of algorithmically determining the ideal delivery time for each individual contact.
Many high-end ESPs offer this feature out of the box, but they charge a premium for it. The underlying logic is straightforward. The system logs the timestamp of every single open and click event for each contact. Over time, it builds a profile of when a specific user is most likely to engage with their email. When you schedule a campaign, you select the “STO” option, and the platform throttles the sends, delivering the email to each contact at their personal, predicted peak time over a 24-hour period.
Building a Manual STO Process
If your platform lacks this feature, or you want to avoid the cost, you can build a simplified version. The first step is data collection. You need to ensure your email event webhooks are firing and you’re storing the `event_type` (open/click) and `timestamp` associated with a `contact_id`. You’d store this in a database you control.
Next, you need a recurring script, likely a cron job that runs weekly. This script queries your event database for each contact, aggregates the open times, and determines the most common hour of engagement. For example, if a contact has opened 10 emails, and 7 of them were between 4:00 PM and 5:00 PM, the script would update a custom field on their contact record called `optimal_send_hour` to “16”. Your sending automation would then be configured to query contacts where `optimal_send_hour` matches the current hour UTC and dispatch the email.
This is a data-heavy operation. For a list of 100,000 contacts, this script has to perform significant aggregation and then fire off thousands of API update calls. It’s slow and can be a resource drain. The trade-off is higher open rates versus higher infrastructure or platform costs.
3. Automated A/B/n Testing of Preview Text
Engineers obsess over subject lines but often forget the second most important element for opens: the preview text. This short snippet of text displayed next to the subject line in most email clients is critical, especially on mobile devices where it can take up as much screen real estate as the subject itself. Manually testing this is tedious. Automating it allows for testing multiple variants at scale.
Standard A/B testing is limited. An automated A/B/n system allows you to test many variants (A, B, C, D, etc.) simultaneously. The workflow sends each variant to a small, statistically significant portion of your total list. It then waits for a predefined period, measures the open rate of each variant, and automatically dispatches the winning variant to the remaining, larger segment of the list.
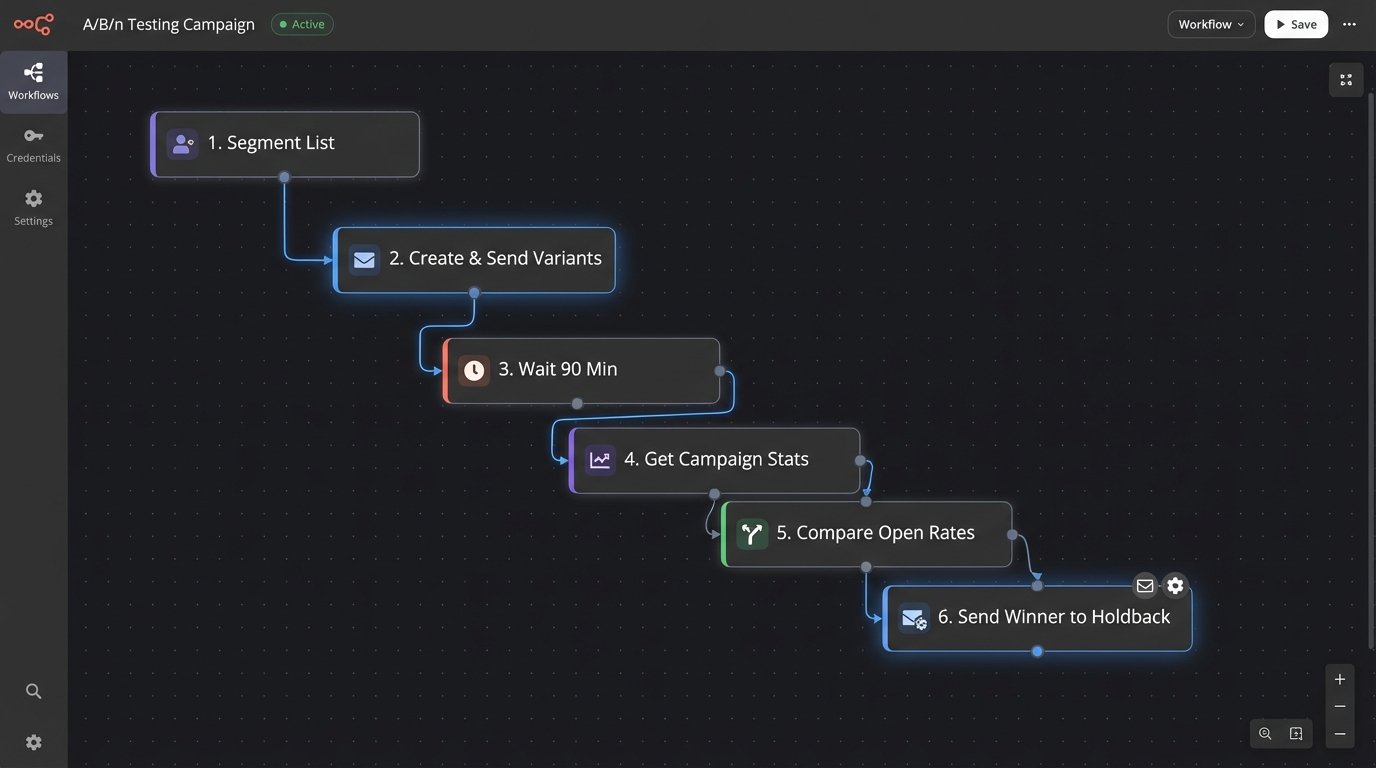
Workflow Architecture
This requires scripting against your ESP’s API. The process looks like this:
- Step 1: Segmentation. Your script divides your target list. For a list of 50,000, you might create five 1,000-contact test segments and one 45,000-contact holdback segment.
- Step 2: Campaign Creation. The script programmatically creates five identical email campaigns. The only difference is the preview text for each one. This is done by hitting the `/campaigns/create` endpoint of your ESP’s API.
- Step 3: Execution. The script sends each of the five campaigns to its corresponding 1,000-contact test segment.
- Step 4: Monitoring. The script enters a wait loop, for example, 90 minutes. After the wait, it starts polling the `/campaigns/{id}/stats` endpoint for each of the five test campaigns, retrieving the open rates.
- Step 5: Declaration and Final Send. The script compares the open rates, identifies the winner, and then triggers the send of that winning campaign to the 45,000-contact holdback segment.
This process removes human error and emotion from the decision. You get a data-backed reason for your choice of preview text. The primary pitfall is timing. If your monitoring window is too short, you might declare a false winner. If it’s too long, you miss the optimal sending window for the bulk of your audience.
4. Re-engagement Campaigns Triggered by Open Rate Decay
A large portion of your email list is likely inactive. These unengaged contacts are dead weight. They don’t open, they don’t click, and their presence on your list actively harms your sender reputation with ISPs like Google and Microsoft. Manually cleaning your list is inefficient. An automation can monitor engagement decay and attempt to re-engage or prune these contacts systematically.
The logic is based on a contact’s `last_opened_date`. You define a threshold for inactivity, for instance, 120 days. Any contact who hasn’t opened an email in that period is automatically moved from your primary newsletter list into a separate re-engagement sequence. This isn’t just a list management trick; it improves the open rates of your main campaigns because you are only sending to an engaged audience.
Implementing the State Machine
Think of each contact as having an engagement state: `active`, `cooling`, `inactive`. A daily scheduled function is responsible for state transitions.
The function queries all contacts where `state = active` and checks if `(current_date – last_opened_date) > 120`. If the condition is met, the script updates the contact’s `state` to `cooling` via an API call and simultaneously adds them to the “Re-engagement Automation.” This automation might send a series of three emails over two weeks with direct subject lines like, “Do you still want to hear from us?” or offering a unique piece of content.
If the contact opens or clicks any email in this sequence, another automation rule fires, updates their `state` back to `active`, and removes them from the re-engagement campaign. If they complete the entire sequence without engaging, the final step of the automation updates their `state` to `inactive` and archives them. They are no longer mailed, protecting your sender score. This entire loop is a self-cleaning oven for your contact database.
5. Content Personalization Based on Property Type
Generic content gets ignored. Sending a high-end condo listing to a lead who has only ever looked at suburban single-family homes is pointless. It demonstrates that you know nothing about their needs. True personalization goes beyond injecting a first name. It means dynamically altering the content blocks within the email itself based on the contact’s known data.
This requires robust segmentation based on browsing history. As a user clicks on listings, you should be tagging their contact record with attributes like `property_type_preference` (Condo, SFH, Multi-Family), `min_price`, `max_price`, and `target_zip_codes`. Once these data points exist in your ESP, you can use conditional logic within your email template to show or hide entire sections of content.
Templating Engine Logic
Most modern ESPs use a templating language like Liquid or Handlebars. The implementation involves wrapping content blocks in conditional statements. For example, to show a block of new condo listings only to contacts tagged as “condo seekers,” your template code might look like this:
    <!-- Main content for everyone -->

    <p>Here is your weekly market update...</p>
<!-- Conditional Block for Condo Seekers -->
{% if contact.custom_fields.property_type_preference == 'Condo' %}
<h3>Featured Condos in Your Area</h3>
<p>Condo listing 1...</p>
<p>Condo listing 2...</p>
{% endif %}
<!-- Conditional Block for SFH Seekers -->
{% if contact.custom_fields.property_type_preference == 'SFH' %}
<h3>New Single-Family Homes on the Market</h3>
<p>SFH listing 1...</p>
<p>SFH listing 2...</p>
{% endif %}
The real engineering challenge is not writing the template code. It’s building the data pipeline that accurately populates and updates those custom fields in near real-time. This is a fragile process. A bug in your website’s tracking script can lead to incorrect segmentation, which results in sending completely irrelevant content. Getting this data flow right is like trying to change the plumbing in a house while the water is still running. You are going to run into problems before it works correctly.
6. List Hygiene Automation via Email Verification APIs
Your open rate is a ratio: `(Opens / Delivered Emails)`. If your number of delivered emails is artificially inflated by invalid, misspelled, or junk addresses, your open rate plummets. More importantly, a high bounce rate destroys your sender reputation. ISPs track this, and if you look like a spammer, they will start routing all your mail to the spam folder, including for your valid contacts.
The solution is to validate email addresses at the point of entry, before they ever hit your main list. This is done by integrating a third-party email verification API into your lead capture process. Services like ZeroBounce, Hunter, or NeverBounce can tell you if an email address is valid, a role-based address (like `info@`), a disposable address, or a catch-all.
The Webhook-Based Architecture
You cannot do this validation client-side. You must do it on the backend to protect your API key and control the logic. The standard architecture uses a webhook or an intermediary serverless function.
When a user submits a lead form on your website, the form’s payload is not sent directly to your ESP. Instead, it is sent to your own API endpoint. This endpoint receives the email address and other data. Your server-side code then makes a synchronous API call to the verification service. The verification API responds with a JSON object containing the status of the email. Your code logic-checks this status. If the status is `valid`, your code proceeds to make a second API call, this time to your ESP, to add the contact to your list. If the status is `invalid` or `risky`, your code simply discards the lead or flags it for manual review.
This adds cost and latency. Each API call to the verification service costs a fraction of a cent, which adds up over thousands of leads. It also adds a few hundred milliseconds to your form submission process. This is the direct cost of maintaining a high-quality list and protecting your deliverability. There is no way around it.