
Polling APIs for title and escrow status is a colossal waste of compute cycles and developer sanity. You repeatedly ask a server “anything new?” only to get a “no” 99% of the time. This isn’t engineering. It’s digital nagging. Webhooks reverse this broken dynamic. The source system tells you when something happens, pushing data to your endpoint the moment an event occurs. No more scheduled jobs, no more missed updates because your cron job ran five minutes too late.
The switch to a webhook-driven architecture forces a change in mindset from active querying to passive listening. Your system becomes reactive, not proactive. The initial build is more complex than a simple GET request loop, but the long-term payoff is a system that scales efficiently and provides near real-time data synchronization. Get it wrong, and you build a fragile system that drops data or creates security holes. Get it right, and you gut a major source of operational overhead.
Prerequisites: The Non-Negotiable Foundation
Before writing a single line of code, you need a stable foundation. First, you must have a publicly accessible HTTPS endpoint. Using a raw IP address or a non-TLS connection is asking for trouble. Services like ngrok are fine for local development, but for production, this means a properly configured server behind a load balancer or an API gateway. This endpoint is your front door. Do not leave it unlocked.
Second, get your hands on the webhook provider’s documentation. Read it. Then read it again. You need to know the exact structure of the JSON payload for each event type, the expected HTTP headers, and, most critically, their security signature mechanism. If they don’t offer HMAC signature validation or some equivalent, you should question the integrity of their service. An API key in the URL is not security.
Finally, map out your data strategy. You need a persistent store, like a PostgreSQL database or a Redis cache, to track incoming event IDs. This is the bedrock of preventing duplicate processing. Without it, a simple network hiccup at the source could cause them to resend an event, triggering duplicate actions in your system. You have to assume the webhook will be delivered more than once. It always is.
Step 1: Building and Securing the Listener Endpoint
Your listener endpoint has two jobs: ingest data and survive the internet. Its primary function is to receive the HTTP POST request from the title company’s system, validate its authenticity, and then immediately hand off the payload for asynchronous processing. The single biggest mistake is trying to do heavy lifting directly within the endpoint’s request-response cycle. This will lead to timeouts and lost data when the source system gives up waiting for your response.
The endpoint must return a `200 OK` status code as fast as possible. Anything else, like a `201 Created` or `202 Accepted`, might be misinterpreted by the source system, causing it to retry the delivery indefinitely. This creates a feedback loop of death that will flood your logs and potentially get your endpoint blocked. The goal is to acknowledge receipt, nothing more.
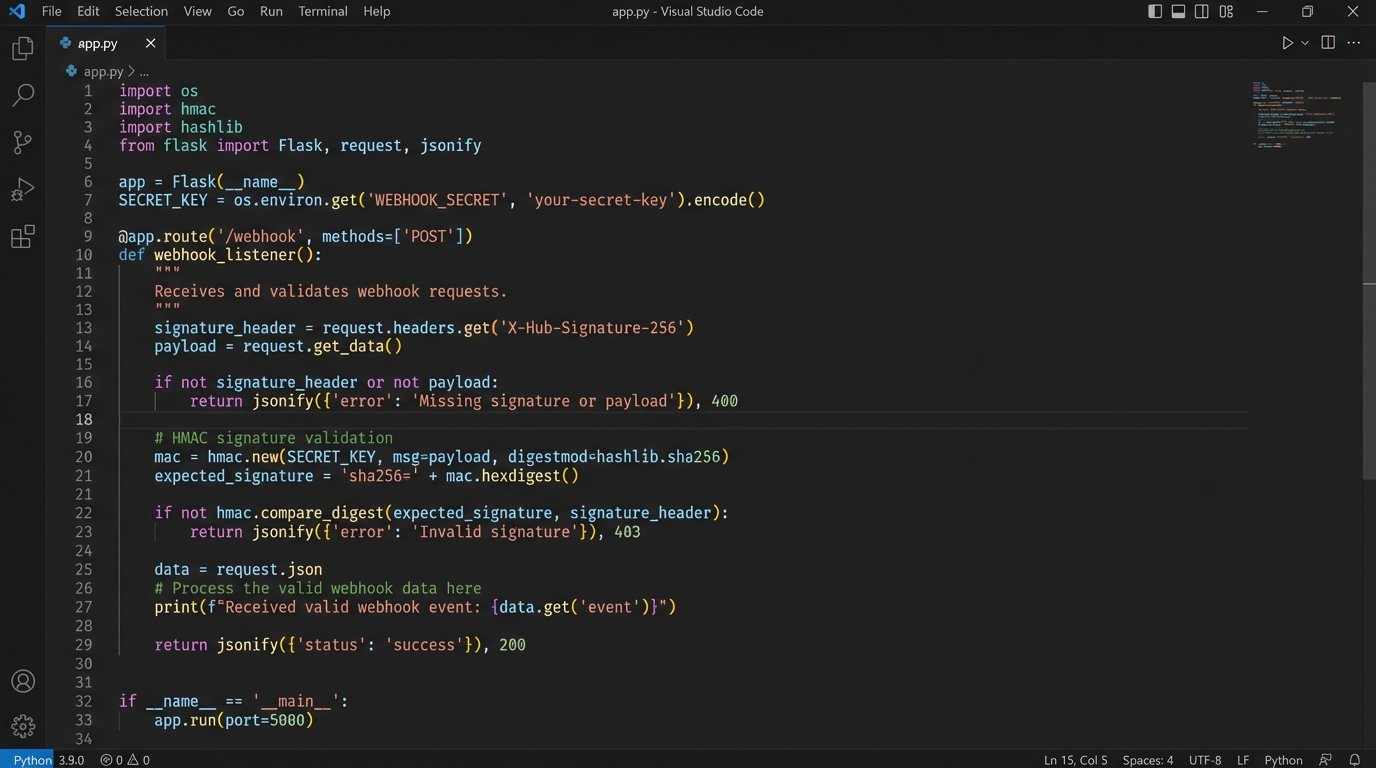
Security is not optional. Most competent webhook providers use a Hash-based Message Authentication Code (HMAC) to sign their requests. They generate a signature using a secret key you both share, and include it in a request header like `X-Signature`. Your first action upon receiving a request is to compute your own signature on the raw request body using the same secret key and algorithm (e.g., SHA256). If your signature matches theirs, the request is legitimate. If it doesn’t, you drop it and return a `401 Unauthorized`. This prevents anyone on the internet from spoofing events and injecting bad data. Trying to build this without signature validation is like routing raw server traffic directly to a database port. It’s negligent.
Here is a bare-bones Python example using Flask to show the basic structure. Notice it does no real work. It validates the signature, then queues the job.
    import hmac
    import hashlib
    from flask import Flask, request, abort

    # This should be stored securely, not hardcoded.
    WEBHOOK_SECRET = 'your_super_secret_key_from_provider'

    app = Flask(__name__)

    def verify_signature(payload_body, secret_token, signature_header):
        """Verify that the payload was sent from the provider."""
        if not signature_header:
            return False
        hash_object = hmac.new(secret_token.encode('utf-8'), msg=payload_body, digestmod=hashlib.sha256)
        expected_signature = "sha256=" + hash_object.hexdigest()
        return hmac.compare_digest(expected_signature, signature_header)

    @app.route('/webhook-listener', methods=['POST'])
    def webhook_listener():
        # Get the signature from the headers
        signature = request.headers.get('X-Signature')

        # Get the raw request body
        payload = request.get_data()

        if not verify_signature(payload, WEBHOOK_SECRET, signature):
            # Signature mismatch, drop the request
            abort(401)

        # At this point, the request is authentic.
        # DO NOT process here. Pass it to a background worker.
        # For example, push to a Redis queue:
        # redis_queue.enqueue('process_escrow_update', payload.decode('utf-8'))

        # Acknowledge receipt immediately.
        return 'OK', 200
Step 2: Offloading to a Job Queue
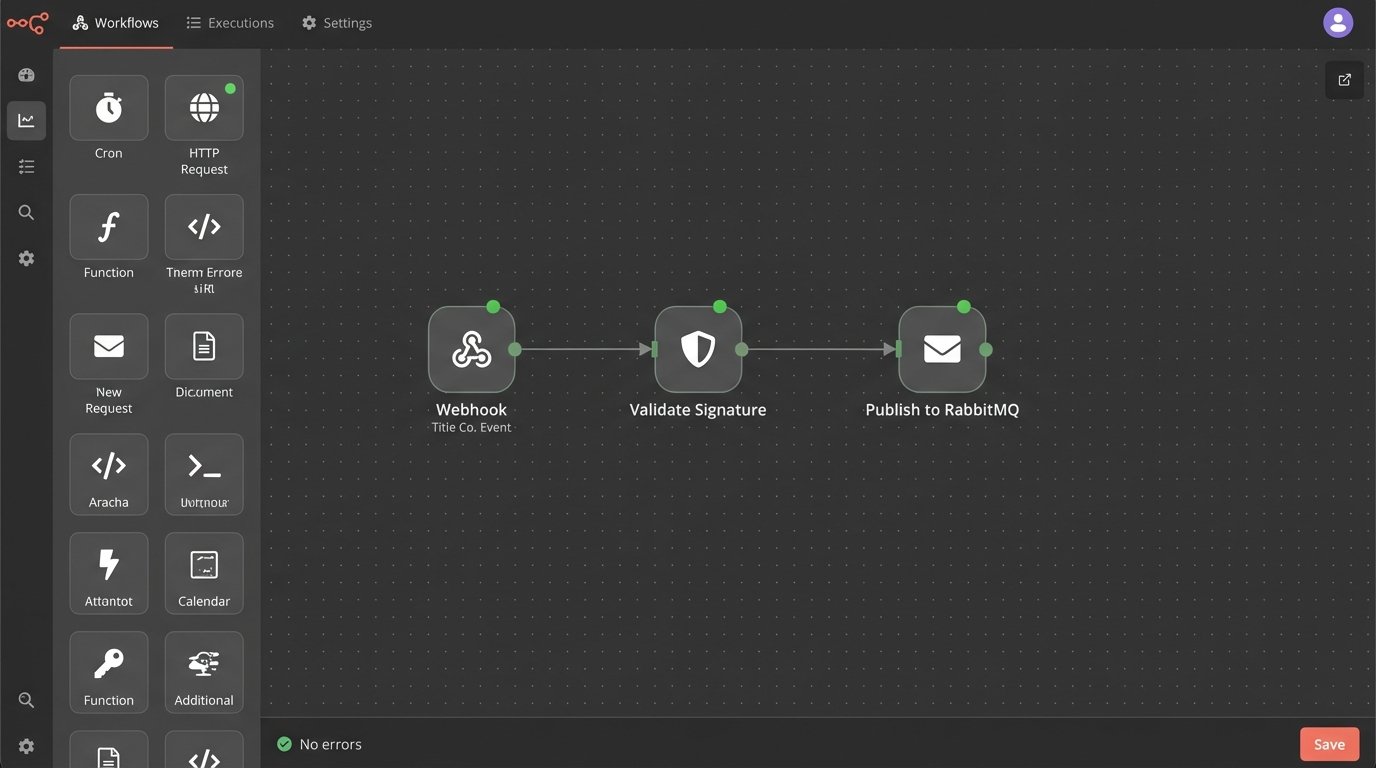
Once the webhook payload is validated, the listener’s job is done. The payload must be passed to a message queue or job scheduler like RabbitMQ, Redis Queue (RQ), or AWS SQS. This decouples ingestion from processing. This architecture provides resilience. If your processing logic crashes, the message remains in the queue, ready to be retried once the worker is back online. If you tried to process it in the web request, that data would be lost forever.
This decoupling also enables scalability. Your listener might be a lightweight web server that can handle thousands of incoming requests per second. The processing logic, however, might involve slow database writes or calls to other internal APIs. By putting a queue in the middle, you can scale the number of worker processes independently of the web-facing listener. You can have ten workers churning through a backlog without slowing down the ingestion of new events.
Think of the job queue as a shock absorber for your system. A sudden burst of 10,000 updates from the title provider would crush a synchronous system. With a queue, the listener calmly accepts all 10,000 requests in seconds, and the workers process them at a sustainable pace. The alternative is a system that falls over under its own weight.
Step 3: Enforcing Idempotency
Webhook providers guarantee “at-least-once” delivery, not “exactly-once.” This means you must prepare for duplicate events. A network timeout might cause the provider to resend the same payload. If your logic is simply “on receipt of ‘OrderClosed’ event, send email,” you will end up spamming users with duplicate notifications. This is unprofessional and erodes trust.
The solution is idempotency. An operation is idempotent if running it multiple times has the same effect as running it once. To achieve this, you need a unique identifier for each event. Most providers include an event ID in their payload (e.g., `event_id: “evt_123abc”`). Before processing any event, your worker must check if it has seen this ID before. A simple way is to store processed event IDs in a database table or a Redis set with a time-to-live (TTL).
The logic is simple:
- Worker pulls a job from the queue.
- Extract the unique `event_id` from the payload.
- Check your persistent store. Does this `event_id` already exist?
- If yes, discard the job and acknowledge the message from the queue. The work is already done.
- If no, add the `event_id` to your store, then execute your business logic.
Skipping this step guarantees you will eventually corrupt your data or perform redundant, costly actions. It is a ticking time bomb in any event-driven system.
Step 4: Mapping and Transforming the Data
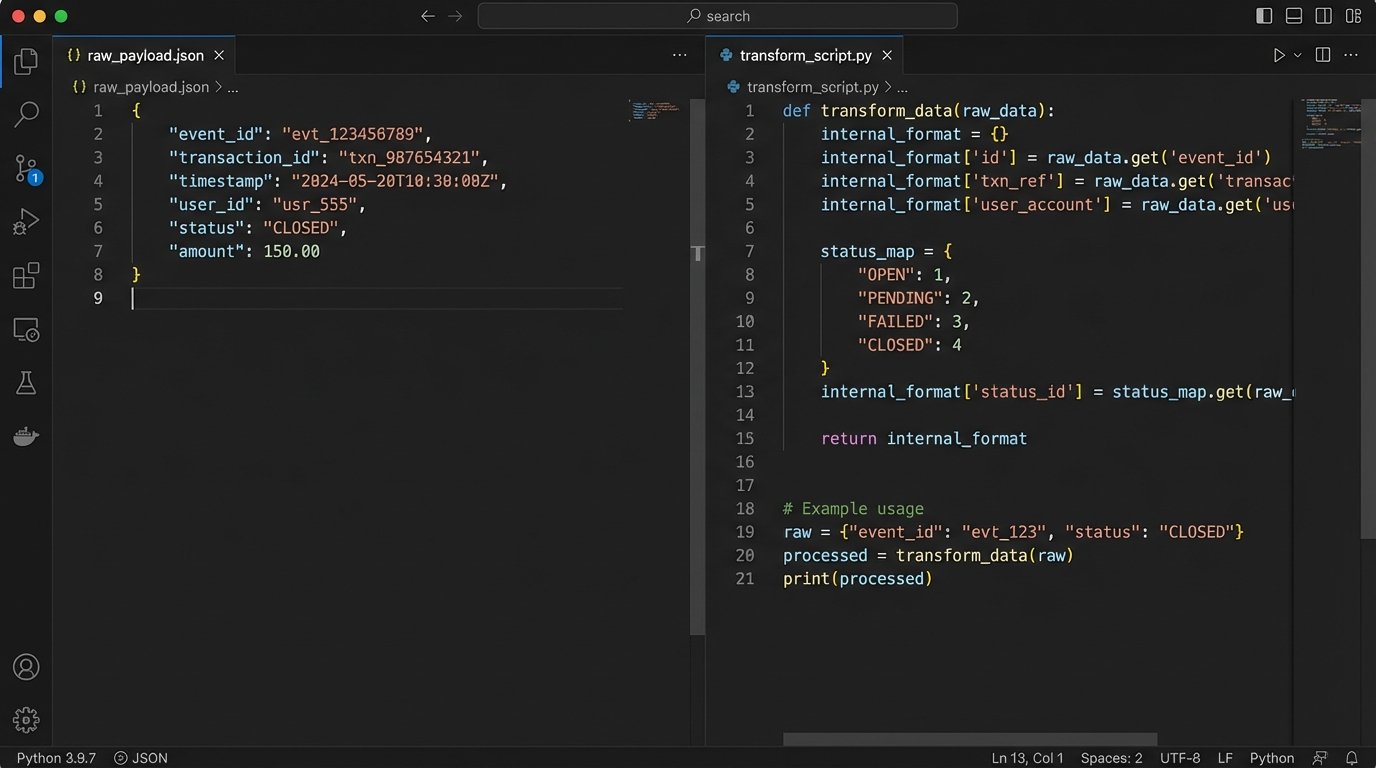
The webhook payload arrives in a format dictated by the title company, not by you. It will never perfectly match your internal database schema. This is where the grunt work of data transformation happens. Your worker process needs to be a ruthless data bouncer, stripping useless fields, renaming keys, and reformatting values to fit your system’s requirements. A `status` field might come in as `“CLOSED”` but your system expects an integer `4`. A timestamp might be in ISO 8601 format, but you need a Unix epoch.
This mapping logic should be centralized and well-documented. Hardcoding field mappings directly in the worker function creates a maintenance nightmare. A better approach is to use a dictionary or a dedicated mapping class that defines the translation layer. This isolates the messy reality of the external API from your clean internal data models. When the provider inevitably releases version 2 of their webhook payload, you only have to update the mapping logic, not rewrite your entire processing function.
This transformation stage is also the right place to perform data validation. Just because the request had a valid signature doesn’t mean the data itself is valid. Does the `transaction_id` exist in your system? Is the `closing_date` a valid date? Reject and log any payload that fails these logic checks. Do not inject garbage data into your production database just because it came from a trusted source.
Step 5: Logging, Monitoring, and Failure Handling
Your webhook integration will fail. Not maybe, but will. The provider’s API will go down. Your database will lock up. A bug in your code will throw an unhandled exception. A robust system anticipates these failures. The first line of defense is structured logging. Log every critical step: event received, signature validated, job queued, job started, job completed or failed. Use JSON-formatted logs with the `event_id` and `transaction_id` in every log message. This makes it possible to trace the entire lifecycle of a single event through your system when things go wrong.
When a worker fails to process a message, don’t just discard it. Use a dead-letter queue (DLQ). Most message queue systems support this pattern. After a configurable number of failed retries, the message is automatically moved to a separate DLQ. This gets the poison pill message out of the main queue so it doesn’t block other events, but preserves it for manual inspection. An engineer can then examine the payload, diagnose the issue, and either fix the bug, manually correct the data, or discard the event.
Finally, set up monitoring and alerting. You need to know when your queue depth is growing faster than your workers can process, or when the rate of messages entering the DLQ spikes. These are early warning signs of a systemic problem. Waiting for a customer to call and complain about a missing update is not a monitoring strategy. A dashboard showing webhook ingestion rates, worker throughput, and DLQ size is a necessity for operating this kind of system reliably. Without it, you are flying blind.