Every real estate operation eventually bolts Zapier onto its tech stack. It’s the universal adapter for systems that were never designed to speak to each other. But treating it like a simple plug-and-play tool is the first mistake. The automations that look simple on the surface are often the most fragile, ready to shatter the moment they encounter a malformed phone number or an unexpected API timeout from your CRM.
The difference between a stable, lead-converting automation and a silent, data-dropping failure is not in the complexity of the Zap. It is in the defensive architecture you build around it. These are not tips for beginners. These are operational procedures for people who know the cost of a lost lead and have no patience for workflows that break after a minor software update.
Data Normalization Is Not a Suggestion
The most common failure point in real estate automation is dirty data. Leads from sources like Zillow, Realtor.com, or Facebook Lead Ads arrive with zero consistency. You get “john smith,” “John Smith,” and “SMITH, JOHN.” Phone numbers can be “(555) 123-4567,” “555-123-4567,” or “5551234567.” Pushing this directly into a CRM like Follow Up Boss or LionDesk is asking for duplicate contacts and broken follow-up sequences.
Your first line of defense is Zapier’s own Formatter step. Before any data hits your CRM, it must be forced through a gauntlet of formatting rules. This is a non-negotiable part of the build. Use the Text transform to standardize capitalization, trim whitespace, and extract patterns. Use the Numbers transform to format currency and phone numbers. This multi-step sanitization process is tedious but necessary.
A typical lead processing Zap should look like this:
- 1. Trigger: New Lead (e.g., from Facebook Lead Ads).
- 2. Action: Formatter (Text) -> Capitalize First Name.
- 3. Action: Formatter (Text) -> Capitalize Last Name.
- 4. Action: Formatter (Text) -> Remove all non-numeric characters from Phone Number field.
- 5. Action: Create/Update Contact in CRM with the cleaned data.
Ignoring this creates a technical debt that your agents, not you, will have to pay by manually cleaning up the CRM database. That’s a losing battle.

Build Defensively Against API Rate Limits
Real estate CRMs and lead sources are notoriously sensitive to API call volume. A successful ad campaign can generate hundreds of leads in a few minutes, triggering a corresponding number of Zaps. This flood of activity often slams into the platform’s API rate limit, causing subsequent requests to fail. Zapier will report these as errors, but by then the lead is already cold.
The crude but effective method to manage this is to inject a Delay by Zapier step. For workflows that are not time-sensitive, adding a one or two minute delay can be enough to smooth out the traffic spikes. This is a blunt instrument. A more resilient architecture involves creating an intermediate buffer to decouple the lead ingestion from the CRM processing.
The Webhook and Sheet Buffer
A better pattern is to have your lead source send a webhook to Zapier. The Zap’s only job is to catch this webhook and immediately write the raw lead data as a new row in a Google Sheet. This action is incredibly fast and unlikely to fail. A second, separate Zap is then configured to run on a schedule, perhaps every five minutes. It reads a batch of unprocessed rows from the Google Sheet, processes them, and then updates a status column in the sheet to mark them as “Processed.”
This “decoupling” method accomplishes two things:
- Durability: Your lead capture is never blocked by a downstream CRM being slow or unavailable. The Google Sheet acts as a persistent queue.
- Rate Limiting: The scheduled Zap naturally throttles the API calls to your CRM, processing leads in controlled batches instead of a chaotic flood.
The cost is a few minutes of latency. For most inbound lead types, this is an acceptable price for near-guaranteed delivery.
Stop Using Polling Triggers for Critical Workflows
Many of Zapier’s default triggers are “polling” triggers. This means Zapier asks the application, “Is there anything new?” on a schedule. Depending on your Zapier plan, this check might happen every one to fifteen minutes. For a new property inquiry, fifteen minutes is an eternity. By the time your system is notified, the lead has already spoken to three other agents who had a faster response mechanism.
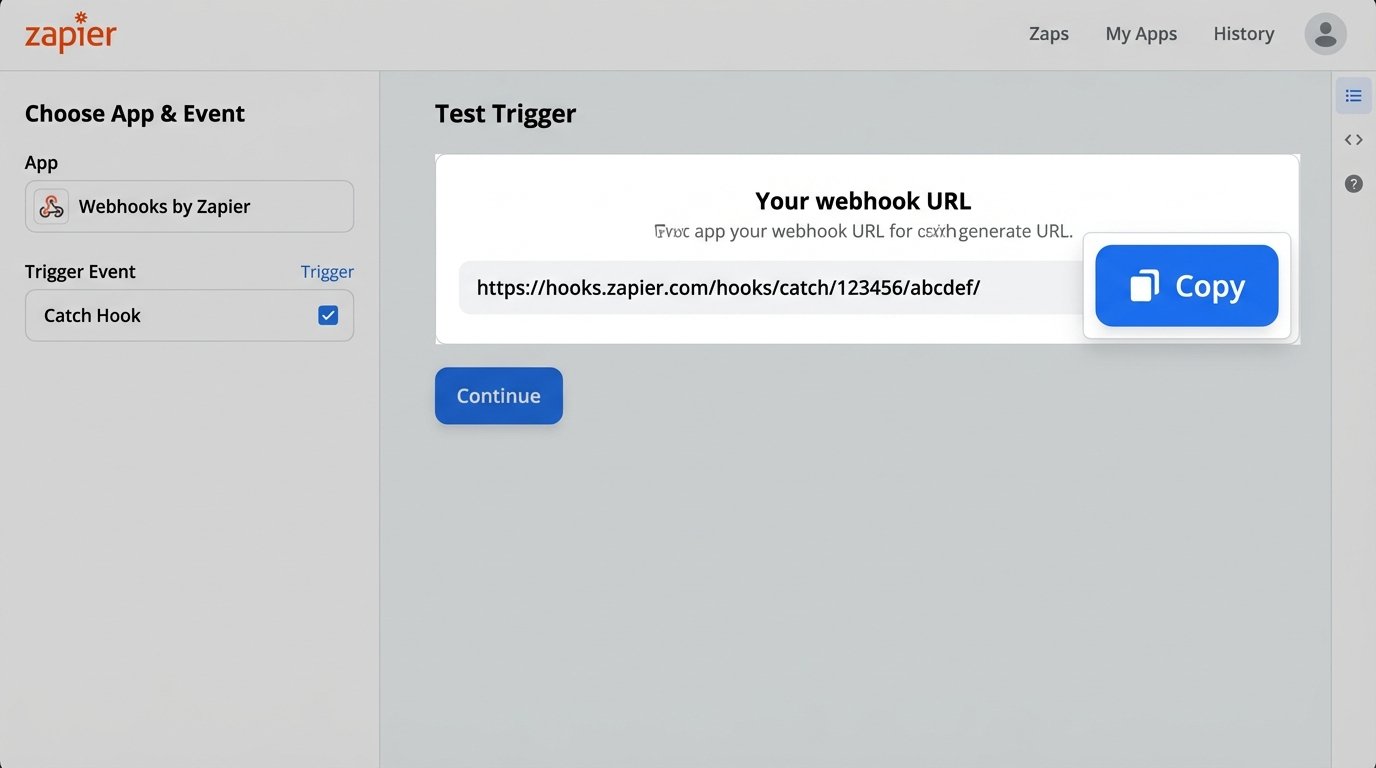
Speed to lead is a primary metric in real estate. The solution is to use webhooks whenever possible. A webhook is the opposite of polling. Instead of Zapier asking for new data, the source application instantly sends the data to a unique Zapier URL the moment an event occurs. This is the difference between checking your mailbox every hour and getting an instant delivery notification on your phone.
If your lead source or CRM supports outbound webhooks, use them. The setup in Zapier is straightforward: choose the “Webhook by Zapier” app and the “Catch Hook” trigger. Zapier will provide a URL. You paste this URL into the webhook configuration of your source system. The result is a near-instantaneous trigger, reducing lead notification time from minutes to seconds. This is a pure structural advantage.
Forcing an entire lead follow-up system to operate on a 15-minute polling delay is like shoving a firehose of time-sensitive data through a needle. It’s a bottleneck by design.
Error Handling Must Be Explicit
A Zap can fail for dozens of reasons: an expired API key, a change in the data structure from the source, or a new required field added to your CRM. Zapier’s default behavior is to halt the Zap and send you a generic email. These emails are easy to ignore and lack the context needed for a quick diagnosis. You need to build your own error handling path directly into your Zaps.
The primary tool for this is the Filter by Zapier or Paths by Zapier. Before the final “Create Contact” step, insert a filter that checks for the existence of critical data. For example, a filter might check that the “Email” field is not empty and contains an “@” symbol. If the data passes the check, it proceeds to the CRM. If it fails, it goes down a separate path.
This error path should not be passive. It should trigger an explicit, detailed alert. For example:
- Path A (Success): Filter passes -> Create Contact in CRM.
- Path B (Failure): Filter fails -> Send a message to a specific Slack channel (#zapier-errors) that includes the raw data from the trigger and a note about what validation failed.
This gives you immediate, contextual visibility into failures. You are no longer relying on Zapier’s email notifications, which often arrive long after the problem started. You are building a proactive monitoring system. Hope is not a valid error handling strategy in a production environment.
Recognize the Multi-Step Zap Tax
Zapier’s pricing model is based on “Tasks.” Every action, every filter, every formatter step consumes one task. A seemingly simple workflow to process a lead, clean the data, check for duplicates, and then add them to the CRM can easily balloon into a 10-step Zap. If this Zap runs 100 times a day, that’s 1,000 tasks consumed. This becomes a wallet-drainer, fast.
There is an inflection point where the convenience of the visual builder is outweighed by the cost and fragility of a complex Zap. Once a Zap requires multiple paths, complex conditional logic, or data manipulation beyond what the Formatter can handle, it’s time to use the escape hatch: Code by Zapier.
The “Code by Zapier” step allows you to inject a small snippet of Python or JavaScript. A single code step can often replace five or six individual Formatter and Filter steps. You can split a full name, format a phone number, and check for a valid email all within one task, not three.
When to Write Code
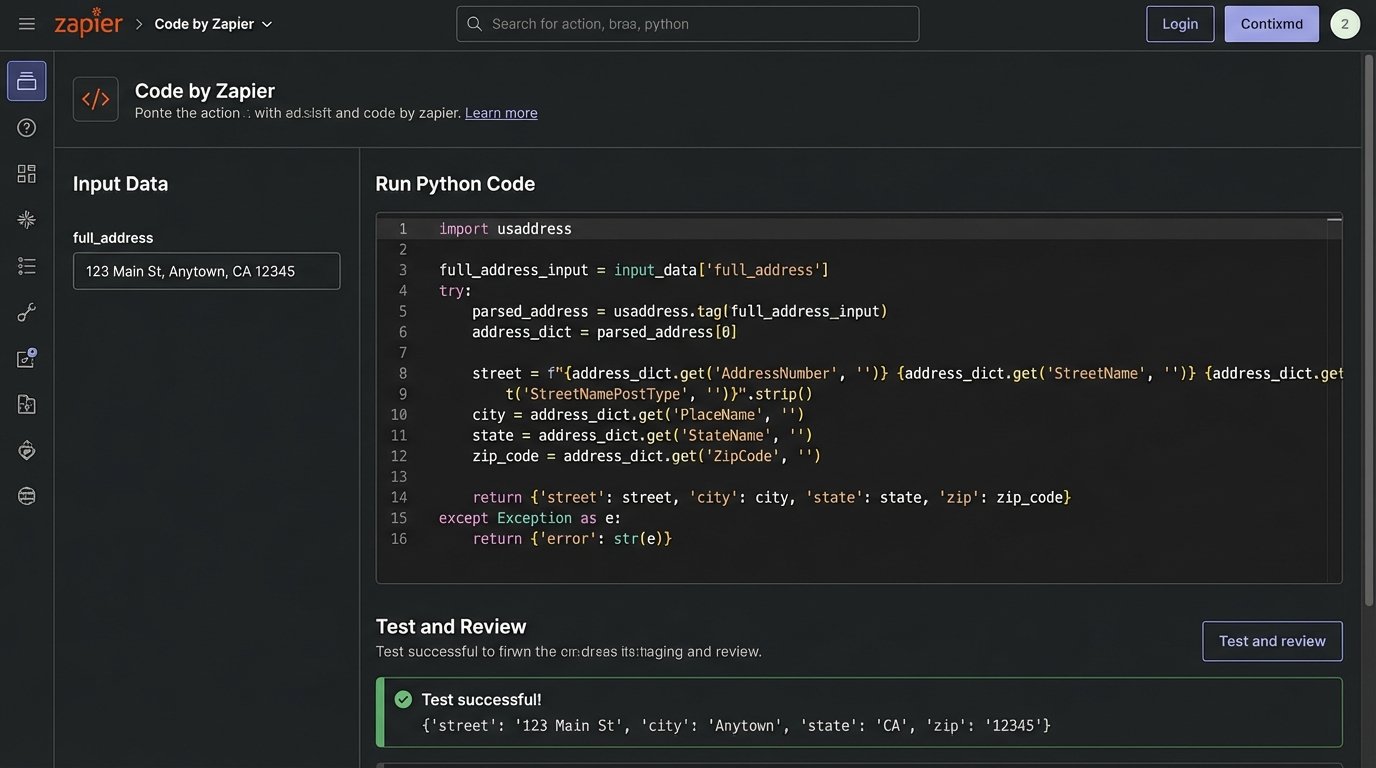
Consider this Python snippet for parsing an address. Doing this with Formatter steps would be a nightmare of splitting text by spaces, then by commas, and trying to guess which part is which.
# Assume input_data['full_address'] = "123 Main St, Anytown, CA 90210"
address_parts = input_data['full_address'].split(',')
street = address_parts[0].strip()
city = address_parts[1].strip()
# Further split state and zip
state_zip = address_parts[2].strip().split(' ')
state = state_zip[0]
zip_code = state_zip[1]
return {'street': street, 'city': city, 'state': state, 'zip': zip_code}
This one code block consolidates multiple fragile steps into a single, predictable operation. It reduces task consumption and makes the Zap’s logic easier to debug. Using Zapier for complex workflows without leveraging code is like insisting on using a hand screwdriver to assemble an entire house.
Document Field Mappings Externally
A Zap is a contract between two systems. It maps specific data fields from a source to a destination. This mapping lives inside the Zapier editor, which is a terrible place for documentation. Six months after you build a Zap, a well-meaning marketing coordinator might decide to change a custom field in the CRM from “Lead Source” to “Origin.” The Zap will break silently.
No one will remember why. The investigation will require clicking through every step of the Zap to reverse-engineer the original logic. This is an avoidable waste of time. For every critical Zap, maintain a simple external document. This can be in a shared spreadsheet, a Confluence page, or whatever your team uses for technical documentation.
The document should contain:
- Zap Name & Link: A direct link to the Zap in the editor.
- Business Purpose: A one-sentence description. E.g., “Creates new contact in Follow Up Boss from Zillow leads.”
- Trigger System & Event: Zillow, New Lead.
- Action System & Event: Follow Up Boss, Create Contact.
- Field Mapping Table: A simple two-column table showing `Source Field -> Destination Field`.
This documentation is not for your boss. It’s for you, three months from now, at 2 AM, when a critical automation has stopped and you need to diagnose the failure immediately. You will thank yourself for having done it.