A No-Nonsense Guide to Engineering Email Drips for Homebuyer Leads
Most homebuyer lead campaigns fail because they treat engineering as an afterthought. They focus on email copy and subject lines while the backend is held together with scripts that fall over if an API returns a 429 error. We are not going to do that. This guide is about building the plumbing first. The part that ingests, cleans, segments, and triggers communications without manual intervention.
Forget the marketing fluff. A drip campaign is a state machine triggered by data. Our job is to build a reliable machine.
Prerequisites: The Stack You Actually Need
Before writing a line of code, you need three core components in place. Selecting the wrong tool here will force you into ugly workarounds later. Most sales pitches for these tools will conveniently omit their integration limits.
- A Lead Source with Webhook Support: Your leads have to come from somewhere. A Zillow Premier Agent account, a Facebook Lead Ad form, or a custom landing page. The critical non-negotiable feature is a webhook. Polling an API for new leads every five minutes is an inefficient, brittle approach that adds latency. We want the lead source to push data to our endpoint the instant it’s available.
- A Competent CRM: This is your central nervous system. It needs a documented, RESTful API that allows you to programmatically create contacts, update fields, and apply tags. A CRM without a usable API is just a glorified spreadsheet. Be prepared to vet the API documentation for rate limits and authentication methods. An API that only offers basic auth is a red flag.
- An Email Service Provider (ESP): This is the component that sends the emails. Tools like SendGrid, Mailchimp, or ConvertKit work, but again, the API is what matters. We need to be able to add a subscriber to a specific sequence or automation workflow via an API call. We also need a way to remove them from that sequence when they take a disqualifying action, like booking a call.
Core Architecture: Webhooks, an API Layer, and State Management
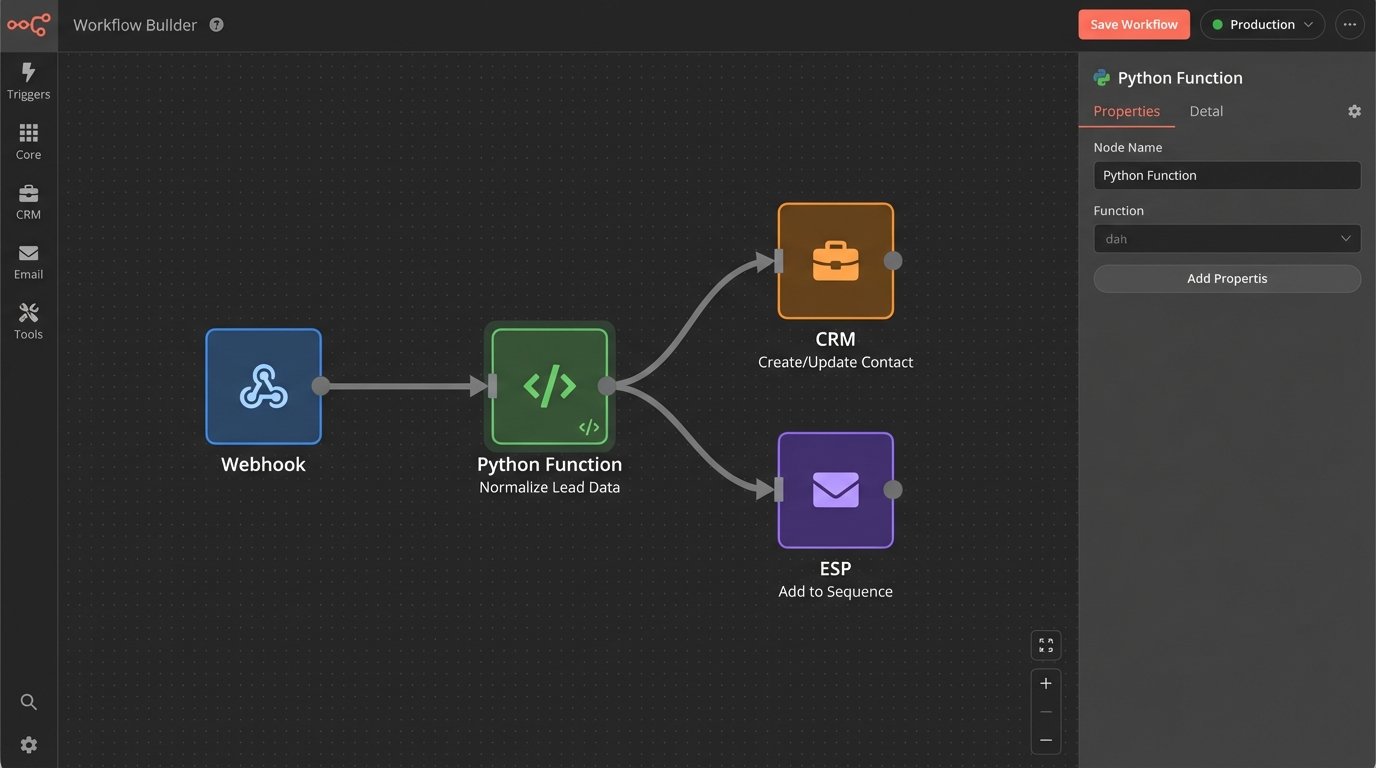
The architecture is straightforward. A lead source fires a webhook to an intermediary API layer that we control. This layer is responsible for data normalization and sanitation. It then makes sequential, logic-checked calls to the CRM to create or update the contact, and then to the ESP to enroll them in the correct sequence. Using an intermediary layer prevents the entire system from failing if one downstream API is temporarily unavailable.
Think of this intermediary service as a traffic cop at a chaotic intersection. It inspects each vehicle (the lead data), cleans the mud off the license plate (normalizes the data), and then directs it down the correct road (to the CRM and ESP). Without it, you are just ramming raw, unpredictable traffic directly into your core systems.
This API layer can be a serverless function (AWS Lambda, Google Cloud Function) for low cost and scalability, or a small Flask or Express app running on a cheap virtual server. For this example, we will use Python with Flask.
Step 1: Ingesting and Normalizing the Lead Data
Lead data is never clean. You will get names in all caps, phone numbers with random punctuation, and email addresses with trailing spaces. The first job of our webhook receiver is to sanitize this input before it pollutes our CRM. This is the most critical step for data integrity.
The webhook from a lead provider like Facebook might send a JSON payload that looks disorganized. We need to catch it, strip out the garbage, and map it to a clean, internal data structure.
Here is a basic Flask endpoint to catch a webhook. It expects JSON, validates the presence of essential keys, and performs basic cleaning operations.
from flask import Flask, request, jsonify

import re
app = Flask(__name__)
def normalize_phone(phone_number):
if not phone_number:
return None
return re.sub(r'\D', '', str(phone_number))
def normalize_email(email):
if not email:
return None
return email.lower().strip()
@app.route('/webhook/new-lead', methods=['POST'])
def lead_ingestion_webhook():
data = request.get_json()
if not data:
return jsonify({"status": "error", "message": "Invalid JSON payload"}), 400
# Basic key validation
required_keys = ['full_name', 'email', 'phone', 'source']
if not all(key in data for key in required_keys):
return jsonify({"status": "error", "message": "Missing required keys"}), 400
# Sanitize and structure the data
clean_lead = {
'name': data.get('full_name', '').title().strip(),
'email': normalize_email(data.get('email')),
'phone': normalize_phone(data.get('phone')),
'source': data.get('source', 'unknown').lower(),
'interest_property_id': data.get('property_id'),
'timestamp': data.get('submission_time')
}
# At this point, you would pass clean_lead to the next function
# for CRM processing.
# For now, we'll just return it.
print(f"Processing clean lead: {clean_lead}")
# process_lead_in_crm(clean_lead)
return jsonify({"status": "success", "processed_data": clean_lead}), 200
if __name__ == '__main__':
app.run(debug=True, port=5001)
This script ensures that by the time the data is ready for the CRM, it’s in a predictable format. This prevents duplicate contacts and makes segmentation reliable.
Step 2: Tagging and Segmentation in the CRM
Once the lead is clean, we need to inject it into the CRM and tag it correctly. Tags are the triggers for our automation. A lead is not just a name and email. It is a collection of attributes that define which communication path it should follow. A lead interested in a $1.2M property in a specific zip code should not get the same emails as a first-time homebuyer looking at condos for $300k.
We will create tags based on the lead source (`source:zillow`), property details (`interest:4-bed-plus`), or stated budget. The API call to the CRM must first check if the contact exists to avoid creating duplicates. If the contact exists, we update it with the new information and tags. If not, we create it.
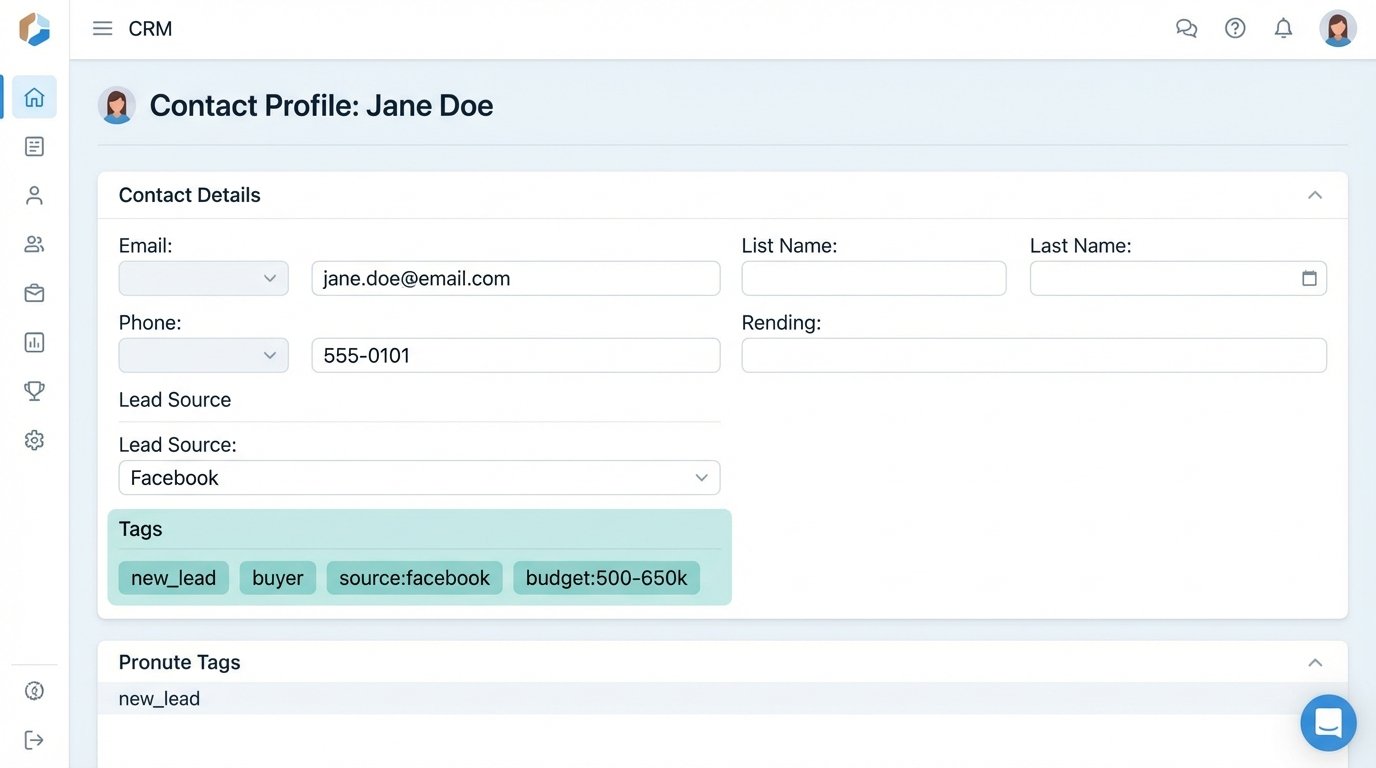
Here is an example of a JSON payload you might send to a CRM’s `contacts` endpoint. Notice the structure and the inclusion of custom fields and tags.
{

  "email": "jane.doe@example.com",

  "properties": {

    "firstname": "Jane",

    "lastname": "Doe",

    "phone": "1234567890",

    "lead_source": "Facebook Lead Ad"

  },

  "tags": [

    "new_lead",

    "buyer",

    "source:facebook",

    "budget:500-650k"

  ],

  "custom_fields": {

    "inquired_property_address": "123 Maple St, Anytown, USA",

    "inquired_property_mls": "MLS1234567"

  }

}
The tag `new_lead` is the master trigger. It indicates the contact is fresh and needs to be enrolled in the initial welcome sequence. Other tags provide the context for future, more specific campaigns.
Step 3: Triggering the ESP Sequence
With the contact tagged in the CRM, we can finally trigger the email sequence. Some CRMs have native integrations with ESPs that handle this. Most are slow and limited. A direct API call from our intermediary service to the ESP is faster and more reliable. This call adds the subscriber to a specific automation workflow or audience identified by an ID.
This action must be idempotent. Sending the same command twice should not result in the contact being added to the sequence twice. The ESP’s API should handle this by either ignoring the duplicate request or simply updating the existing subscriber’s state.
The logic flow inside our application is:
1. Receive lead from webhook.
2. Normalize data.
3. Successfully create or update contact in CRM and apply tags.
4. If successful, make an API call to the ESP to enroll the contact’s email in `sequence_id_123`.
Step 4: Drip Sequence Logic and Exit Conditions
Now we design the campaign itself. This is less about code and more about logic. A good initial sequence for a homebuyer lead might look like this:
- Email 1 (Immediate): Confirmation. “Thanks for your interest in 123 Maple St. Here are the details. An agent will be in touch shortly.” This provides instant value and confirms you received their request.
- Email 2 (Day 2): Value Add. “5 things to look for during a home inspection in Anytown.” This establishes authority and is genuinely helpful. No hard sell.
- Email 3 (Day 4): Social Proof. “Meet the team” or a client testimonial. This builds trust in the agent or brokerage.
- Email 4 (Day 7): Call to Action. “Are you free for a 15-minute chat next week to discuss your home search?” This directly asks for the next step.
The critical part of this logic is the exit condition. The sequence must stop immediately if the lead takes a desired action. If an agent calls the lead and updates their status in the CRM to `Contacted`, our system must detect this change. This is typically done via another webhook, this time from the CRM back to our application, which then makes an API call to the ESP to remove the contact from the sequence. Sending Email 4 after the person has already spoken to an agent is unprofessional and signals a broken process.
Step 5: Production-Grade Error Handling and Logging
In production, APIs fail. A call to the CRM might time out. The ESP might be down for maintenance. A robust system anticipates this. Instead of letting the process crash, we implement retries with exponential backoff for transient errors (like a 503 Service Unavailable). For permanent errors (like a 400 Bad Request due to malformed data), we must log the failure and the payload that caused it to a dead-letter queue for manual inspection.
Your simple Flask app now needs to be instrumented with proper logging. Every incoming webhook, every outgoing API call, and every significant logic branch should be logged. When a lead calls asking why they never got an email, you need to be able to pull up the logs and see exactly what happened. This is not optional.
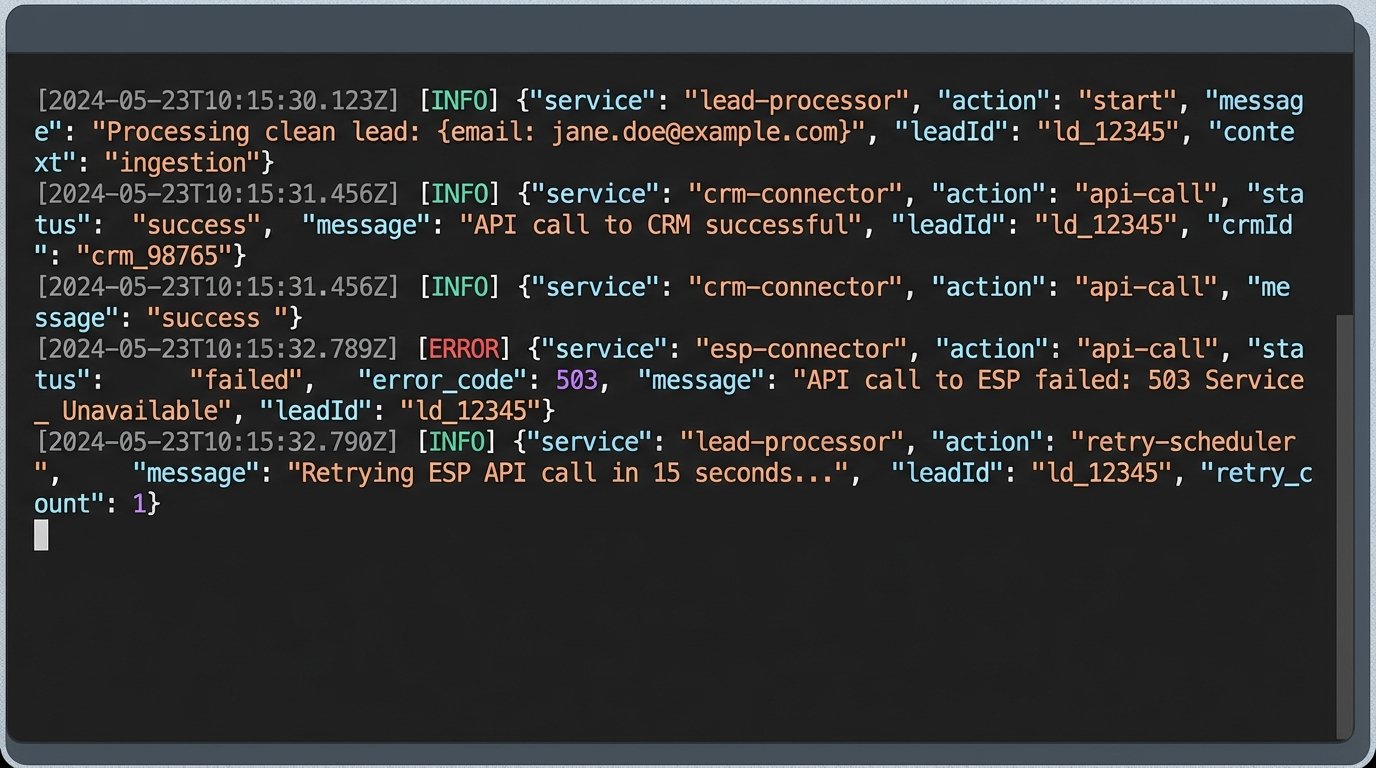
The process of debugging a distributed system without logs is like performing surgery in the dark. You can feel around for the problem, but you are more likely to cause more damage. Detailed logs are your floodlights.
Step 6: Monitoring and Closing the Loop
The system is running, but our work is not done. We need to monitor its performance. This means tracking more than just email open rates. We need to connect the automation back to business outcomes. This is achieved by maintaining a consistent lead ID across all systems.
When the lead is first ingested, generate a unique internal ID. Pass this ID as a custom property to the CRM. When the lead eventually closes and the deal is recorded in the CRM, that ID is associated with the revenue. By analyzing this data, you can answer the critical question: “Did the leads that went through our automated drip campaign convert at a higher rate than those that did not?” Without this feedback loop, you are just running an expensive and complex machine with no way to prove its value.