
Stop Manually Ticking Boxes. It’s a Point of Failure.
Manual transaction checklists are where deals go to die. A missed signature, a forgotten follow-up, an incorrect date pulled from memory. These are not minor clerical errors. They are unforced financial errors that erode margin and create legal exposure. The entire process is a fragile chain of human memory and attention, and at scale, it breaks.
Automating this isn’t about convenience. It’s about injecting a deterministic, auditable machine into your most critical revenue-generating process. We are going to build a system that reacts to state changes in your transaction, generates the required tasks, and validates document completion without human intervention. Forget pretty dashboards. This is about building the engine.
Prerequisites: The Groundwork You Can’t Skip
Before you write a line of code, you need to secure the raw materials. Without these, your project is dead on arrival. Most automation efforts fail here, in the planning and access phase, not in the execution.
- API Access & Keys: You need programmatic access to every system of record. This means your CRM (Salesforce, Follow Up Boss), your document signing platform (DocuSign, PandaDoc), and your task management tool (Asana, Trello, Jira). Get the API keys, read the rate limit documentation, and confirm the authentication method (OAuth2, Bearer Token). Assume nothing.
- A Defined Data Model: Map out every critical data point for a transaction on a whiteboard. Property Address, Buyer Name, Seller Name, Key Dates (Offer, Acceptance, Inspection, Closing), Agent ID, and Document Statuses. This becomes the canonical object your automation will use. If your source systems call the same thing by three different names, you decide on one source of truth now.
- A Triggering Event: The automation needs a starting gun. The most reliable trigger is a deal stage change in your CRM. For example, moving a deal from “Active” to “Under Contract”. This requires a CRM that supports outbound webhooks. If it doesn’t, you’re stuck with a polling mechanism, which is inefficient and slow.
- Execution Environment: You need a place for this code to live. A serverless function (AWS Lambda, Google Cloud Functions) is the correct choice here. It’s event-driven, scales to zero, and forces you to write stateless, focused code. Spinning up a dedicated server for this is a wallet-drainer and overkill.
Step 1: Architecting the Webhook Ingestor
Your automation starts when your CRM fires a webhook. This is an HTTP POST request sent to an endpoint you control, containing a JSON payload with data about the event. The first component you build is the endpoint that catches this payload. We use a serverless function fronted by an API Gateway for this.
The sole job of this function is to receive the data, perform basic validation, and immediately drop it into a message queue like AWS SQS or Google Pub/Sub. Do not put any complex business logic here. This ingestor must be fast and resilient. If the CRM sends a burst of 100 updates, your endpoint should be able to catch all 100 without timing out or dropping data. Processing happens later.
This decoupling is critical. The CRM doesn’t care if your logic takes 10 seconds or 10 minutes to run. It just wants a 200 OK response quickly. By putting the payload on a queue, you provide that immediate response and guarantee the data will be processed, even if the downstream services are temporarily offline.
Step 2: Normalizing the Data Payload
The data that arrives from a CRM webhook is never clean. It will have internal IDs, cryptic field names, and nested structures designed for the CRM’s UI, not for your automation. Your next function pulls messages from the queue and its only job is to translate this mess into your clean, canonical data model you defined earlier.
This is a data mapping exercise. You strip out the noise and build your internal transaction object. For example, the CRM might send `{‘custom_field_1024’: ‘123 Main St’, ‘contact_primary_name’: ‘John Doe’}`. Your normalization logic converts this into `{‘property_address’: ‘123 Main St’, ‘buyer_name’: ‘John Doe’}`. This insulates the rest of your system from upstream changes in the CRM.
This is where you write your first real block of code. It’s not glamorous, but it prevents future headaches. If the CRM vendor decides to rename `custom_field_1024` to `property_street_address`, you only have to update this one mapping function, not every single part of your automation logic.
# Example Python logic for normalization

def normalize_crm_payload(raw_payload):

    """

    Strips and maps a messy CRM payload to our internal model.

    Returns a clean dictionary or raises ValueError if key fields are missing.

    """

    key_fields = ['deal_id', 'stage_name', 'property_details.address.full_street_address']
# Logic-check for required data before processing
if not all(field in raw_payload for field in key_fields):
raise ValueError("Missing critical data in CRM payload.")
clean_transaction = {
'transaction_id': raw_payload.get('deal_id'),
'current_stage': raw_payload.get('stage_name'),
'property_address': raw_payload.get('property_details', {}).get('address', {}).get('full_street_address'),
'closing_date': raw_payload.get('key_dates', {}).get('estimated_closing'),
'agent_id': raw_payload.get('assigned_agent_internal_id')
}
return clean_transaction
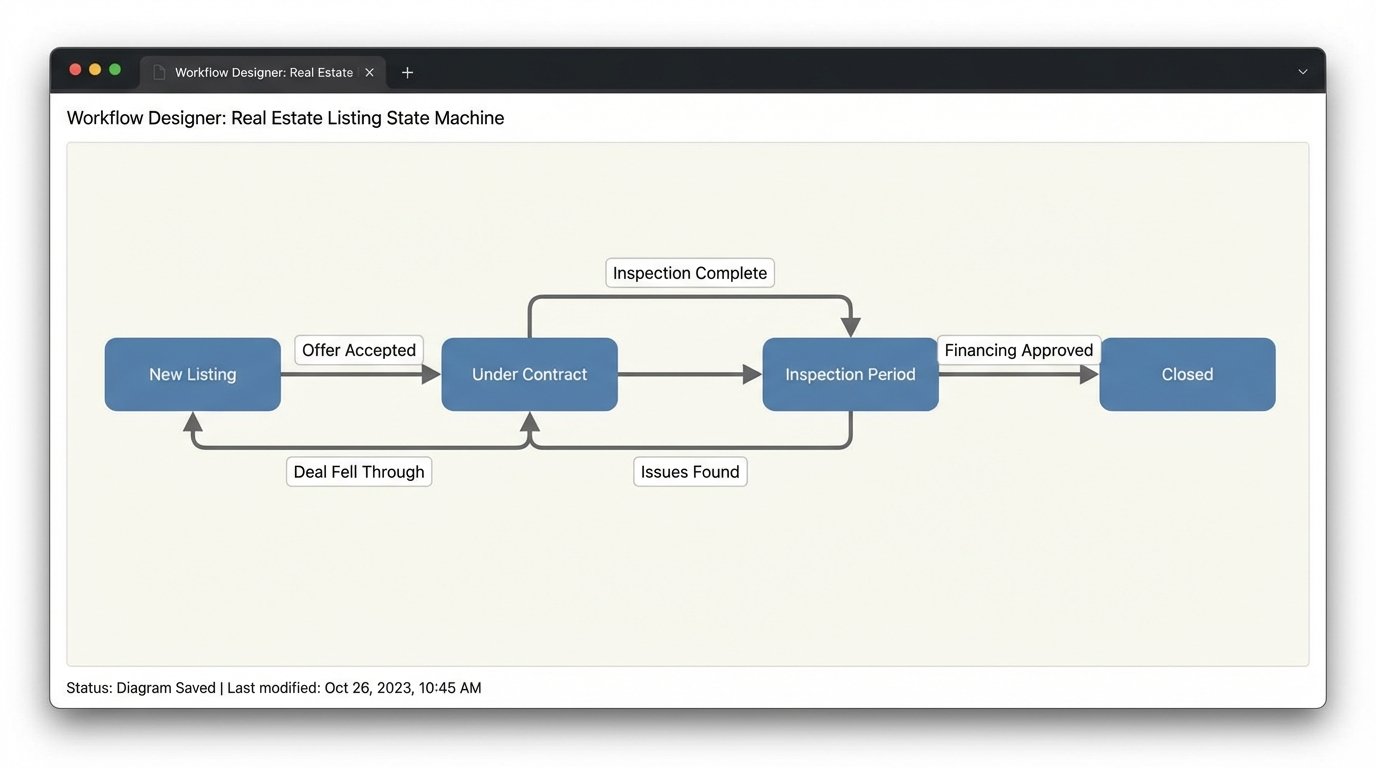
Step 3: The Logic Core. A State Machine, Not a Script.
Once you have a clean transaction object, you must determine what to do with it. The brute-force method is a giant `if/elif/else` block that checks the deal stage. This approach is brittle and becomes an unmaintainable nightmare as new stages and rules are added. The professional approach is to implement a finite state machine.
A state machine formally defines all possible stages of a transaction (“Listing”, “Under Contract”, “Inspection Period”, “Closed”) and the valid transitions between them. You can’t go from “Listing” to “Closed”. You must transition through the intermediate states. Your logic core loads the current state of the transaction from a database (like DynamoDB) and uses the incoming data to trigger a state transition.
A simple script is a straight pipe. A state machine is a full HVAC system with thermostats, vents, and emergency shutoffs. It actively manages the flow, it doesn’t just hope the data gets to the end. Each state transition is an atomic event that can trigger a specific set of actions, like generating a checklist.
When a transaction moves to “Under Contract”, the state machine emits an event. This event becomes the trigger for the next step: task generation. This design pattern keeps the logic for state management completely separate from the logic for communicating with external systems.
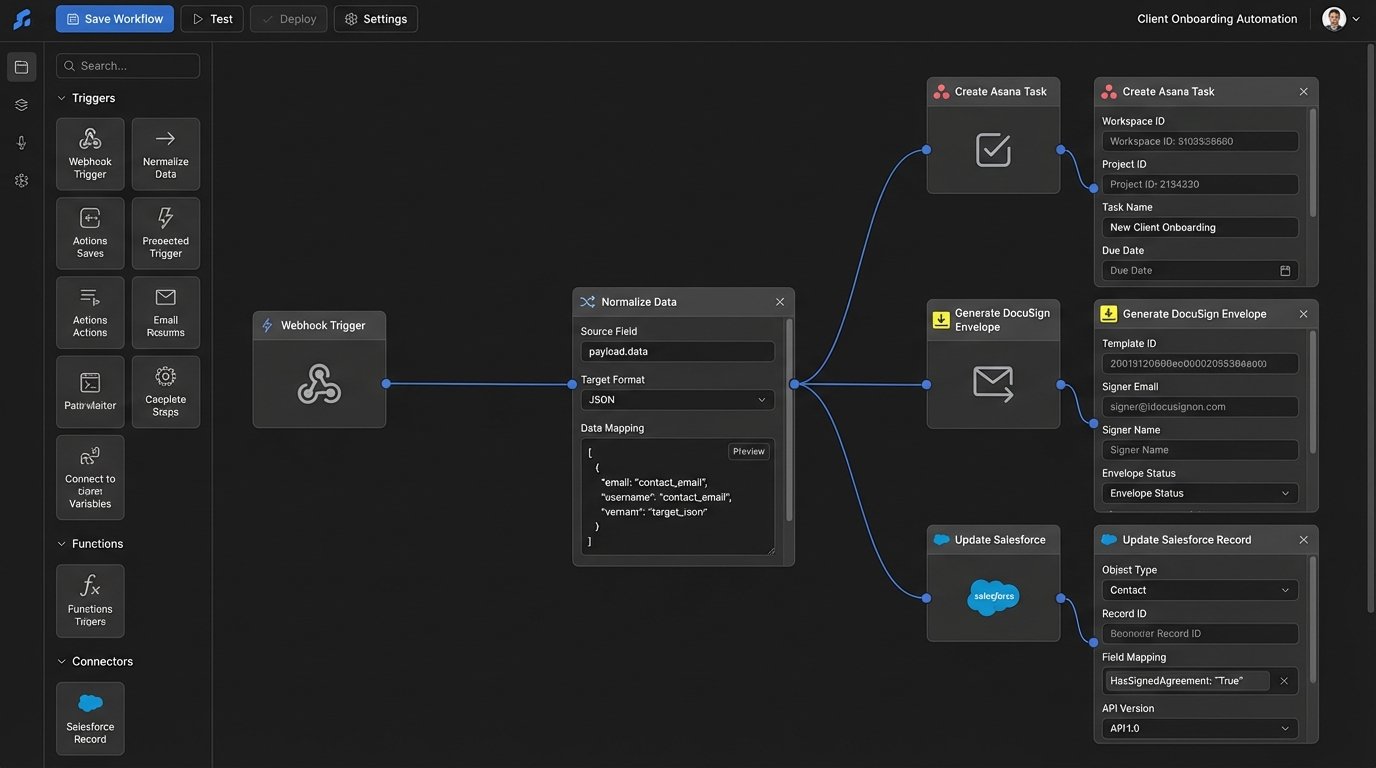
Step 4: Task Generation via API
Your state machine has determined a checklist is needed. Now you must create those tasks in your project management tool. This is another dedicated function that listens for events from the state machine. Its input is the transaction ID and the target checklist template (e.g., “Buyer Side Under Contract Checklist”).
The function first loads the checklist template. Do not hard-code checklists in your application logic. Store them as JSON or YAML files in a repository or as items in a database. This allows non-engineers to modify checklists without requiring a code deployment. The function then iterates through the template and makes a series of API calls to create each task.
This is where you have to be careful with API rate limits. If your checklist has 50 items, you are making 50 consecutive API calls. Some APIs offer a batch endpoint to create multiple tasks in a single request. Use it if available. If not, build in a small delay between calls or implement a more sophisticated token bucket algorithm to avoid getting your API key suspended.
# Simplified cURL example for creating a task in Asana

curl --request POST 'https://app.asana.com/api/1.0/tasks' \

--header 'Authorization: Bearer YOUR_ACCESS_TOKEN' \

--header 'Content-Type: application/json' \

--data-raw '{

    "data": {

        "name": "Schedule Termite Inspection for 123 Main St",

        "notes": "Transaction ID: TXN-4815162342. See CRM for details.",

        "assignee": "agent_asana_id_123",

        "due_on": "2024-09-15",

        "projects": ["project_gid_for_transactions"]

    }

}'
Step 5: Document Polling and Validation
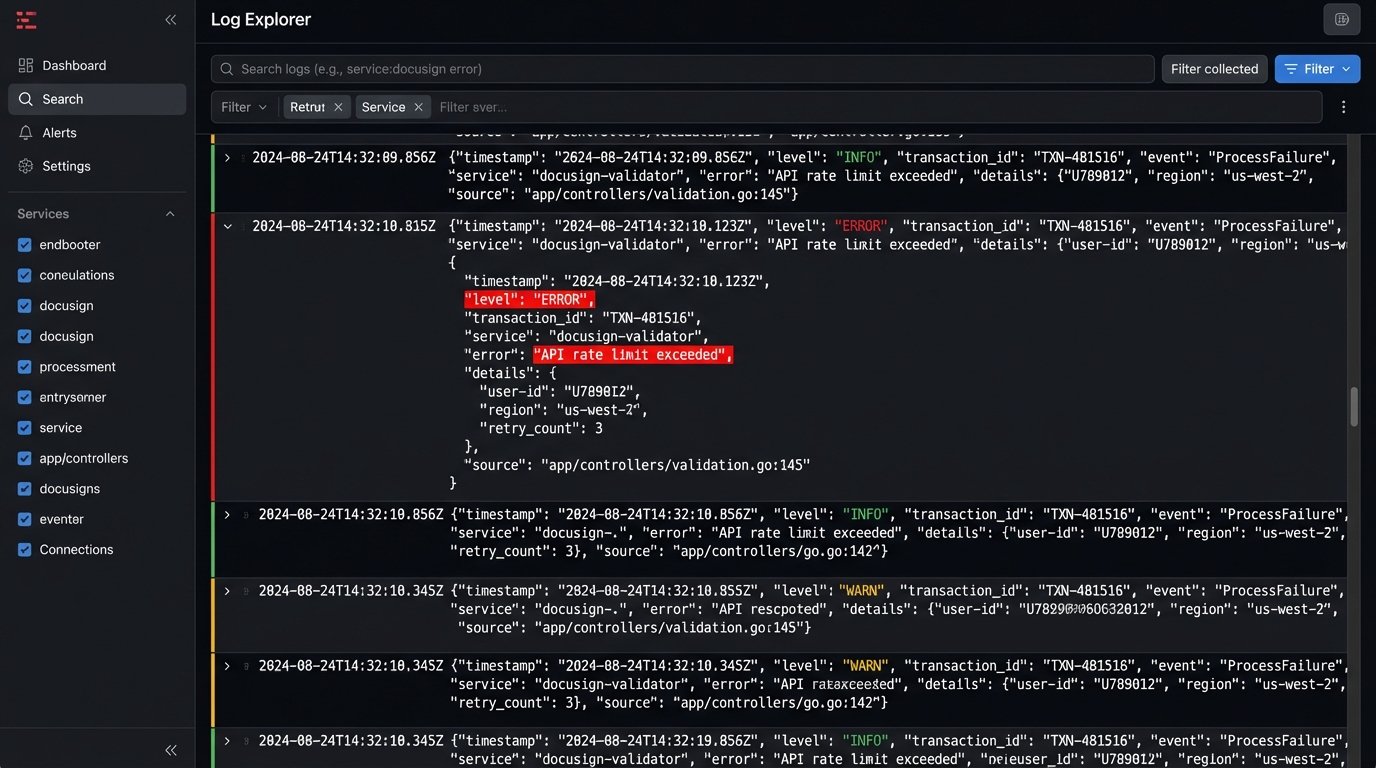
Creating tasks is easy. Verifying they were completed is hard. For tasks involving documents, like “Get Buyer Signature on Disclosure”, you need to close the loop. This requires integration with your e-signature platform. This is one of the few places where polling is often unavoidable, as not all platforms provide reliable webhooks for document status changes.
You need a scheduled function that runs periodically (e.g., every hour). This function queries your database for all transactions in an active state. For each transaction, it queries the DocuSign API for the status of specific envelopes linked to that transaction. When it detects that an envelope has been completed, it updates the transaction’s state in your database and can even make an API call to check off the corresponding task in your project management tool.
This part of the system is sluggish and introduces latency. It’s a trade-off. The alternative is having coordinators manually check DocuSign all day. This is also the part most likely to break when the e-signature platform changes its API, which they do. Expect to maintain this code.
Step 6: Brutal Error Handling and Logging
The system will fail. An API will be down. A CRM payload will arrive with malformed data. A network hiccup will interrupt a function. Your automation is useless if it fails silently. You need to architect for failure from the beginning.
Every function that processes a message from a queue must be configured with a dead-letter queue (DLQ). If the function fails to process a message after a certain number of retries, the message is automatically moved to the DLQ. This preserves the failed message so you can inspect it later. Without a DLQ, the message is gone forever and you have no idea a failure even occurred.
Log everything. Don’t just log success or failure messages. Log the transaction ID, the current state, and the action being taken. Use structured logging (JSON format) so your logs can be shipped to a real logging platform like Datadog or an ELK stack. Trying to debug a production issue by reading raw text logs from a serverless function is a special kind of hell.
Maintenance is the Real Cost
Building this system might take a few weeks. Maintaining it is a permanent job. APIs will be deprecated. The CRMs will add new fields. Business logic will change. This is not a “set it and forget it” project. The value is immense, but it comes at the cost of ongoing technical ownership.
The goal is not to build a perfect, unbreakable system. The goal is to build a system that fails gracefully, tells you exactly why it failed, and preserves the data so you can fix the problem and re-process it. That is the difference between a toy automation and enterprise-grade infrastructure.