Stop Manually Chasing Real Estate Leads
The core problem in real estate automation is not a lack of data. It is a surplus of disconnected data. Leads arrive from Zillow, your IDX site, and Facebook Ads, each with its own messy format. Agents are expected to manually bridge these gaps, copying contact info into a CRM, setting reminders, and then searching for properties. This manual process is slow, error-prone, and a direct revenue leak. Forget streamlining workflows. We are here to force systems to talk to each other without a human acting as a cheap, unreliable translator.
Make.com is a viable tool for this, but it is not magic. It is a visual state machine that executes API calls. Treat it as such. An improperly configured scenario is just a faster way to create duplicate contacts or send five hundred incorrect emails before you can hit the stop button. We will build a foundational lead processing pipeline that ingests, validates, enriches, and acts upon new lead data. The goal is a system that requires supervision, not constant intervention.
Prerequisites: The Non-Negotiable Stack
Before you drag a single module onto the canvas, get your credentials in order. This is not a drill. Scrambling for API keys mid-build is how you lose momentum and make mistakes. You need administrative access to the following systems. If you do not have it, get it.
- Make.com Account: Get a paid plan. The free tier is for testing “Hello World,” not for running a business process. You will hit the operations limit before you finish debugging.
- CRM API Access: We will use Follow Up Boss as the example because its API is reasonably documented. You will need an API key. Find it in your admin settings. Treat this key like a password.
- Lead Source Access: You need a way to get the lead data out. For a website form, this means a direct integration or a webhook URL. For Zillow or Realtor.com, this involves configuring lead forwarding to a specific email address that Make can monitor. We will use a direct webhook for this guide because email parsing is a fragile, last-resort solution.
- Notification Channel: Slack is the obvious choice for internal team alerts. You will need to create a Slack App and get a Bot User OAuth Token. An SMS provider like Twilio is better for agent alerts but adds cost.
Organize these credentials in a password manager. Do not paste them into a spreadsheet. That is how credentials end up in public GitHub repos.
Step 1: Ingesting a New Lead via Webhook
The entry point for our automation is a Make.com webhook. This is a unique URL that waits for an HTTP POST request containing data. Your website’s backend or lead generation service will send the lead information to this URL. This is the most reliable ingestion method because it is instant and the data structure is predictable.
First, create a new scenario in Make. Select the “Webhooks” module and choose “Custom webhook.” Add a new webhook and Make will generate a URL. Copy it. Now, you need to trigger it with sample data. Configure your website’s form to send its payload to this URL. If you are working with a developer, send them the URL and an example of the expected JSON structure. Forcing a specific structure from the source is always better than trying to clean up a chaotic one later.
A typical lead payload looks something like this. Notice the nested objects and inconsistent casing. This is reality.
{
  "lead_source": "Website Form",
  "contactInfo": {
    "firstName": "John",
    "lastName": "Doe",
    "email": "j.doe@example.com",
    "phone_number": "(555) 123-4567"
  },
  "propertyDetails": {
    "address": "123 Main St, Anytown, USA",
    "mls_id": "987654321",
    "price": 500000
  },
  "inquiry_type": "Showing Request"
}
Once you send this test data, the Webhook module in Make will show that it has successfully determined the data structure. This allows you to reference these data points, like `contactInfo.firstName`, in subsequent modules.

This initial step is the foundation. If the data is not captured cleanly here, every downstream action is compromised. Logic-check the incoming data immediately.
Step 2: Sanitizing and Structuring Data
Raw data from a web form is a liability. It is filled with garbage characters, extra spaces, and formatting inconsistencies. Before we even think about touching the CRM, we must sanitize the input. Adding a “Set multiple variables” module right after the webhook is a non-negotiable step.
This is where you apply functions to clean the raw data and map it to a standardized internal structure. For example, phone numbers come in all formats: `(555) 123-4567`, `555-123-4567`, `555.123.4567`. A CRM expects a clean string of digits. Use the `replace()` function with a regular expression to strip everything that is not a number.
The formula in Make would look like this: `replace({{1.contactInfo.phone_number}}; “/[^0-9]/g”; “”)`. This expression targets the incoming phone number and guts any character that is not a digit from 0 to 9. We do the same for email addresses, using `lower()` to prevent case-sensitivity issues, and `trim()` to remove leading or trailing whitespace from names.
Trying to sync this dirty data directly is like shoving a firehose of muddy water through the fine-tolerance gears of a Swiss watch. The system will jam. You must filter and refine the data first, ensuring it conforms to the specifications of the destination system. This sanitation step prevents a mountain of future debugging.
Step 3: CRM Contact Creation with Duplication Checks
With clean data, we can now interact with the CRM. The primary directive is to avoid creating duplicate contacts. The standard pattern for this is “Search, then Create or Update.” It is a two-step logic gate.
First, add a Follow Up Boss module for “Search for a Person.” Configure it to search using the sanitized email address from the previous step. This module will attempt to find an existing contact. The critical part is what comes next: a Router. A Router in Make splits the workflow into multiple branches based on conditions.
The first branch off the router will have a filter: “Does a contact ID exist from the search step?” You check if the `personId` variable from the search module contains data. If it does, the contact already exists. In this branch, you might add a Follow Up Boss “Update a Person” module to add a new note or tag indicating the new inquiry. You could also use a “Create a Task” module assigned to the existing contact.
The second branch is the fallback path. Its filter is the opposite: “Contact ID does not exist.” This is the path for new leads. Here, you add a Follow Up Boss “Create a Person” module. You map your sanitized variables (first name, last name, phone, email) to the corresponding fields in the module. This ensures you only create a new contact record when one does not already exist for that email address.
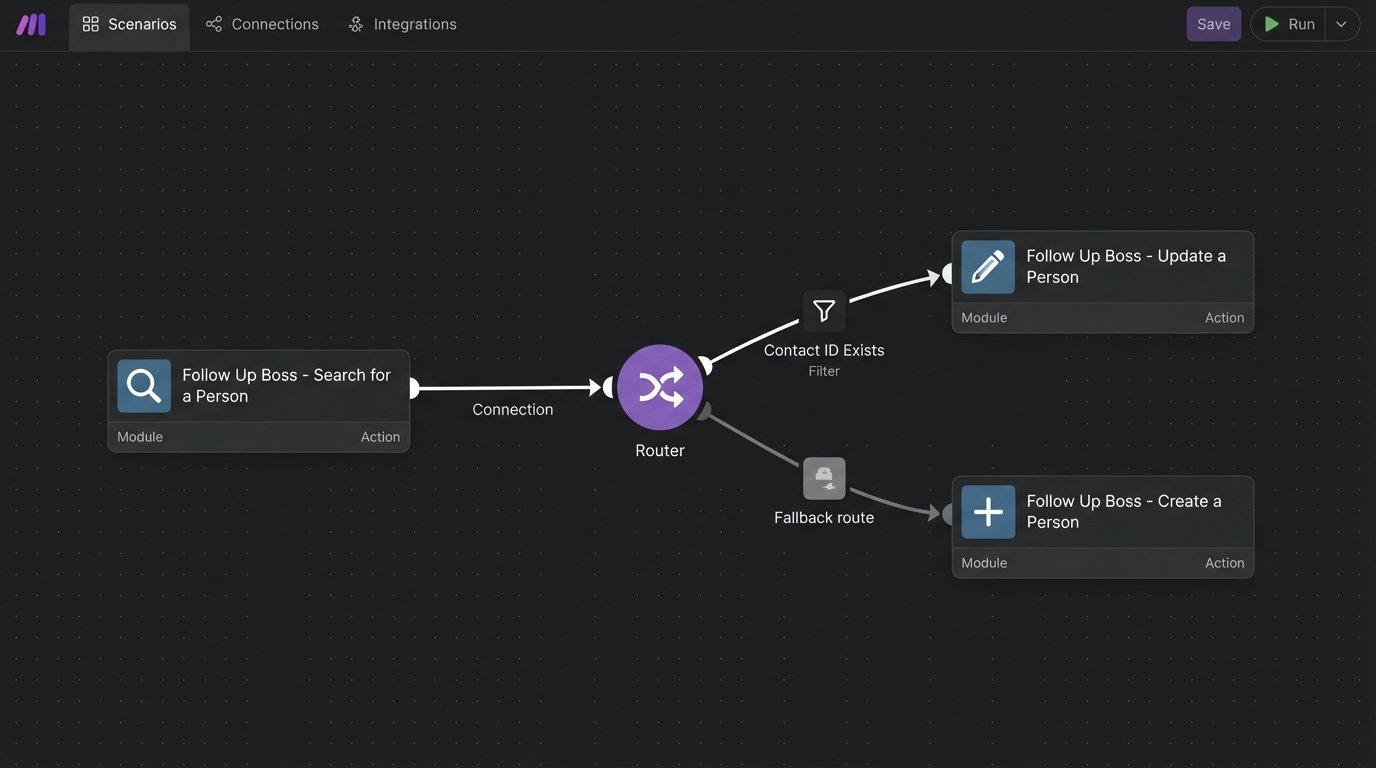
Executing a “Create” action without a “Search” first is pure negligence. It floods your CRM with duplicates and makes your contact database unusable.
Step 4: Actionable Notifications and Task Assignment
A lead sitting silently in a CRM is a dead end. The agent needs to be notified immediately. After the Router, whether the contact was new or existing, we converge the paths and trigger actions.
Add a Slack “Create a Message” module. Configure it to post to a specific channel, like `#new-leads`. The message content should be dense with information. Do not just send “New lead received.” Send a formatted message that includes the lead’s name, contact info, the property they inquired about, and a direct link to their new or updated profile in Follow Up Boss. This requires using the `personId` returned by either the “Create a Person” or “Search for a Person” module to construct the URL.
Simultaneously, create a task directly in the CRM. Add another Follow Up Boss module, this time for “Create a Task.” Assign it to the relevant agent (this can be static or based on routing rules). The task title should be explicit: “Follow up with John Doe regarding 123 Main St.” The task body can contain the lead’s full inquiry details. This embeds the action item directly into the agent’s existing workflow.
Be mindful of API rate limits here. If you are processing a batch import of 1,000 leads, do not send 1,000 individual Slack messages in a ten-second burst. You will get temporarily blocked. For batch processes, aggregate the data and send a single summary message.
Step 5: Logging and Bulletproof Error Handling
The scenario will fail. Not “if,” but “when.” An API will be down, a lead will arrive with a malformed email, or your CRM credentials will expire. A production-grade scenario must anticipate and handle these failures gracefully.
Make provides error handling routes. Right-click on any module and select “Add error handler.” You can choose from several directives. The “Break” directive is the most aggressive; it halts the entire scenario and marks it as an error, requiring manual intervention. For critical steps like creating a CRM contact, this is the correct choice.
Your error path should not be a dead end. At a minimum, it should log the failure. A common pattern is to connect a Google Sheets “Add a Row” module to the error handler. In this sheet, you log the timestamp, the module that failed, the error message provided by Make, and the complete incoming data payload that caused the failure. This creates an invaluable debug log. When an agent says “I didn’t get the lead from John Doe at 3:15 PM,” you can check the log instead of guessing.
You can build more complex logic. For transient errors like a temporary API outage, you can use the “Resume” directive with a delay to retry the operation. For non-critical failures, like a Slack notification failing, you can use the “Ignore” directive to allow the rest of the scenario to complete. The choice depends on the business impact of the module’s failure.
A scenario without error logging is a black box that works until, suddenly, it does not. Do not build black boxes.
Beyond the Basics: Cost and Scalability
This lead processing pipeline is a solid foundation, but it consumes Make.com operations. Every module that runs is one operation. Our primary scenario consumes about five to six operations per lead. If you get 1,000 leads a month, that is 6,000 operations. This is manageable on a mid-tier plan.
The cost becomes a factor when you introduce loops or polling. Imagine a scenario that checks an MLS API every five minutes for new listings. That is 12 checks per hour, or 288 operations per day, just for the trigger. That is over 8,600 operations a month before it even finds a single listing to process. These background jobs are what drain your budget.

Evaluate your triggers carefully. A webhook consumes zero operations until a lead arrives. A polling trigger consumes operations on a fixed schedule, regardless of whether it finds new data. For high-volume or high-frequency tasks, Make’s cost model can become prohibitive. At that point, you must weigh the cost against a custom solution running on a server, where you pay for compute time, not execution blocks. Make gets you running fast. A dedicated server might be cheaper in the long run. Choose the right tool for the scale of the job.