
The Core Problem: Lead Rot and Speed to Contact
A Facebook lead from a real estate ad has a half-life measured in minutes, not hours. Every minute that passes between a prospect hitting “submit” and an agent making contact drops the conversion probability exponentially. The standard practice of manually downloading a CSV of leads once a day is an operational failure. It guarantees you are only contacting stale, unresponsive prospects who have already spoken to three other agents.
The only acceptable solution is a sub-five-minute contact window. This is not achievable through manual action. It requires a direct, automated pipeline from Facebook’s API straight into the agent’s CRM, triggering an immediate action sequence.
Architecture Overview: The Direct Webhook Approach
We are bypassing the common GUI-based integration platforms. While tools like Zapier have their place for simple, low-volume tasks, they introduce latency, abstraction layers that are difficult to debug, and a cost model that becomes a wallet-drainer at any significant scale. We need granular control over retry logic, data validation, and error handling, which these platforms obscure behind a friendly interface.
The architecture is straightforward. A submitted Lead Ad form triggers a Facebook webhook. This webhook sends a JSON payload to an API endpoint we control. Our endpoint listener validates the payload, parses the data, transforms it to match our CRM schema, and injects it directly into the CRM via its API. This is a straight shot, with no middlemen.
Attempting to manage a high volume of valuable leads through a point-and-click interface is like shoving a firehose through a needle. It’s a bottleneck by design. A direct webhook integration gives you the full diameter of the pipe.
Prerequisites: What You Need Locked Down Before Writing Code
Do not start this process without having these assets and permissions in place. Hunting for access mid-project is a guaranteed way to stall development for days.
- Administrator Access to Facebook Business Manager: Not “Editor” or “Analyst.” You need full admin rights to create apps and manage page subscriptions.
- A Live Facebook Page: The app connects to a specific page that will run the lead ads.
- A Meta Developer App: This is created within the Meta for Developers portal. It’s the technical entity that gets API permissions.
- Correct API Permissions: Specifically, you must request and be granted `leads_retrieval`, `pages_manage_ads`, and `pages_show_list`. The review process for this is not instant.
- A Target CRM with a Documented API: You need an API key, access token, and clear documentation for the endpoint that creates new contacts or leads. We will use Follow Up Boss as a hypothetical target, but the principles apply to any modern CRM.
- A Publicly Accessible Server Endpoint: This is the URL that will receive the webhook from Facebook. It can be a simple Flask app on a VPS, an AWS Lambda function fronted by API Gateway, or any other service capable of receiving an HTTP POST request.
_
Step 1: Configuring the Facebook App and Webhooks
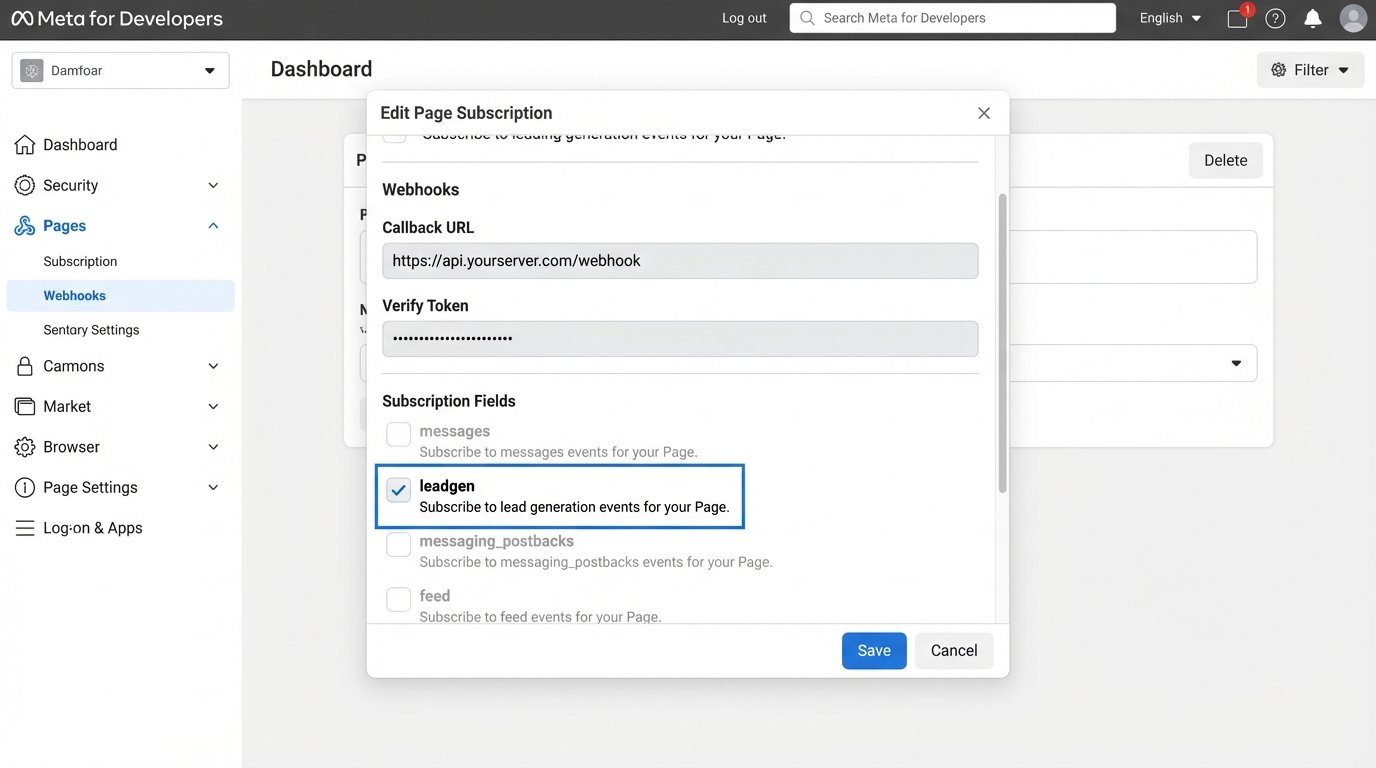
The first part of the build is entirely within Facebook’s developer environment. Navigate to `developers.facebook.com`, create a new App, and select “Business” as the app type. Once the app is created, find the “Webhooks” product in the sidebar and add it to your app. From the Webhooks dashboard, you must select “Page” from the dropdown menu and click “Subscribe to this object.”
Facebook will then ask for a `Callback URL` and a `Verify Token`. The Callback URL is the public URL of your listener endpoint. The Verify Token is a simple string that you create. Facebook will send a GET request to your URL with this token to verify you own the endpoint before it starts sending any real data. After you subscribe, find the `leadgen` field in the list of subscriptions for the Page and click “Subscribe.” This tells Facebook to send a notification to your endpoint every time that specific page gets a new lead.
Step 2: Building the Webhook Listener
Your listener has two primary responsibilities. First, it must handle the one-time verification GET request from Facebook. Second, it must handle all subsequent POST requests which contain the lead data. Security is not optional here. You must verify that the incoming POST requests are actually from Facebook by checking the `X-Hub-Signature` header.
Facebook signs the request payload using your app’s secret key. Your listener must compute the same signature on the raw request body and compare it to the one in the header. If they do not match, discard the request. This prevents an attacker from spamming your endpoint with fake leads.
Here is a bare-bones Python example using the Flask framework to demonstrate the logic for both verification and payload handling.
from flask import Flask, request, abort
import hmac
import hashlib
import json

app = Flask(__name__)

# The verify token you set in the Facebook App Dashboard
VERIFY_TOKEN = 'your_super_secret_verify_token'
# Your Facebook App's Secret Key
APP_SECRET = 'your_facebook_app_secret'

@app.route('/webhook', methods=['GET', 'POST'])
def webhook():
    if request.method == 'GET':
        # Webhook verification request
        if request.args.get('hub.mode') == 'subscribe' and request.args.get('hub.challenge'):
            if not request.args.get('hub.verify_token') == VERIFY_TOKEN:
                return 'Verification token mismatch', 403
            return request.args['hub.challenge'], 200
        return 'Hello World', 200

    elif request.method == 'POST':
        # Handle the lead data payload
        signature = request.headers.get('X-Hub-Signature')
        if not signature:
            abort(400, 'Signature missing')

        # Verify the payload signature
        hash_method, signature_hash = signature.split('=')
        if hash_method != 'sha1':
            abort(400, 'Unsupported hash method')

        expected_signature = hmac.new(
            bytes(APP_SECRET, 'latin-1'),
            request.data,
            hashlib.sha1
        ).hexdigest()

        if not hmac.compare_digest(expected_signature, signature_hash):
            abort(400, 'Invalid signature')

        # If signature is valid, process the data
        data = request.get_json()
        print("Received lead data:")
        print(json.dumps(data, indent=2))

        # Add processing logic here (parse, map, send to CRM)

        return 'Event received', 200

    else:
        abort(405)

if __name__ == '__main__':
    app.run(debug=True, port=5000)
Before you can parse the data, you need to understand its structure. The incoming JSON is nested. The actual user-submitted answers are buried inside an array.
{
  "object": "page",
  "entry": [
    {
      "id": "PAGE_ID",
      "time": 1678886400,
      "changes": [
        {
          "field": "leadgen",
          "value": {
            "ad_id": "AD_ID",
            "form_id": "FORM_ID",
            "leadgen_id": "UNIQUE_LEAD_ID",
            "created_time": 1678886399,
            "page_id": "PAGE_ID",
            "adgroup_id": "ADGROUP_ID",
            "field_data": [
              {
                "name": "full_name",
                "values": [
                  "John Doe"
                ]
              },
              {
                "name": "email",
                "values": [
                  "johndoe@example.com"
                ]
              },
              {
                "name": "phone_number",
                "values": [
                  "+15551234567"
                ]
              },
              {
                "name": "are_you_pre_approved_for_a_mortgage_",
                "values": [
                  "Yes"
                ]
              }
            ]
          }
        }
      ]
    }
  ]
}
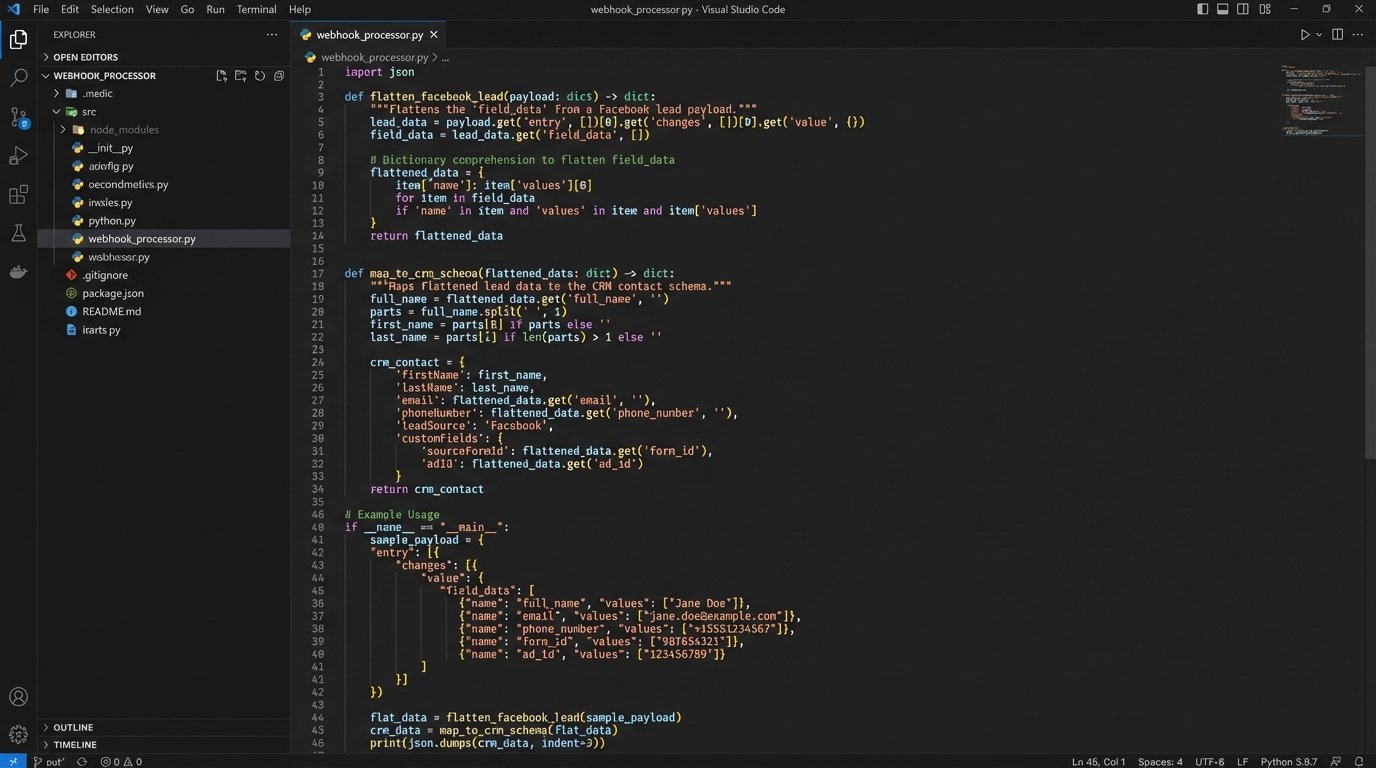
Step 3: Parsing the Payload and Mapping to the CRM
The `field_data` array is the critical part of the payload. Notice it is a list of objects, where each object has a `name` and a `values` array. Your code must iterate through this list to build a clean key-value object that is easier to work with. A simple dictionary comprehension can flatten this structure efficiently.
Data mapping is where most integrations introduce subtle bugs. Facebook’s field `full_name` likely needs to be split into `firstName` and `lastName` for your CRM. The `phone_number` field might contain country codes or formatting that your CRM’s validation rules reject. You must strip or standardize this data before making the API call. Custom questions, like our “are_you_pre_approved_for_a_mortgage_” example, will need to be mapped to a custom field in the CRM, often identified by a cryptic internal ID.
Step 4: Injecting the Lead into the CRM API
With a clean, validated data object, the final step is to make a POST request to your CRM’s API. This request must include the correct authentication headers and a body formatted according to the CRM’s documentation. Always check the HTTP status code of the response. A `200` OK or `201` Created response means success. Anything in the `4xx` or `5xx` range indicates an error that must be handled.
Here is a Python snippet using the `requests` library to post a new lead to a hypothetical CRM endpoint.
import requests

CRM_API_URL = 'https://api.followupboss.com/v1/people'
CRM_API_KEY = 'your_followupboss_api_key'

def send_to_crm(lead_data):
    # This is an example for Follow Up Boss. Your CRM will be different.
    headers = {
        'Authorization': f'Basic {CRM_API_KEY}',
        'Content-Type': 'application/json'
    }

    # Map our clean data to the CRM's expected schema
    # Example: splitting full_name
    first_name, last_name = lead_data.get('full_name', ' ').split(' ', 1)

    payload = {
        "firstName": first_name,
        "lastName": last_name,
        "emails": [{"value": lead_data.get('email')}],
        "phones": [{"value": lead_data.get('phone_number')}],
        "source": "Facebook Lead Ad",
        "tags": ["New Lead", "Facebook"],
        "customFields": [
            {
                "id": 1234, # ID for the 'Pre-Approved' custom field
                "value": lead_data.get('are_you_pre_approved_for_a_mortgage_')
            }
        ]
    }

    try:
        response = requests.post(CRM_API_URL, headers=headers, json=payload)
        response.raise_for_status()  # This will raise an exception for 4xx/5xx responses
        print(f"Successfully sent lead {lead_data.get('leadgen_id')} to CRM.")
        return True
    except requests.exceptions.RequestException as e:
        print(f"Error sending lead to CRM: {e}")
        # Here you would trigger your retry or queuing logic
        return False
Failure Modes and Bulletproofing the System
This system has multiple points of failure. The CRM API could be down for maintenance. Facebook might send a duplicate webhook. A user might enter garbage data into a form field. A robust system anticipates these failures. Relying on every component to be online 100% of the time is pure fantasy. Your error handling is the system’s parachute. You build it hoping you never need it, but you test it religiously.
If the CRM API call fails, do not just drop the lead. The correct action is to place the lead data into a durable message queue like AWS SQS or RabbitMQ. A separate worker process can then pull from this queue and retry the API call with an exponential backoff strategy. This decouples the webhook ingestion from the CRM dependency, making the system far more resilient.
Duplicates are another reality. Facebook’s webhooks can, under certain network conditions, be sent more than once. Your system must be idempotent. Before creating a new lead, logic-check if a lead with the same `leadgen_id` from the payload already exists in your CRM. If it does, you can either ignore the duplicate or update the existing record.

Testing and Validation
Never test this kind of integration on a live, paid ad campaign. Facebook provides a Lead Ads Testing Tool that allows you to select one of your forms and send a test lead. This triggers the entire webhook process exactly as a real lead would, allowing you to debug your listener and data mapping in a controlled environment without cost.
Implement aggressive logging. At a minimum, log the raw incoming payload, your parsed and transformed data object, the exact request you send to the CRM API, and the full response from the CRM API. When a lead fails to appear at 3 AM, these logs are the only evidence you have to diagnose the failure.
This system is not a set-and-forget appliance. It is a machine that requires monitoring. Set up automated alerts for high rates of CRM API errors, a growing message queue depth, or signature validation failures. A silent failure that goes unnoticed for a week is far more damaging than a noisy one you can fix in five minutes.