Stop Manually Sending Documents
Automating DocuSign isn’t about clicking “Send” faster. It’s about gutting the manual process entirely, treating document generation, dispatch, and archival as a single, machine-driven transaction. Most teams get stuck on authentication or misinterpret the API’s object model, burning hours on problems that have already been solved. We are not building a simple “send this PDF” button.
The goal is a zero-touch workflow where your application logic-checks a business event, generates a contract from a template, injects recipient data, fires it off via the DocuSign API, and archives the legally binding, completed document without a human ever touching an interface. This is not a guide for beginners. It’s a map through the minefield for engineers tasked with building it.
Prerequisites: What You Actually Need Before Line One
Forget the sales deck. You need a DocuSign developer account, which gives you access to the sandbox environment. This is non-negotiable. Do not build against the production environment unless you enjoy explaining accidental invoices to your finance department. Create an application and get your Integration Key (that’s the client ID).
The most critical decision is your authentication method. OAuth 2.0 Authorization Code Grant is for scenarios where a user is present to grant consent. For backend, system-to-system automation, you must use the JSON Web Token (JWT) Grant. Setting up the JWT flow is notoriously fragile. It requires generating an RSA key pair, getting admin consent for your application within the DocuSign org settings, and correctly identifying the User ID GUID you will be impersonating. Get any of these wrong, and you’ll be staring at a cryptic `consent_required` error for hours.
The DocuSign Object Model: Envelopes, Not Files
You do not “send a file” with the DocuSign API. You create an “envelope.” An envelope is a container object that holds everything related to the transaction: the documents, the recipients, the data fields (Tabs), and the security settings. Treating the API like a simple file uploader is like trying to connect a garden hose to a fire hydrant. The pressure and protocols are entirely different.
The hierarchy is strict:
- Envelope: The top-level container with a unique ID. Its status (`sent`, `delivered`, `completed`) is the source of truth for the entire workflow.
- Documents: One or more base64-encoded files. PDF, DOCX, etc. You must handle the file-to-string encoding in your own code before building the API request.
- Recipients: A list of people and their roles (`signer`, `carbonCopy`, etc.). Each recipient has a routing order that dictates the signature sequence.
- Tabs: These are the fields mapped onto a document for a specific recipient. A `signHere` tab, a `dateSigned` tab, or a `text` tab for data entry. This is where automation truly happens.
Internalize this structure. Every failed API call can almost certainly be traced back to a malformed object in this hierarchy.
Step 1: Nailing JWT Authentication
The JWT Grant flow bypasses user interaction. Your application asserts its identity by signing a JWT with its private key. DocuSign verifies this signature with the public key you uploaded and issues a short-lived access token. This token is your key to the kingdom, included as a Bearer token in the `Authorization` header of subsequent API calls.
Your JWT claim set must include the `iss` (Integration Key), `sub` (the User ID to impersonate), `aud` (the authentication endpoint), and `scope`. The `scope` is critical. You need `signature` and `impersonation` at a minimum. Forgetting `impersonation` is a common mistake that leads to authorization failures that don’t clearly explain the cause.
Here is a raw Python example for generating the token. This strips out the library magic to show the core mechanics. Notice the dependency on a properly formatted private key.
import jwt

import time

import requests
# Private key content, loaded from a file or env var
# Ensure it includes the -----BEGIN RSA PRIVATE KEY----- headers/footers
private_key = """YOUR_RSA_PRIVATE_KEY"""
integration_key = "YOUR_INTEGRATION_KEY"
user_id = "USER_ID_GUID_TO_IMPERSONATE"
auth_server = "account-d.docusign.com" # Use account.docusign.com for production
def get_docusign_jwt_token():
try:
iat = int(time.time())
exp = iat + 3600 # Token expires in 1 hour
payload = {
"iss": integration_key,
"sub": user_id,
"iat": iat,
"exp": exp,
"aud": auth_server,
"scope": "signature impersonation"
}
signed_jwt = jwt.encode(payload, private_key, algorithm='RS256')
token_url = f"https://{auth_server}/oauth/token"
headers = {'Content-Type': 'application/x-www-form-urlencoded'}
data = {
'grant_type': 'urn:ietf:params:oauth:grant-type:jwt-bearer',
'assertion': signed_jwt
}
response = requests.post(token_url, headers=headers, data=data)
response.raise_for_status()
return response.json()['access_token']
except Exception as e:
# Proper logging should be here
print(f"Error getting DocuSign token: {e}")
return None
# Usage
# access_token = get_docusign_jwt_token()
Most failures happen right here. Check your key format, check that admin consent was granted for this user and scopes, and triple-check that you are pointing to the correct environment (`account-d.docusign.com` for sandbox, `account.docusign.com` for production).
Step 2: Constructing and Dispatching the Envelope
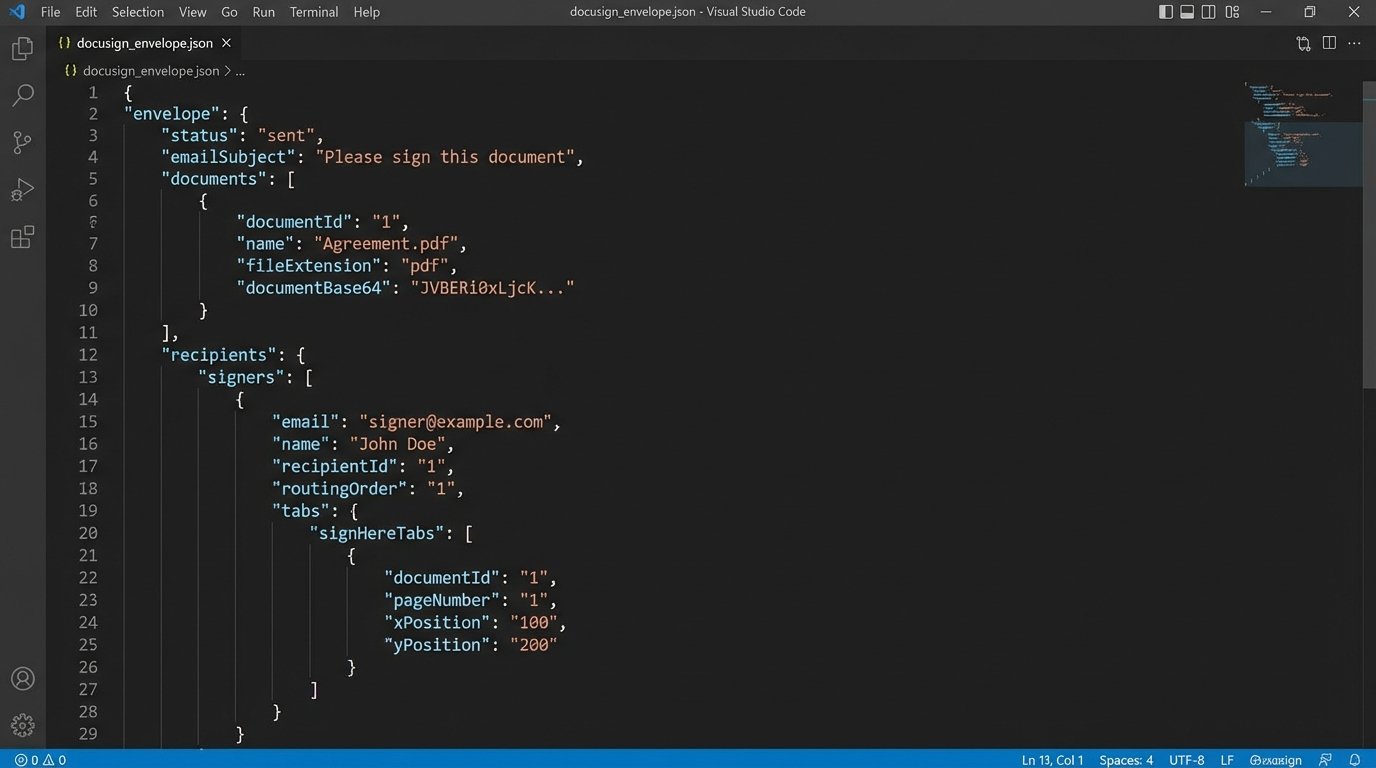
With a valid access token, you can call the Envelope API. The primary endpoint is `POST /v2.1/accounts/{accountId}/envelopes`. The body of this request is a JSON object that defines the entire transaction. This is not a small, simple payload. It’s a detailed instruction set.
A minimal payload includes the `emailSubject`, a `status` of `sent` to dispatch it immediately, a `documents` array, and a `recipients` object. The document’s `documentBase64` field must contain the byte stream of your file, encoded into a base64 string. Any error in this encoding process will result in a corrupted, unopenable document in DocuSign.
The `recipients` object contains arrays for `signers` and `carbonCopies`. Each signer needs a `name`, `email`, `recipientId` (a unique integer within the request), and a `routingOrder`. Signers with `routingOrder: 1` get the document first. Once they sign, it moves to those with `routingOrder: 2`, and so on. All recipients with the same routing order receive it simultaneously.
This is where business logic gets hammered into API calls. You are programmatically defining the signature workflow that a paralegal used to manage by hand.
Step 3: Injecting Tabs for Automated Data Placement
Manually placing fields is a non-starter for automation. We inject `tabs` directly in the envelope creation payload. Tabs are associated with a specific recipient. You attach a `tabs` object to a recipient’s definition within the `signers` array.
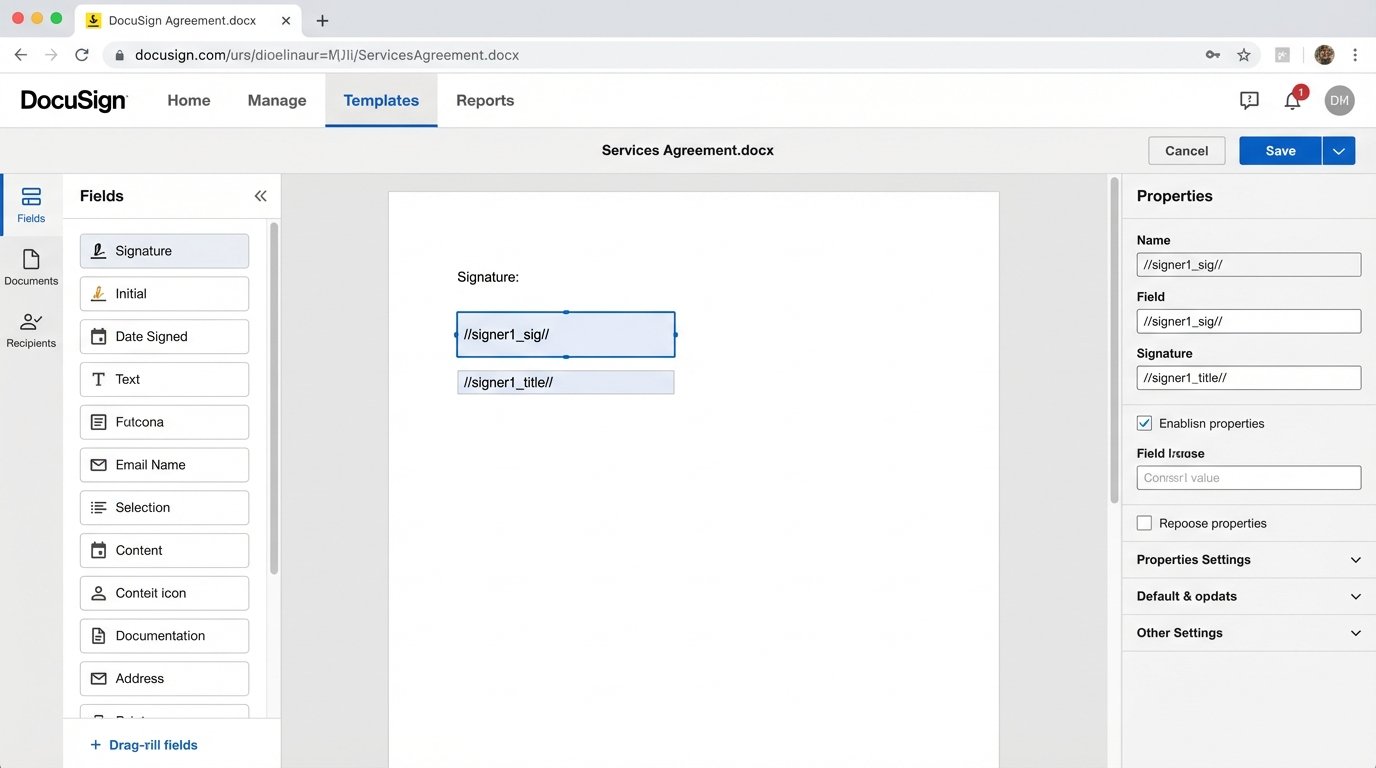
There are two main ways to position tabs: fixed positioning with `xPosition` and `yPosition` coordinates, or anchor tagging. Fixed positioning is brittle. If the source document changes, your tabs will be in the wrong place. The superior method is `anchorString` tagging. You place a unique string of text (e.g., `//signer1_sig//`) in your source document where you want the signature field to go. In the API call, you tell DocuSign to find that string and place the tab there.
Using anchor strings is like telling a robot to put a sticker ‘three inches to the right of the logo’. Using X/Y coordinates is like giving it a GPS-perfect lat/long. One is flexible, the other is precise but breaks if the map changes.
Here’s a JSON snippet showing a signer with a `signHere` tab and a `text` tab, both positioned by anchor strings. Notice the `documentId` links the tab to the correct document in the envelope.
"signers": [

    {

        "email": "test.signer@example.com",

        "name": "Jane Doe",

        "recipientId": "1",

        "routingOrder": "1",

        "tabs": {

            "signHere": [

                {

                    "anchorString": "//signer1_sig//",

                    "anchorUnits": "pixels",

                    "anchorXOffset": "0",

                    "anchorYOffset": "0",

t                   "documentId": "1"

                }

            ],

            "text": [

                {

                    "anchorString": "//signer1_title//",

                    "documentId": "1",

                    "tabLabel": "Title",

                    "value": "Authorized Signer"

                }

            ]

        }

    }

]
We can even pre-populate fields by setting the `value` on a `text` tab. This is how you merge data from your database directly onto the document for the user to see.
Step 4: Using Webhooks for Real-Time Status Updates
Sending the envelope is only the first step. You need to know what happens to it. Polling the `GET /envelopes/{envelopeId}` endpoint is inefficient, noisy, and a fast path to hitting your API rate limits. The only professional solution is to use DocuSign Connect, their webhook system.
You configure a Connect subscription in your DocuSign settings, pointing it to a public-facing URL on your server. When an event occurs for an envelope (e.g., `Delivered`, `Signed`, `Completed`, `Declined`), DocuSign sends an HTTP POST request to your URL with a massive XML or JSON payload containing the complete status of the envelope. Polling the API for status is like repeatedly calling someone to ask if they’ve read your email. A webhook is them sending you a text message the moment they’re done.
Your listener endpoint must be prepared to handle these requests. It needs to be stable and secure. DocuSign can be configured to include a HMAC signature in the headers, which you must validate to ensure the request is authentic and not a malicious actor trying to update your system’s state. Failure to implement HMAC validation is a security failure, not a technical shortcut.
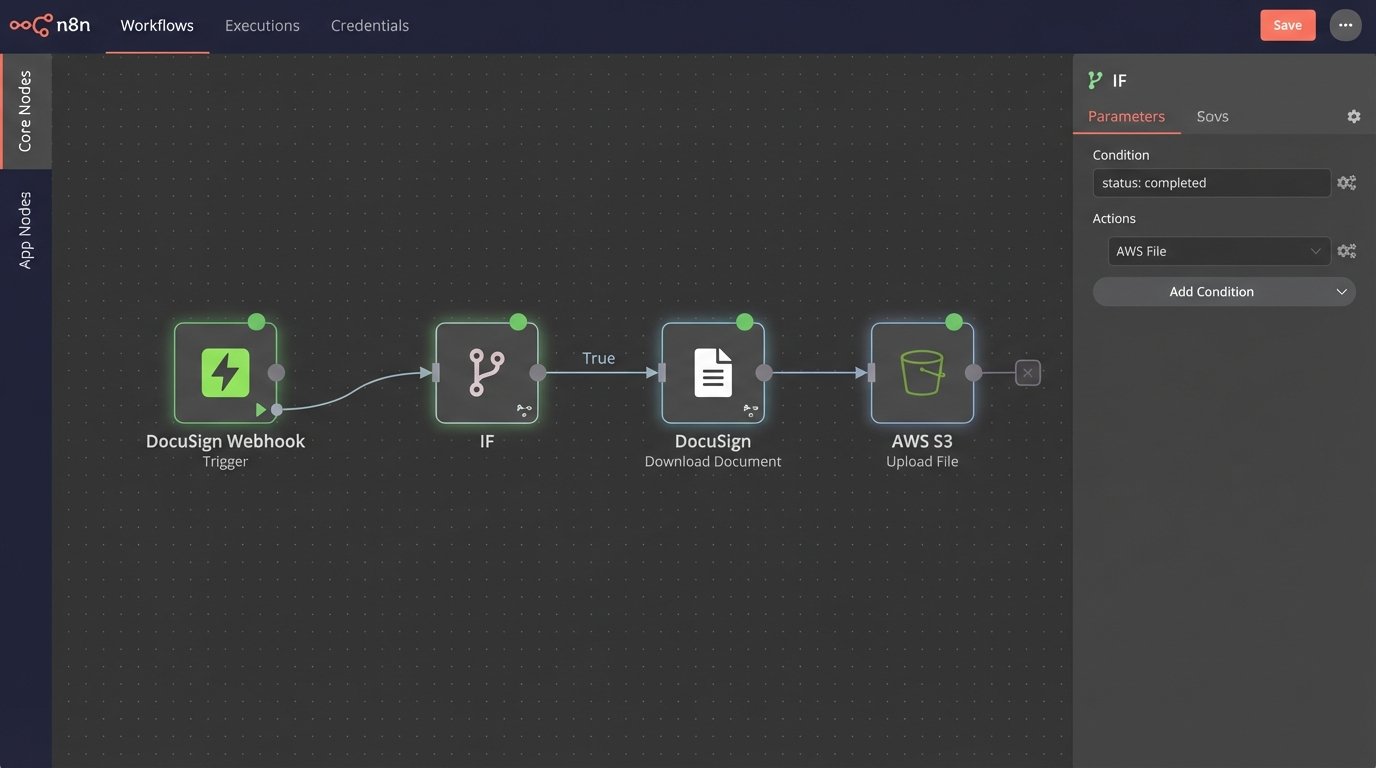
The logic on your listener endpoint would typically parse the incoming payload, check the envelope status, and trigger the next step in your business process. If status is `Completed`, you kick off the archival process.
Step 5: Retrieving the Completed Documents
When your webhook listener receives a `Completed` status event, the transaction is finished. Now you need the evidence. You must programmatically download the final, signed documents for your records. This is done via a `GET` request to the `/envelopes/{envelopeId}/documents/combined` endpoint (or you can fetch individual documents).
This endpoint returns the raw PDF byte stream, not a JSON object. Your HTTP client must be configured to handle a binary response. You then take this byte stream and write it to a file, store it in blob storage like S3, or attach it to a record in your CRM. You must specify the `Content-Type` of the file you are saving, which is usually `application/pdf`.
This completes the loop. The system triggered the signature, dispatched it, was notified of its completion, and retrieved the final artifact, all with zero human intervention.
Moving to Production: The Final Hurdles
Everything you’ve built in the sandbox is worthless until it passes DocuSign’s Go-Live review. You have to run a certain number of successful API calls (typically 20-50) without errors before they will allow your Integration Key to be promoted to the production environment. They are checking for best practices and API compliance. Trying to poll for envelope status in your live code is a good way to fail this review.
Once you are live, the API base URI changes. `demo.docusign.net` becomes `www.docusign.net` (or your regional equivalent). The API auth server changes from `account-d.docusign.com` to `account.docusign.com`. Your Integration Key stays the same, but you must swap out the sandbox User ID and RSA key for production equivalents.
Finally, respect the API rate limits. The default is 1,000 requests per hour per account. If you are building a high-volume system, you must architect for this constraint. Batch envelope creation where possible, use webhooks religiously, and implement exponential backoff on any API calls that might fail transiently. Production is not the place to discover your code can’t handle a 429 “Too Many Requests” response.